

A few months ago, I reviewed my first carbon dioxide monitor – the Aranet4. Likely the market’s most popular carbon dioxide monitor, I gave it a 4.5-star rating and praised it for being a fantastic CO2 monitor with only one major flaw. As you may already be well aware, that flaw is the price.
However, what if I told you there was a monitor that offers almost all of the benefits of the Aranet4 but at a significantly lower price? In fact, this cheaper monitor even has a few big advantages over the higher-priced device. Since you’ve probably already read the title of this article, you’ll know I’m talking about the VisiblAir Model C carbon dioxide monitor.
These monitors, made by Andre Courchesne in Quebec, are designed to provide an affordable way to monitor air quality while also being premium quality and updateable. Despite being affordable, these unassuming monitors are also some of the most feature-filled on the market.
So, are there any downsides to the VisiblAir Model C? In this review, I aim to answer that question and analyse the device after using it for a few weeks. Perhaps most importantly, I will also compare the Click to a range of other popular monitors you might consider purchasing.
Before diving into the review fully, I want to make one important note. VisiblAir offers two different CO2 monitors – the Model C and Model D. These two monitors are identical, but the Model C offers WiFi capability, while the Model D lacks this connectivity.
Considering the price difference between the two is $10 CAD, I highly recommend purchasing the WiFi-enabled Model C. Even if you don’t plan to use the feature, WiFi is incredibly useful, and you may use it to graph your data with the online dashboard. Since you’re only looking at a 5% price increase, there’s no reason not to go for the Model C. As such, this is the device I will be reviewing today.
This post contains affiliate links. For more information, please refer to my affiliate disclaimer. I was sent a product for review, but the article is not sponsored. All opinions expressed in this post are my honest thoughts. I only recommend products that I genuinely believe in.
Informational Purposes: Information on this blog is for informational purposes only. Readers are encouraged to confirm the information herein with other sources. This website assumes no responsibility for the accuracy of the information, and information is subject to change without notice. Products mentioned on this website are not medical devices and do not guarantee protection.
If you notice any errors or inconsistencies in this article, please contact me so I can update the information accordingly.
Sensors & Accuracy
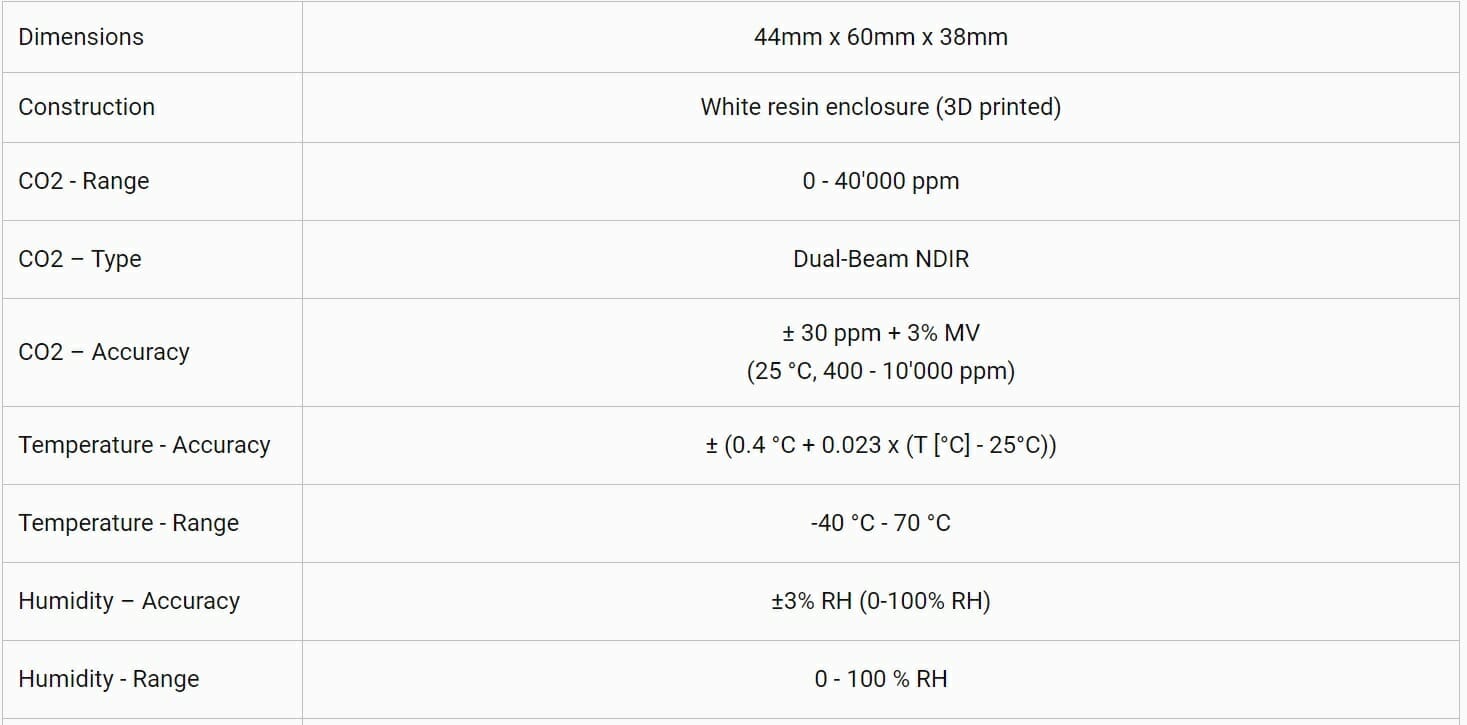
Regarding carbon dioxide monitors, two companies manufacture and provide most of the sensors on the market – Senseair and Sensirion. Both companies have great reputations in the field of CO2 monitoring, and they provide a range of sensors, from inexpensive to quite pricey.
Both the Model C and Model D from VisiblAir use the SCD30 sensor from Sensirion. This is currently the top-of-the-line sensor from the company, and it’s a dual NDIR sensor with an accuracy of ± 30ppm + 3%. This is a stated accuracy identical to the Aranet4, although that product uses a Senseair sensor. The SCD30 also has a temperature and humidity sensor built in, so all of these measurements are taken on the same chip. These sensors have stated accuracies of ± 3% relative humidity and ± 0.4 degrees celsius.
| Measurement Type | Accuracy |
|---|---|
| CO2 | ± 30ppm + 3% |
| Temperature | ± 0.4℃ |
| Relative Humidity | ± 3% |
NDIR (nondispersive infrared) sensors are the gold standard for carbon dioxide monitors. While they require calibration as they experience drift over time, they are the most accurate CO2 monitoring technology currently available. As such, you should never buy a carbon dioxide monitor like the VisiblAir Model C unless it has an NDIR sensor.
Luckily, the VisiblAir Model C has not only an NDIR sensor but a dual-beam NDIR sensor. Since NDIR sensors are prone to drifting (resulting in decreased accuracy), dual-beam sensors hold a second gas chamber with a stable gas with known absorption properties. This means the first sensor and chamber can be used for minute-to-minute (continuous) readings while the second chamber and sensor are read infrequently and used to calibrate the primary sensor.
This is a useful function because NDIR sensors lose accuracy the more they are used. Having a second sensor that only activates at long intervals allows the second sensor to retain accuracy and act as a baseline for the first sensor to calibrate from. Of course, over time, the second sensor can drift and lose accuracy, too.
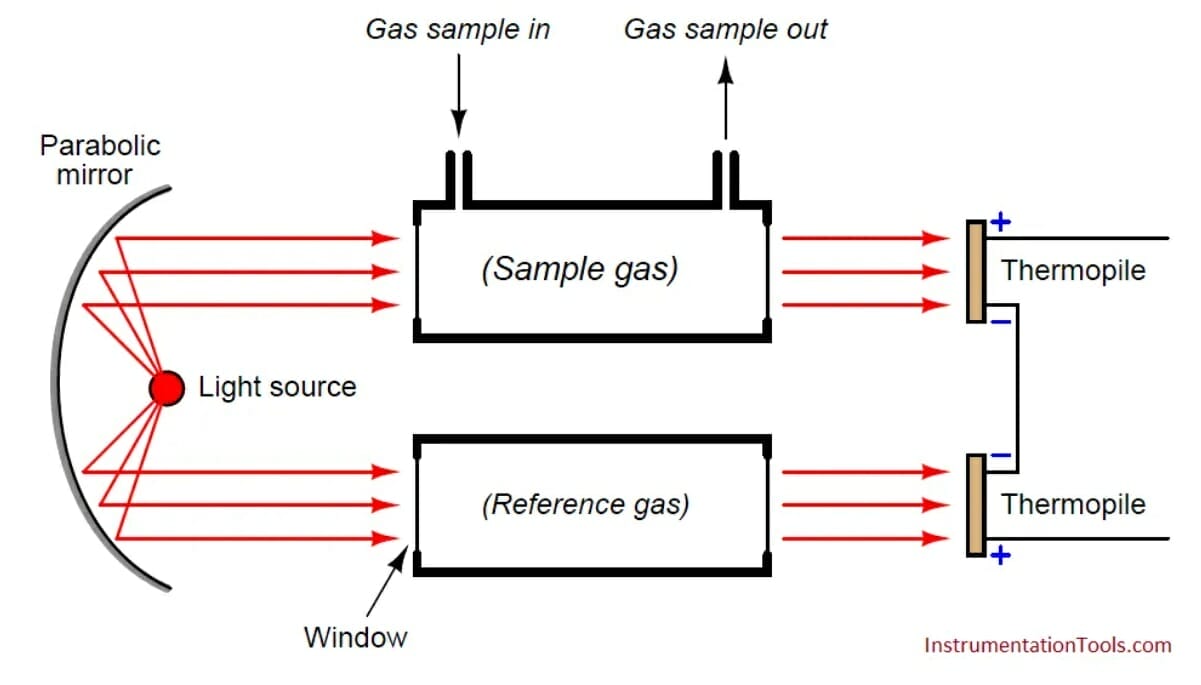
Dual-beam NDIR sensor. Source: instrumentationtools.com.
In the short-term, dual-beam NDIR should increase accuracy. Over time, due to the large range of variables in play (dual-beam NDIR only accounts for emitter deterioration), dual-beam NDIR may not result in any accuracy benefit. However, based on my research, there is no downside to dual-beam NDIR other than the higher sensor price. Therefore the addition of such a sensor is great to see.
It’s worth noting that the VisiblAir Model C is the first device I’ve reviewed on this website with a dual-beam NDIR sensor. Every other device, including the much more pricey Aranet4, uses a single-beam sensor, such as the Senseair Sunrise CO2 Sensor.
Since sensor drift can pose an issue – even for dual-beam NDIR sensors – it’s important to ensure that the carbon dioxide monitor you purchase supports manual calibration. the VisiblAir Model C allows the user to calibrate the device (remotely through the dashboard or on the device itself), and it has no auto-calibration ‘feature’. I am pleased the device relies on manual calibrations, as auto-calibration can often lead to wildly inaccurate readings.
To see how the VisiblAir Model C performs in real life, I ran a range of tests comparing its recordings to other devices. It’s important to note these tests aren’t scientific – I don’t have a lab dedicated to testing such equipment, so these tests merely compare how the devices compare in similar conditions.
To test the devices, I placed them in a cardboard box with fans on either end. This is designed to prevent eddies and keep air flowing past the devices at a constant rate. This box was placed in a room with no ventilation and one person inside (me) for 60-90 minutes. I then recorded the readings every five minutes and graphed the results.
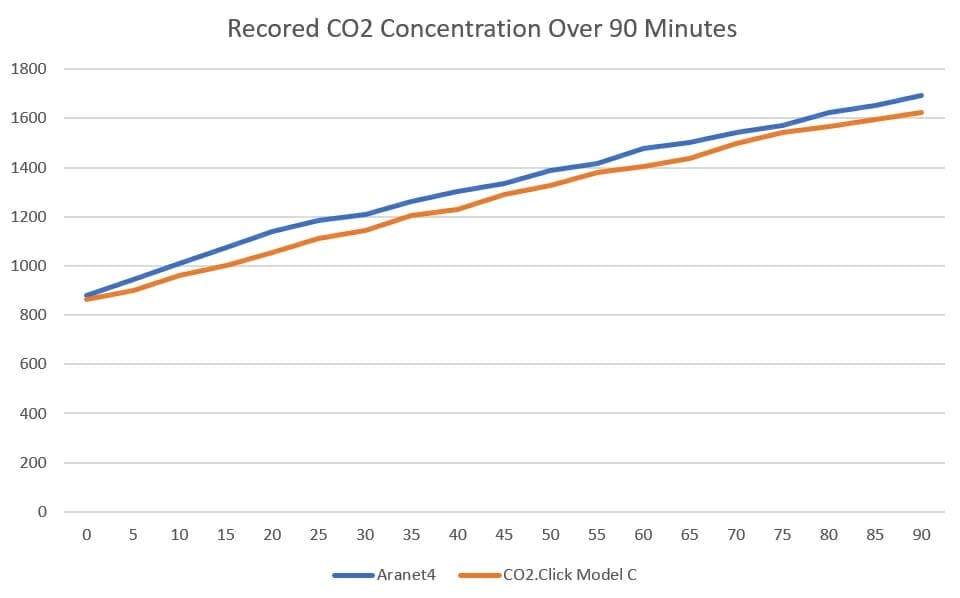
For the first test, I compared the Aranet4 to the VisiblAir Model C. The monitors started at a concentration of 878 and 863 parts per million, respectively, and both were freshly recalibrated the same day. Across the 800-1700ppm range, both devices recorded the same trend – however, the VisiblAir Model C tended to record 0-100ppm below the Aranet4.
As I don’t have a reference monitor, I can’t state which device is closer to the truth. Considering both devices were calibrated in the same location at the same time, I found this difference quite interesting, as I would usually believe a difference like this to be caused by a difference in calibration.
Either way, both devices accurately identified the trend in carbon dioxide concentration, and I don’t believe this difference to be a big deal. At the end of the day, I will take the same actions if my CO2 concentration is 1163ppm or 1201ppm. The same can be said for 2200ppm or 2312ppm, indicating that more ventilation is needed.
Since the accuracy of both devices is ± 30ppm + 3%, I was curious if higher concentrations of carbon dioxide would lead to a bigger difference between readings on the two devices. As such, I repeated my test using the same method but starting at a concentration of 2524ppm and 2454ppm (Aranet, VisiblAir). Below are my graphed results.
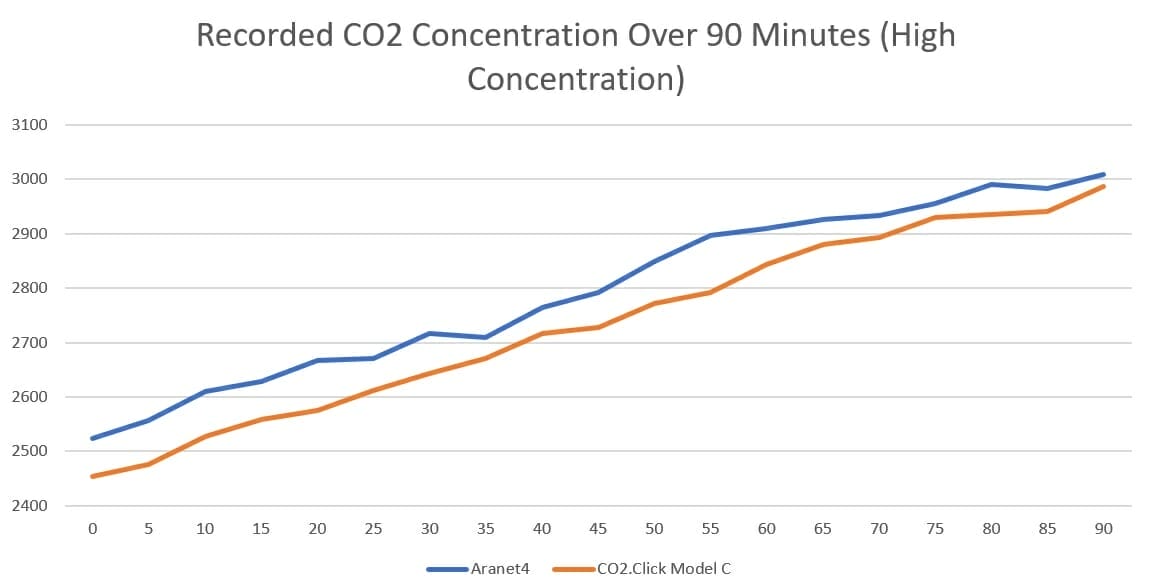
Similar to the first test, the VisiblAir Model C tended to record results 50-100ppm below the Aranet4. However, in this test, the VisiblAir Model C provides a more linear increase which I would expect. The Aranet4 provides more varied results and shows a less consistent increase in carbon dioxide concentration.
I recalibrated the devices between the first and second tests as I felt like calibration could’ve still been an issue. Since both devices showed the same trend but with quite consistent differences, miscalibration seemed to be the likely culprit. However, considering this trend was repeated after a new calibration, I feel it is due to a difference in the sensors and devices themselves.
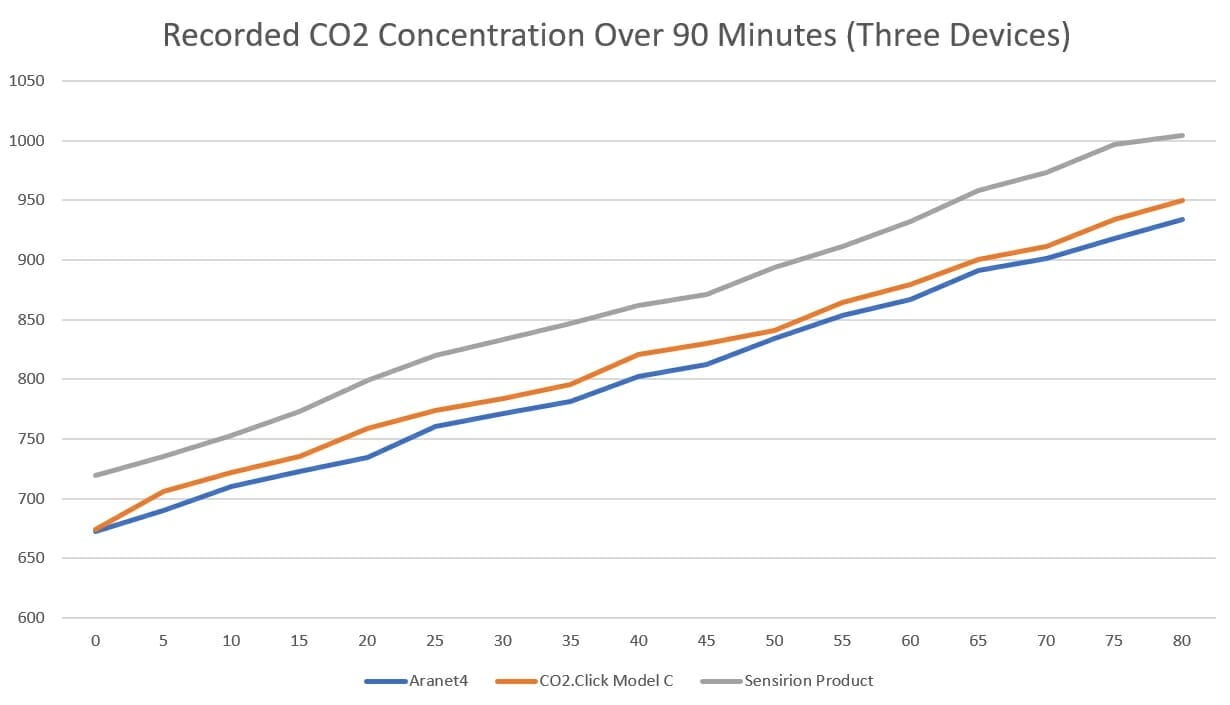
I decided to add a third device using a Sensirion sensor in my third and final test. I can’t name this device as it is not yet released, but it uses a lower-end sensor from the same manufacturer as the VisiblAir Model C’s sensor. In this test, we see surprising results as Aranet4 reports the lowest concentrations with VisiblAir providing very similar results. The third device reports significantly higher concentrations.
At this point, I have to conclude that these differences come down to individual device and sensor differences. Since both the Aranet4 and VisiblAir have stated accuracies of ± 30ppm + 3%, and the third device ± 50ppm + 5%, results could theoretically vary by over 100ppm at 800ppm.
So, what’s the conclusion here? Well, the VisiblAir Model C provides similar readings to the Aranet as high as 3000ppm (and likely higher). It’s accurate, and I feel confident trusting it to provide insight into my carbon dioxide concentrations. With the dual-beam NDIR sensor and user calibration, the VisiblAir Model C also is ready to provide accurate readings far into the future.

BreatheSafeAir is a one-person publication. Every share and every subscriber is important to me.
I don’t have a marketing budget or a team behind me. Just a lot of test equipment and a genuine interest in helping you make sense of your air quality. If you find this useful, subscribing to my newsletter is the best free way to support the work. You’ll get information on what I’m currently testing, findings that don’t make it into the full reviews, and the kind of detail you only get from someone who thoroughly tests these devices.
Design & Build Quality
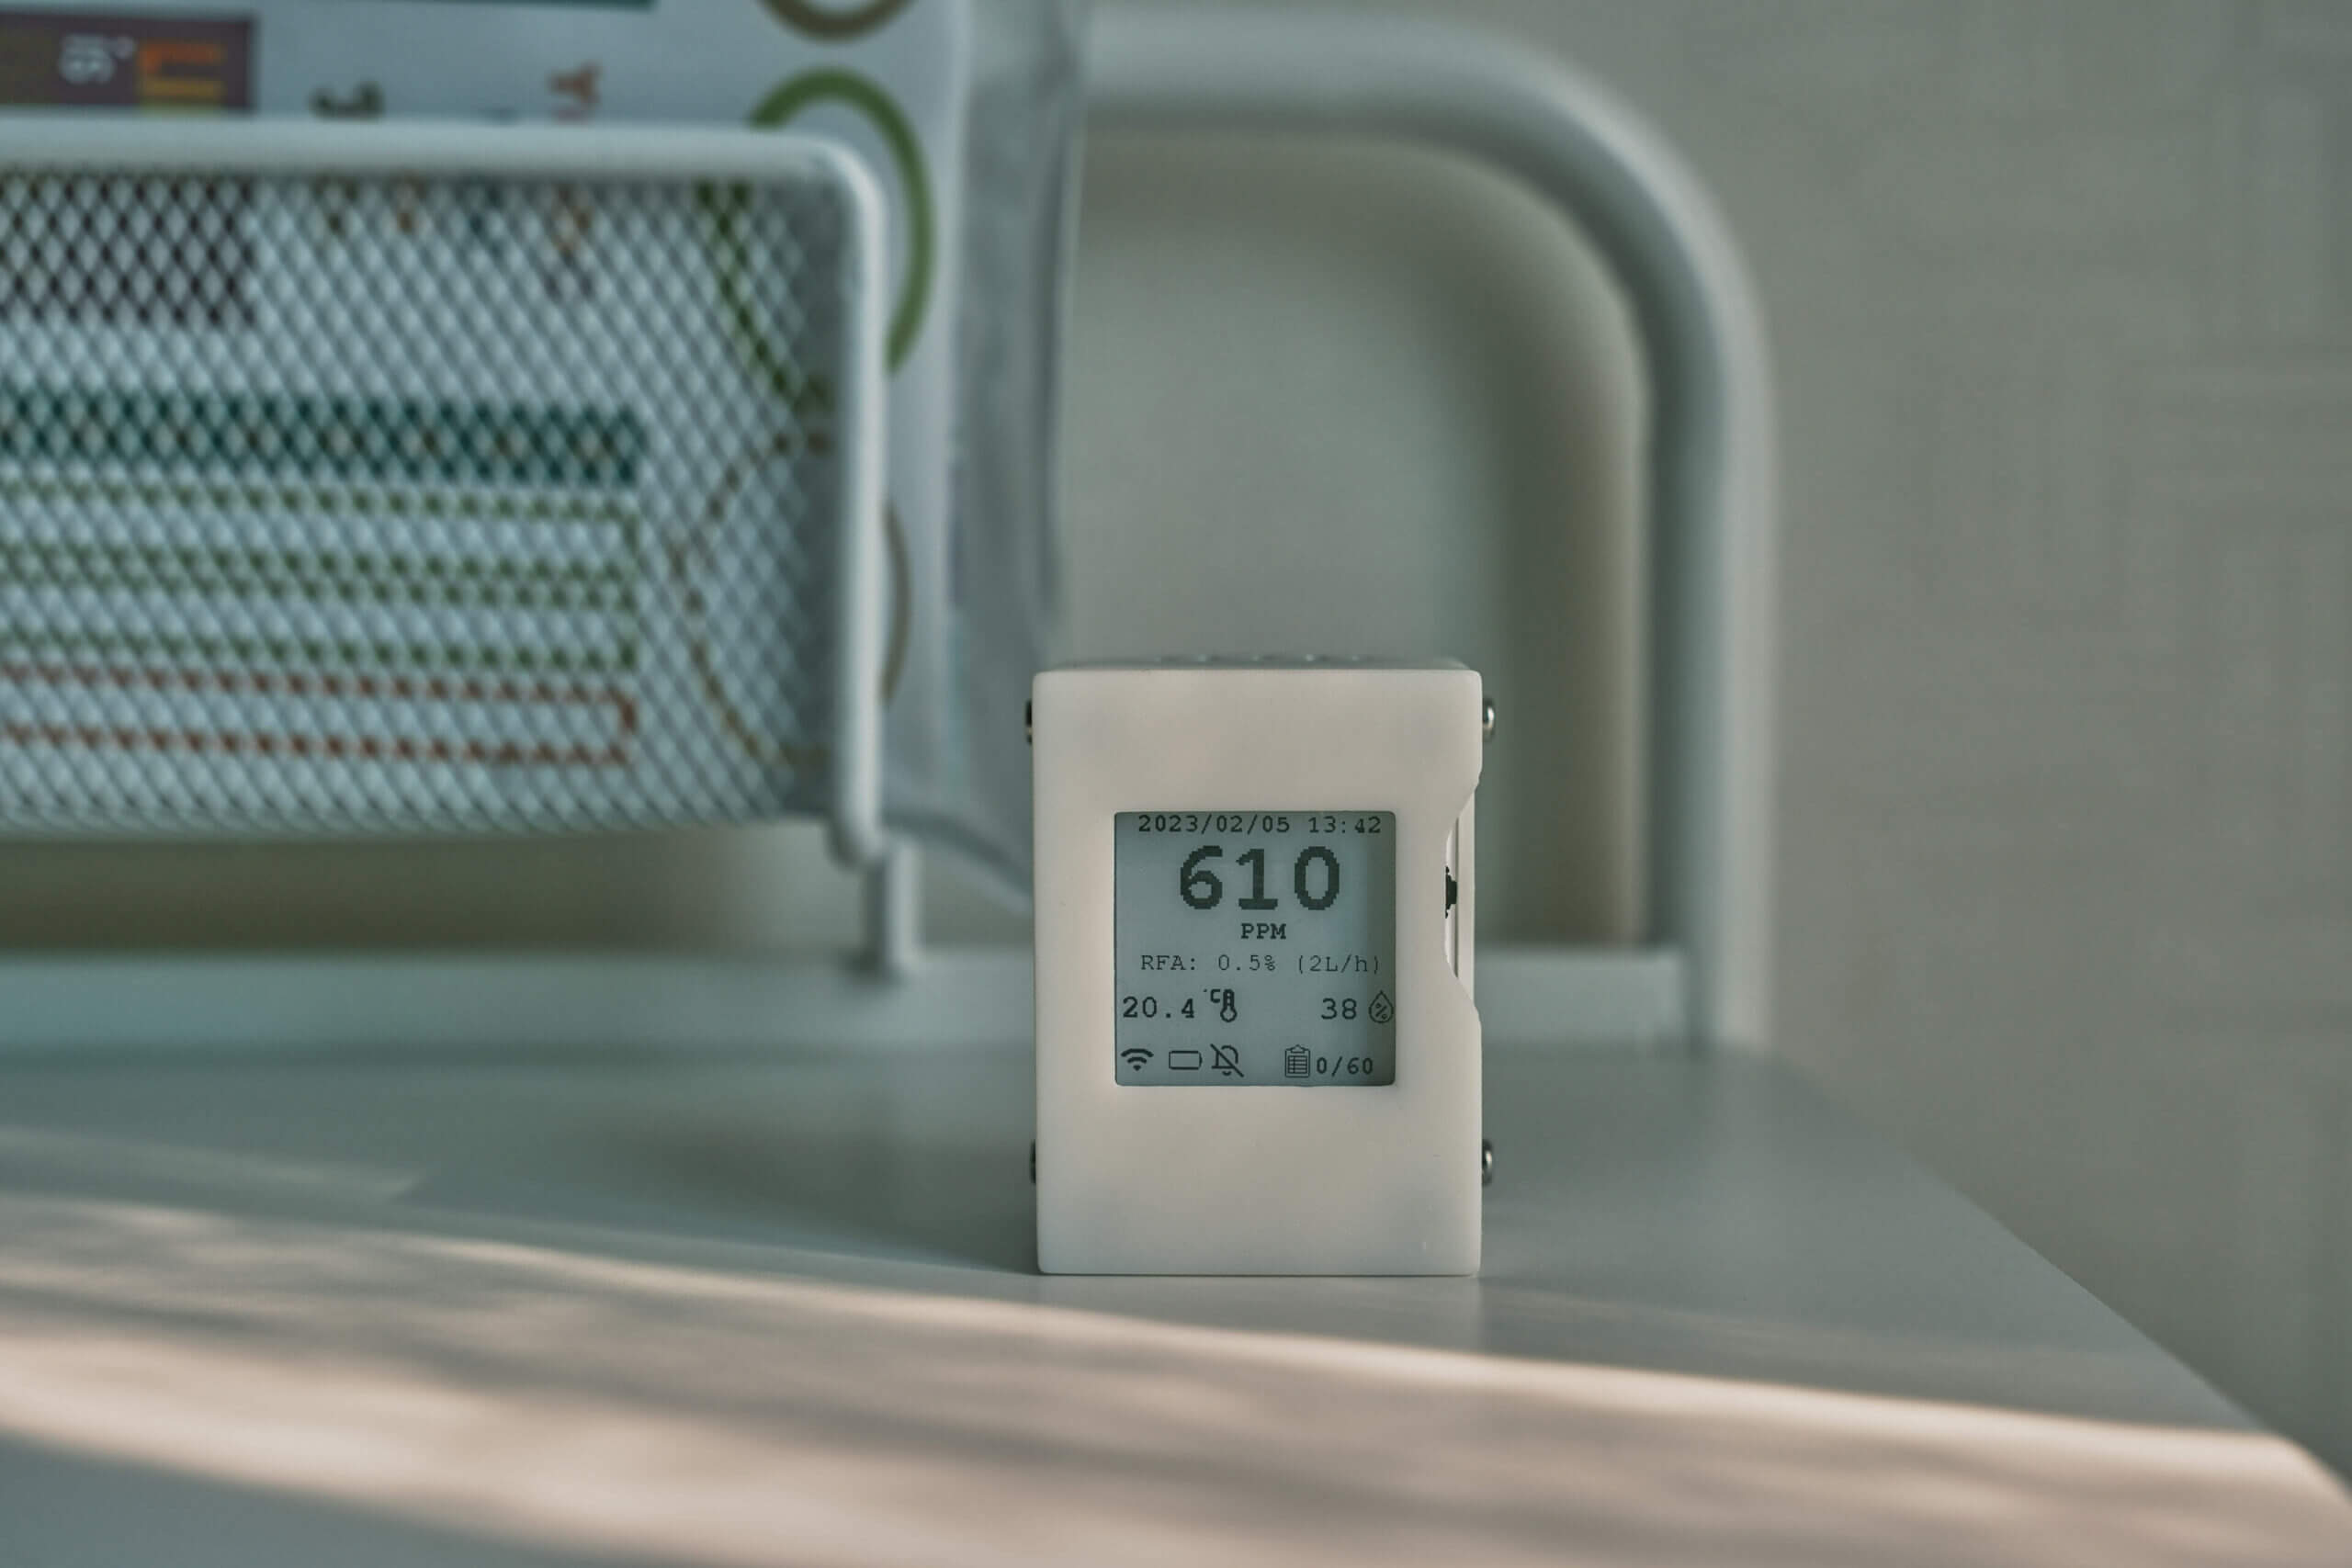
The VisiblAir’s exterior gives the impression of a very simple device. Encased in a vented, 3D-printed housing, the only aspects of note are the USB Type-C port on the bottom of the device, the small E-ink screen on the front, and the control dial on the right-hand side of the case.
When discussing the design of the VisiblAir Model C, I feel it’s best to start with the device’s case. As mentioned, the case is 3D-printed, and every device is hand-made. While I have no issues with the case, I did notice a minor defect in that there are uneven gaps between the sides of the case and the bottom (shown in the image below). This was not a big deal because the gaps are along the device’s bottom (or back, depending on the orientation), which is rarely visible.
The build quality of the case also generally doesn’t feel as good as a mass-manufactured product such as the Aranet4. The plastic quality doesn’t feel as high, and the device feels more fragile. While I would still be happy to stick the VisiblAir Model C in my backpack and carry it around with me, I feel more confident in the build quality of devices such as the Aranet4 or Qingping Air Monitor Lite.

Now, this isn’t to say the build quality of the VisiblAir Model C is low – I don’t think that at all. However, there is a different level of expectation when comparing a 3D-printed, handmade product to a product produced by a large company. With that said, the VisiblAir Model C is durable enough to join you during your school or work day and be returned to its stand every day. I would also say it feels more durable than the Vitalight Mini CO2 Detector.
From here on out, I’ve been pleased with the build quality and design of the VisiblAir Model C (and Model D). On the bottom of the device, for example, is a USB Type-C port for powering the device. If you’ve read my reviews before, you will likely already know that I’m a big advocate for Type-C, and I’m glad to see its inclusion here.

One thing to note about this port is that some cables won’t fit it well. The port is slightly recessed, meaning while every USB cable I’ve tried will charge the device, they can be loose and easily dislodged. The included cable is the best fit, and while it still catches on the plastic edge, it’s the hardest to dislodge accidentally.
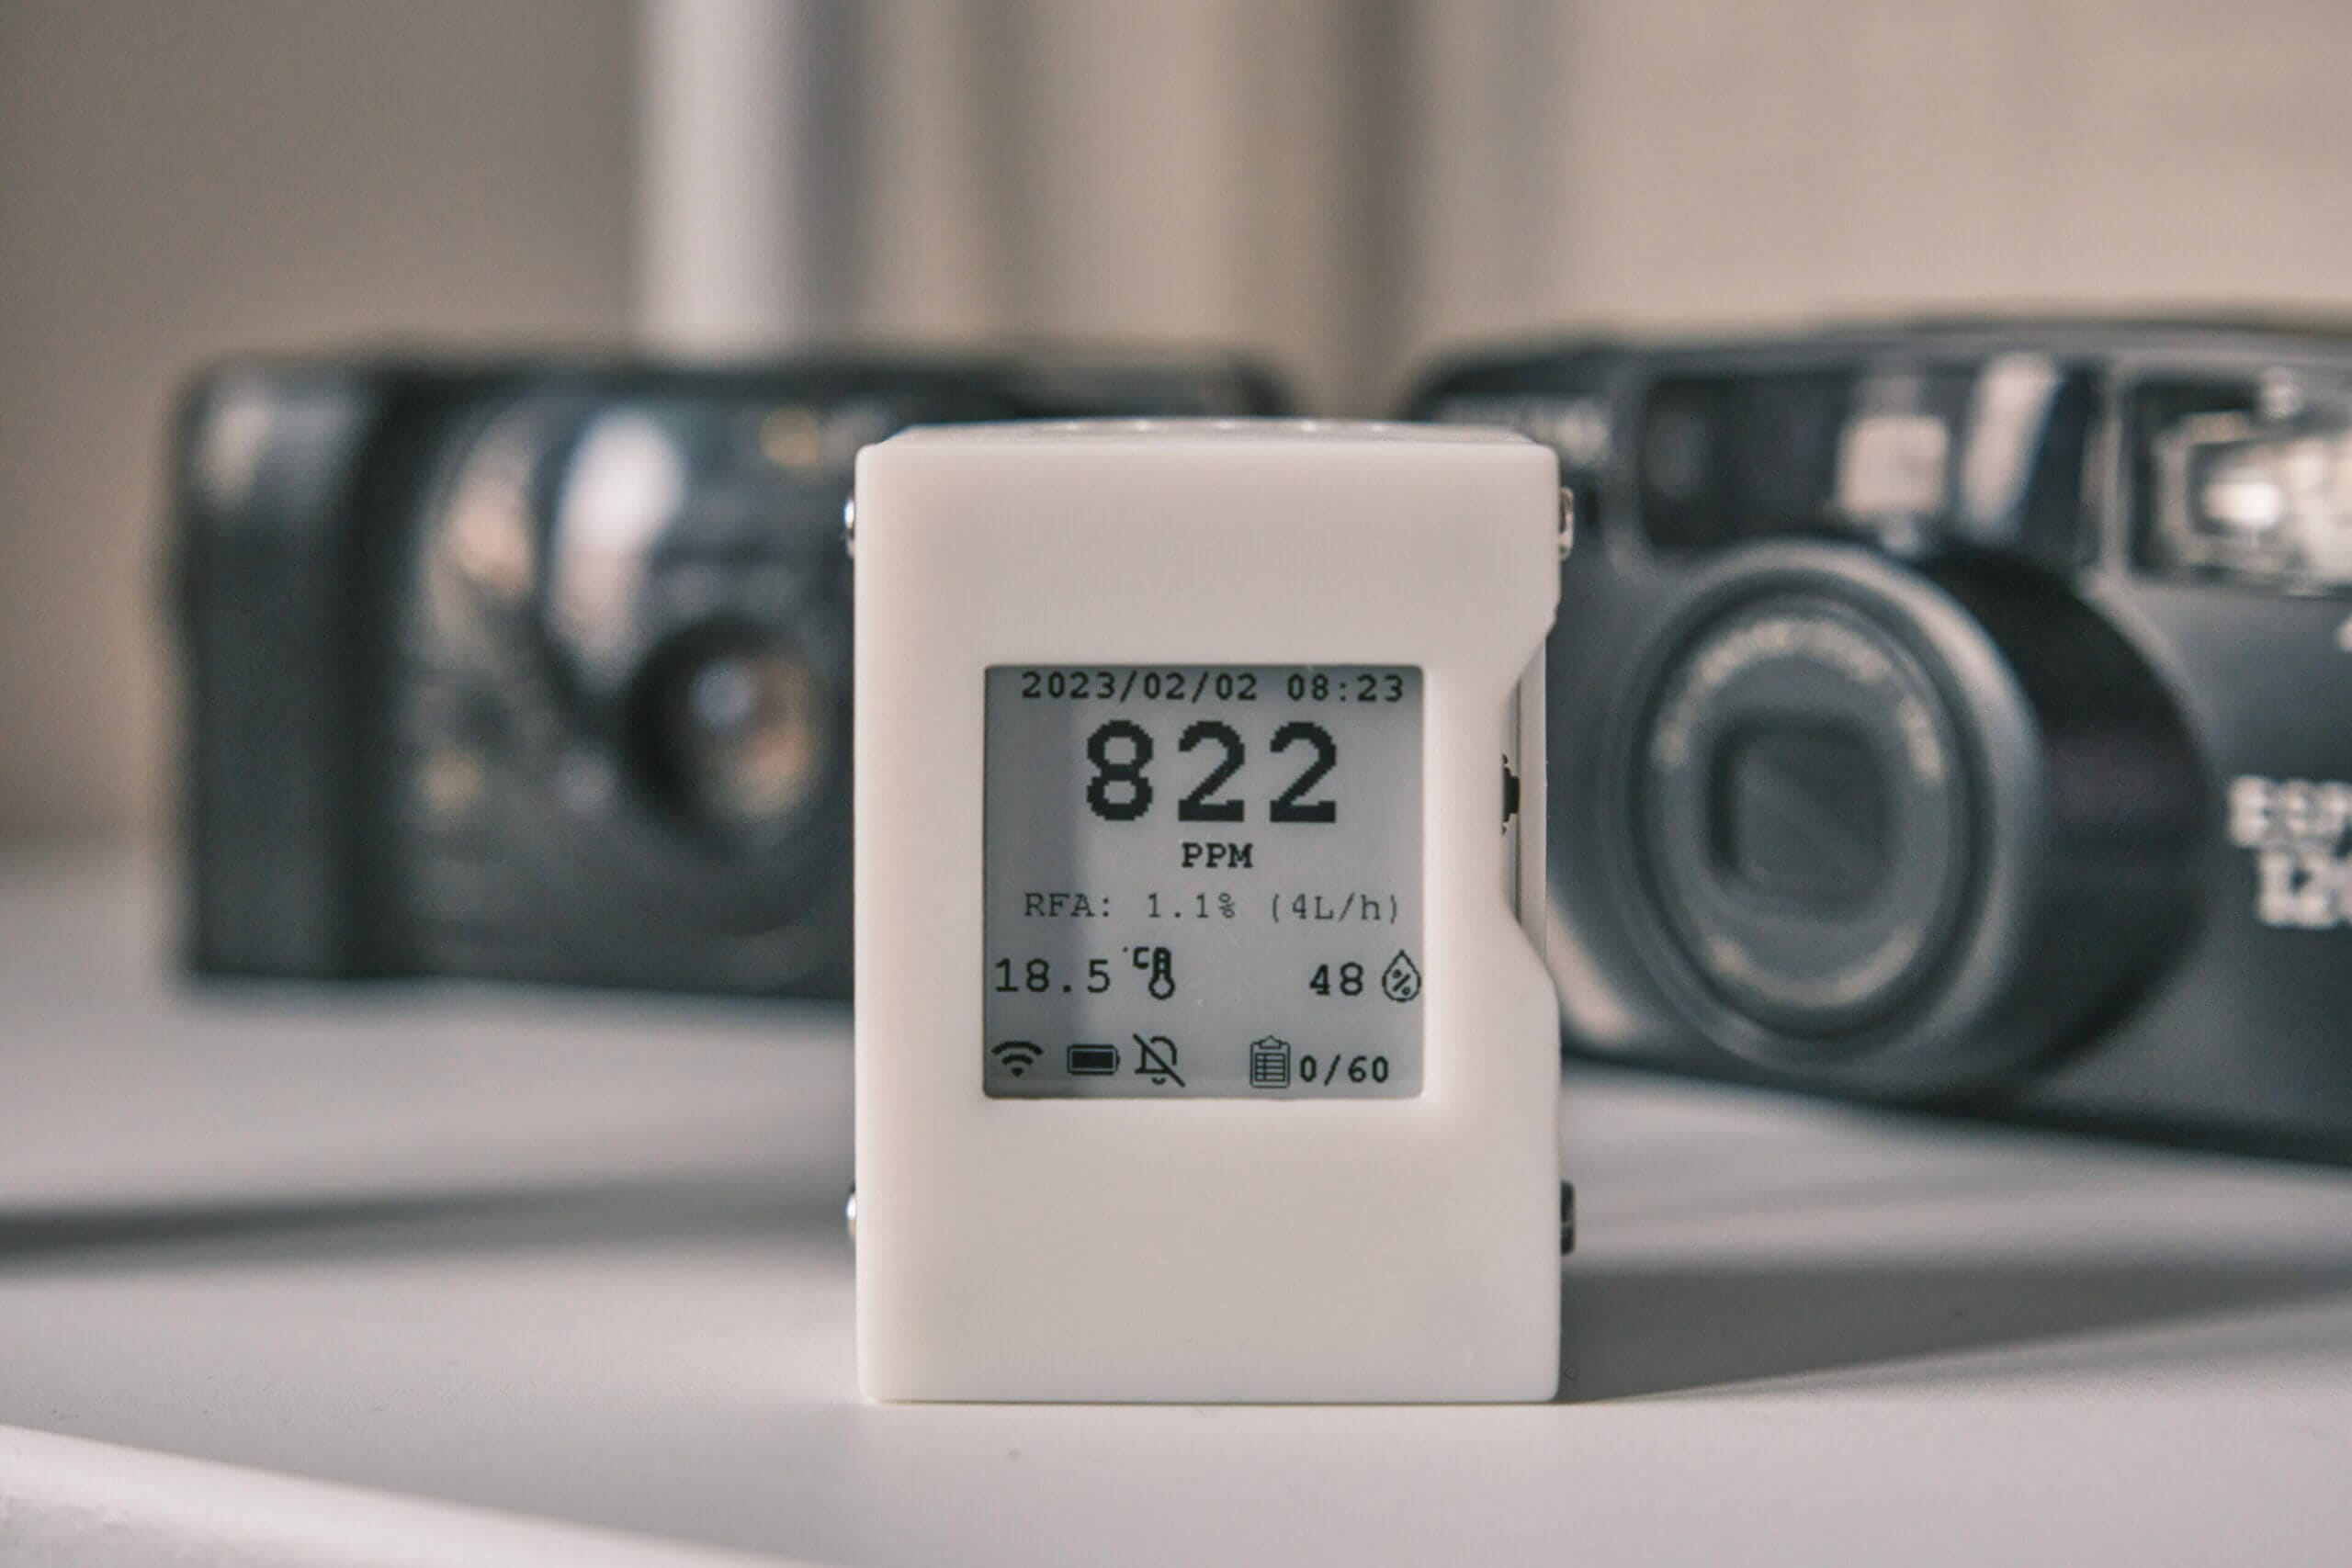
Moving to the front of the device, we can find the E-ink screen. Despite being small, this screen is crisp and packs a good level of contrast – it’s easy to read, and I have no complaints about it. Rather, I like how much information is packed into this small screen.
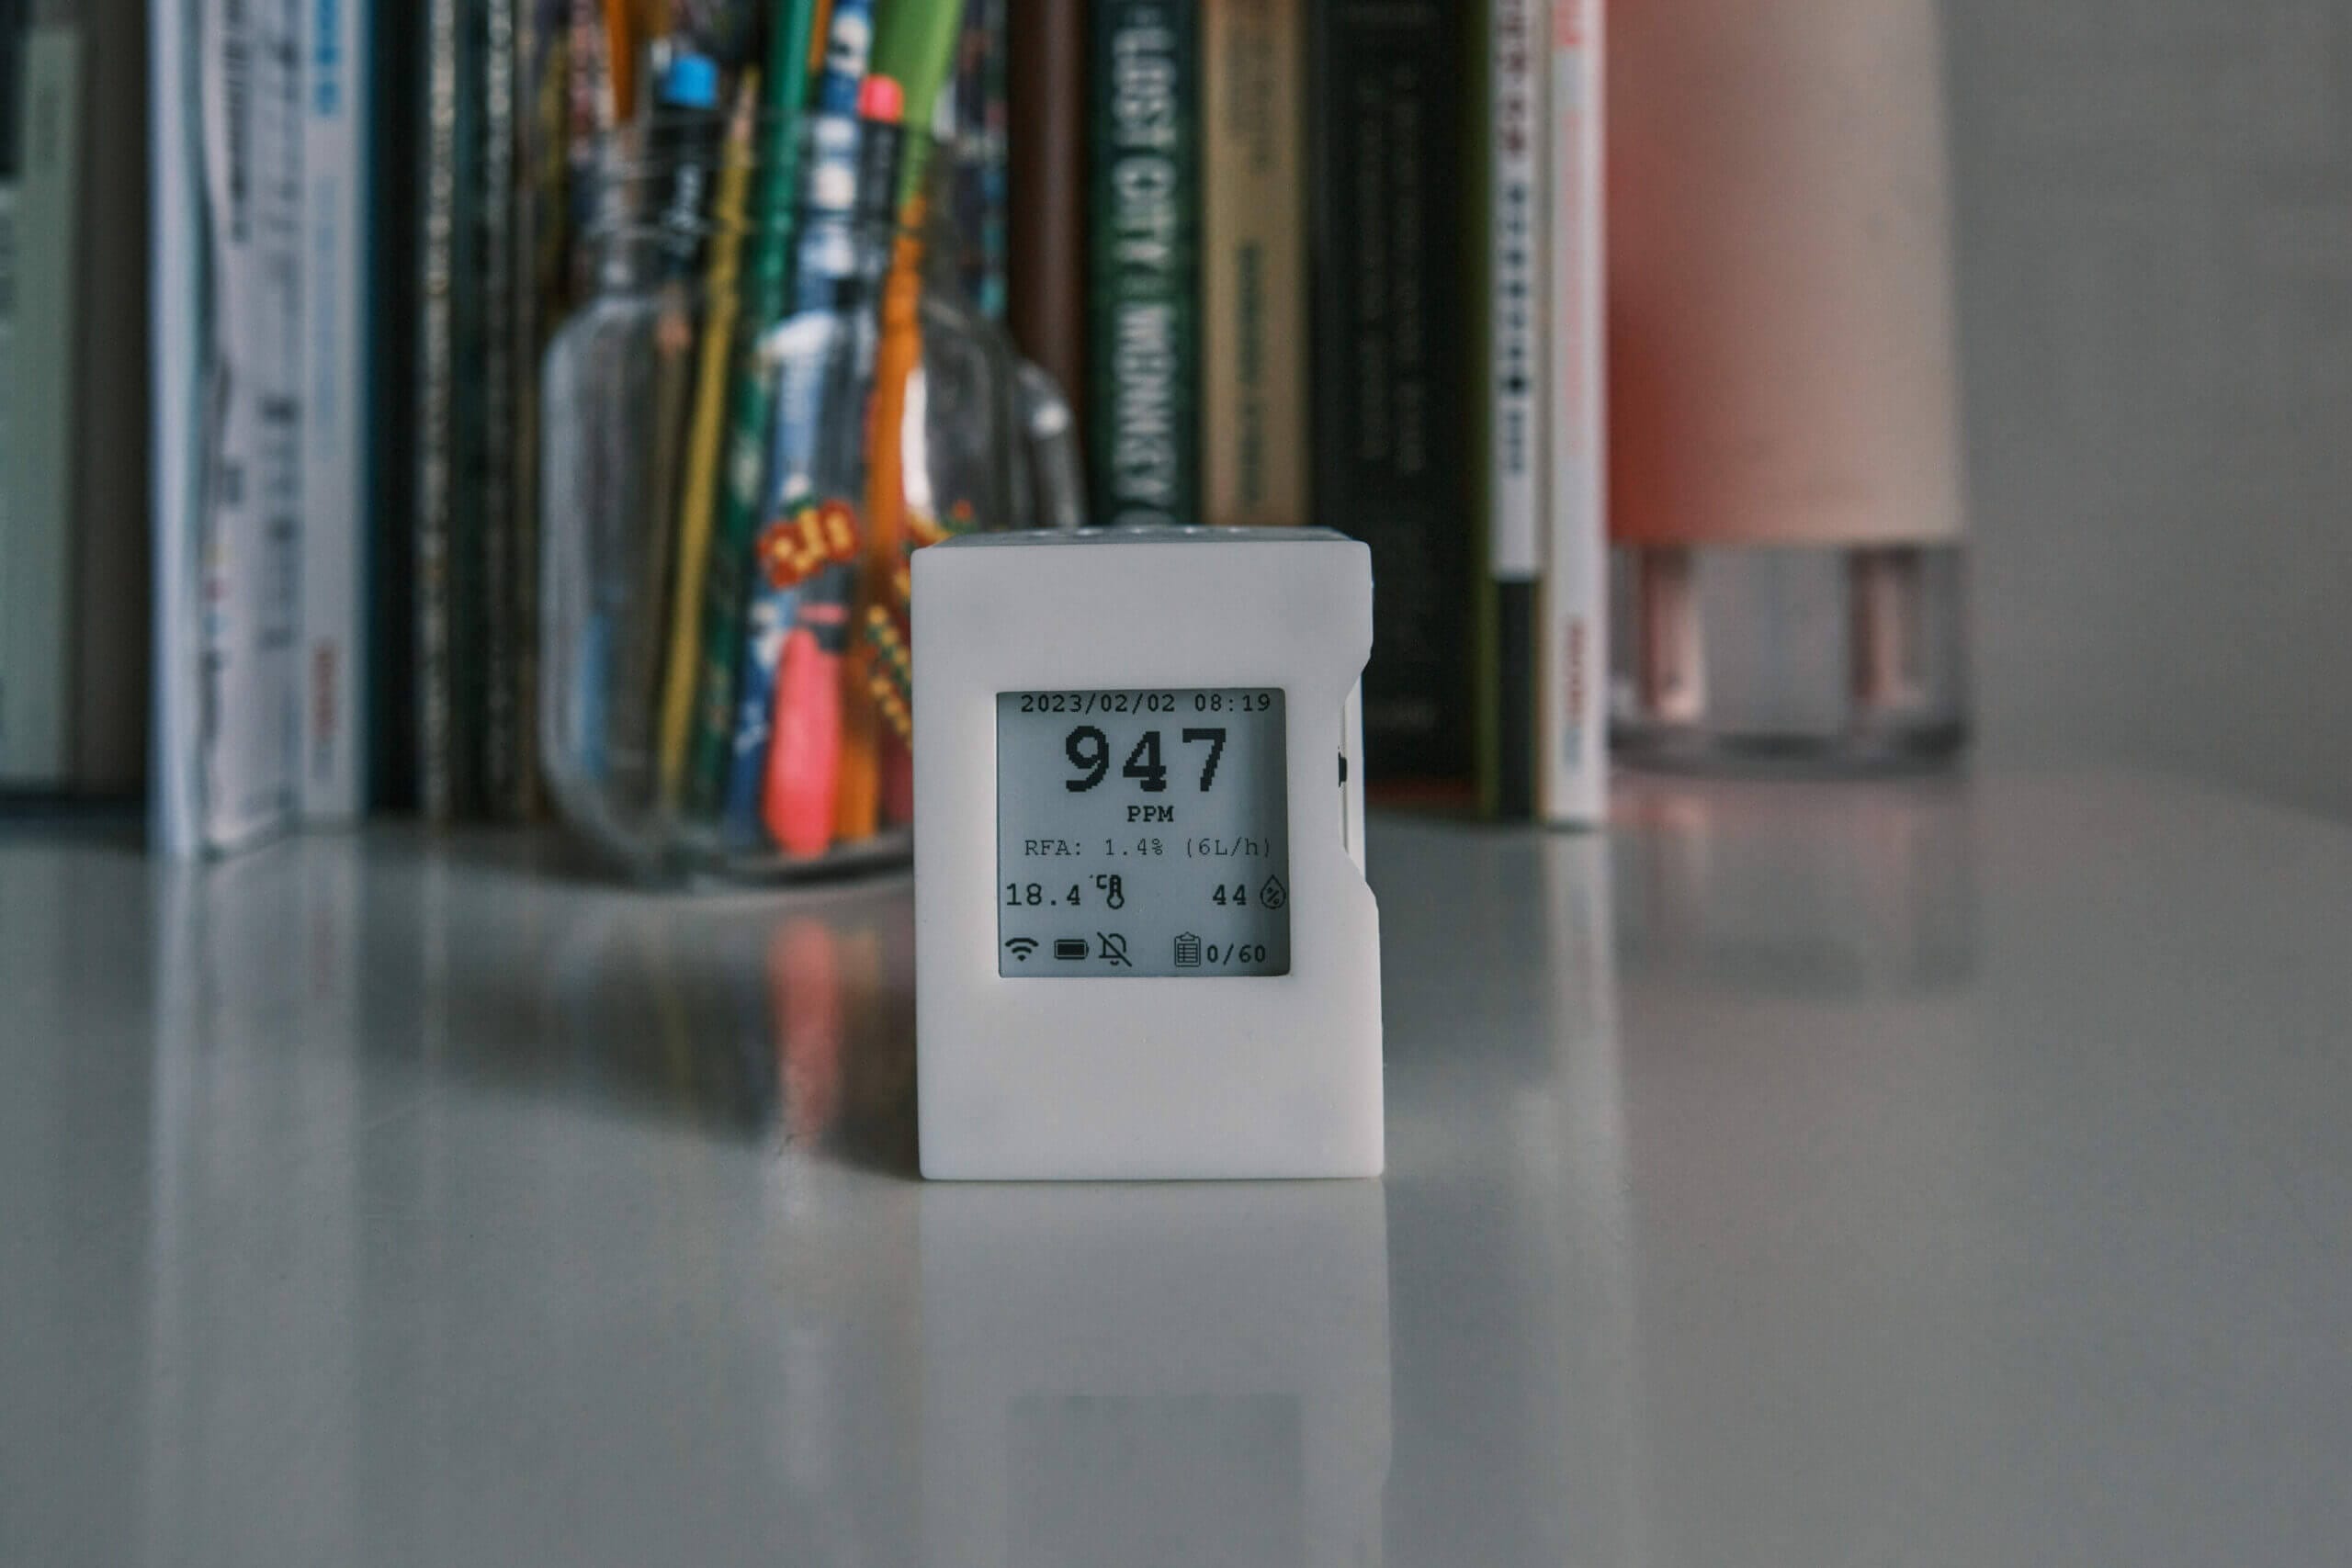
Not only can you see the time and date (which I wish other CO2 monitors included!), but you can also find the CO2 ppm measurement (of course!), temperature, relative humidity, status icons, and, most interestingly, a measurement titled ‘RFA’. RFA stands for the rebreathed fraction of air, and it indicates the percentage and total amount of air you are ‘rebreathing’ from either yourself or other people and animals in your proximity.
I love this small addition because while the parts per million readings are useful, the RFA percentage is also a great stat to share. If I’m with my friends and they ask about the monitor, it’s often hard to explain carbon dioxide in terms of parts per million and their impact, as by the time I’ve explained it, they’ve usually lost interest. On the other hand, if I explain it as ‘you’re rebreathing 2% of your air right now!’ they tend to be far more interested.
This is great because it’s a far more interesting way to introduce people to the world of CO2 monitoring. I promise that 99% of people are more interested to hear they are rebreathing 1.4% of their air than the current CO2 concentration is 949ppm. This provides a great way to spread awareness! On top of this, I also find the rebreathed air percentage fun to check from time to time.
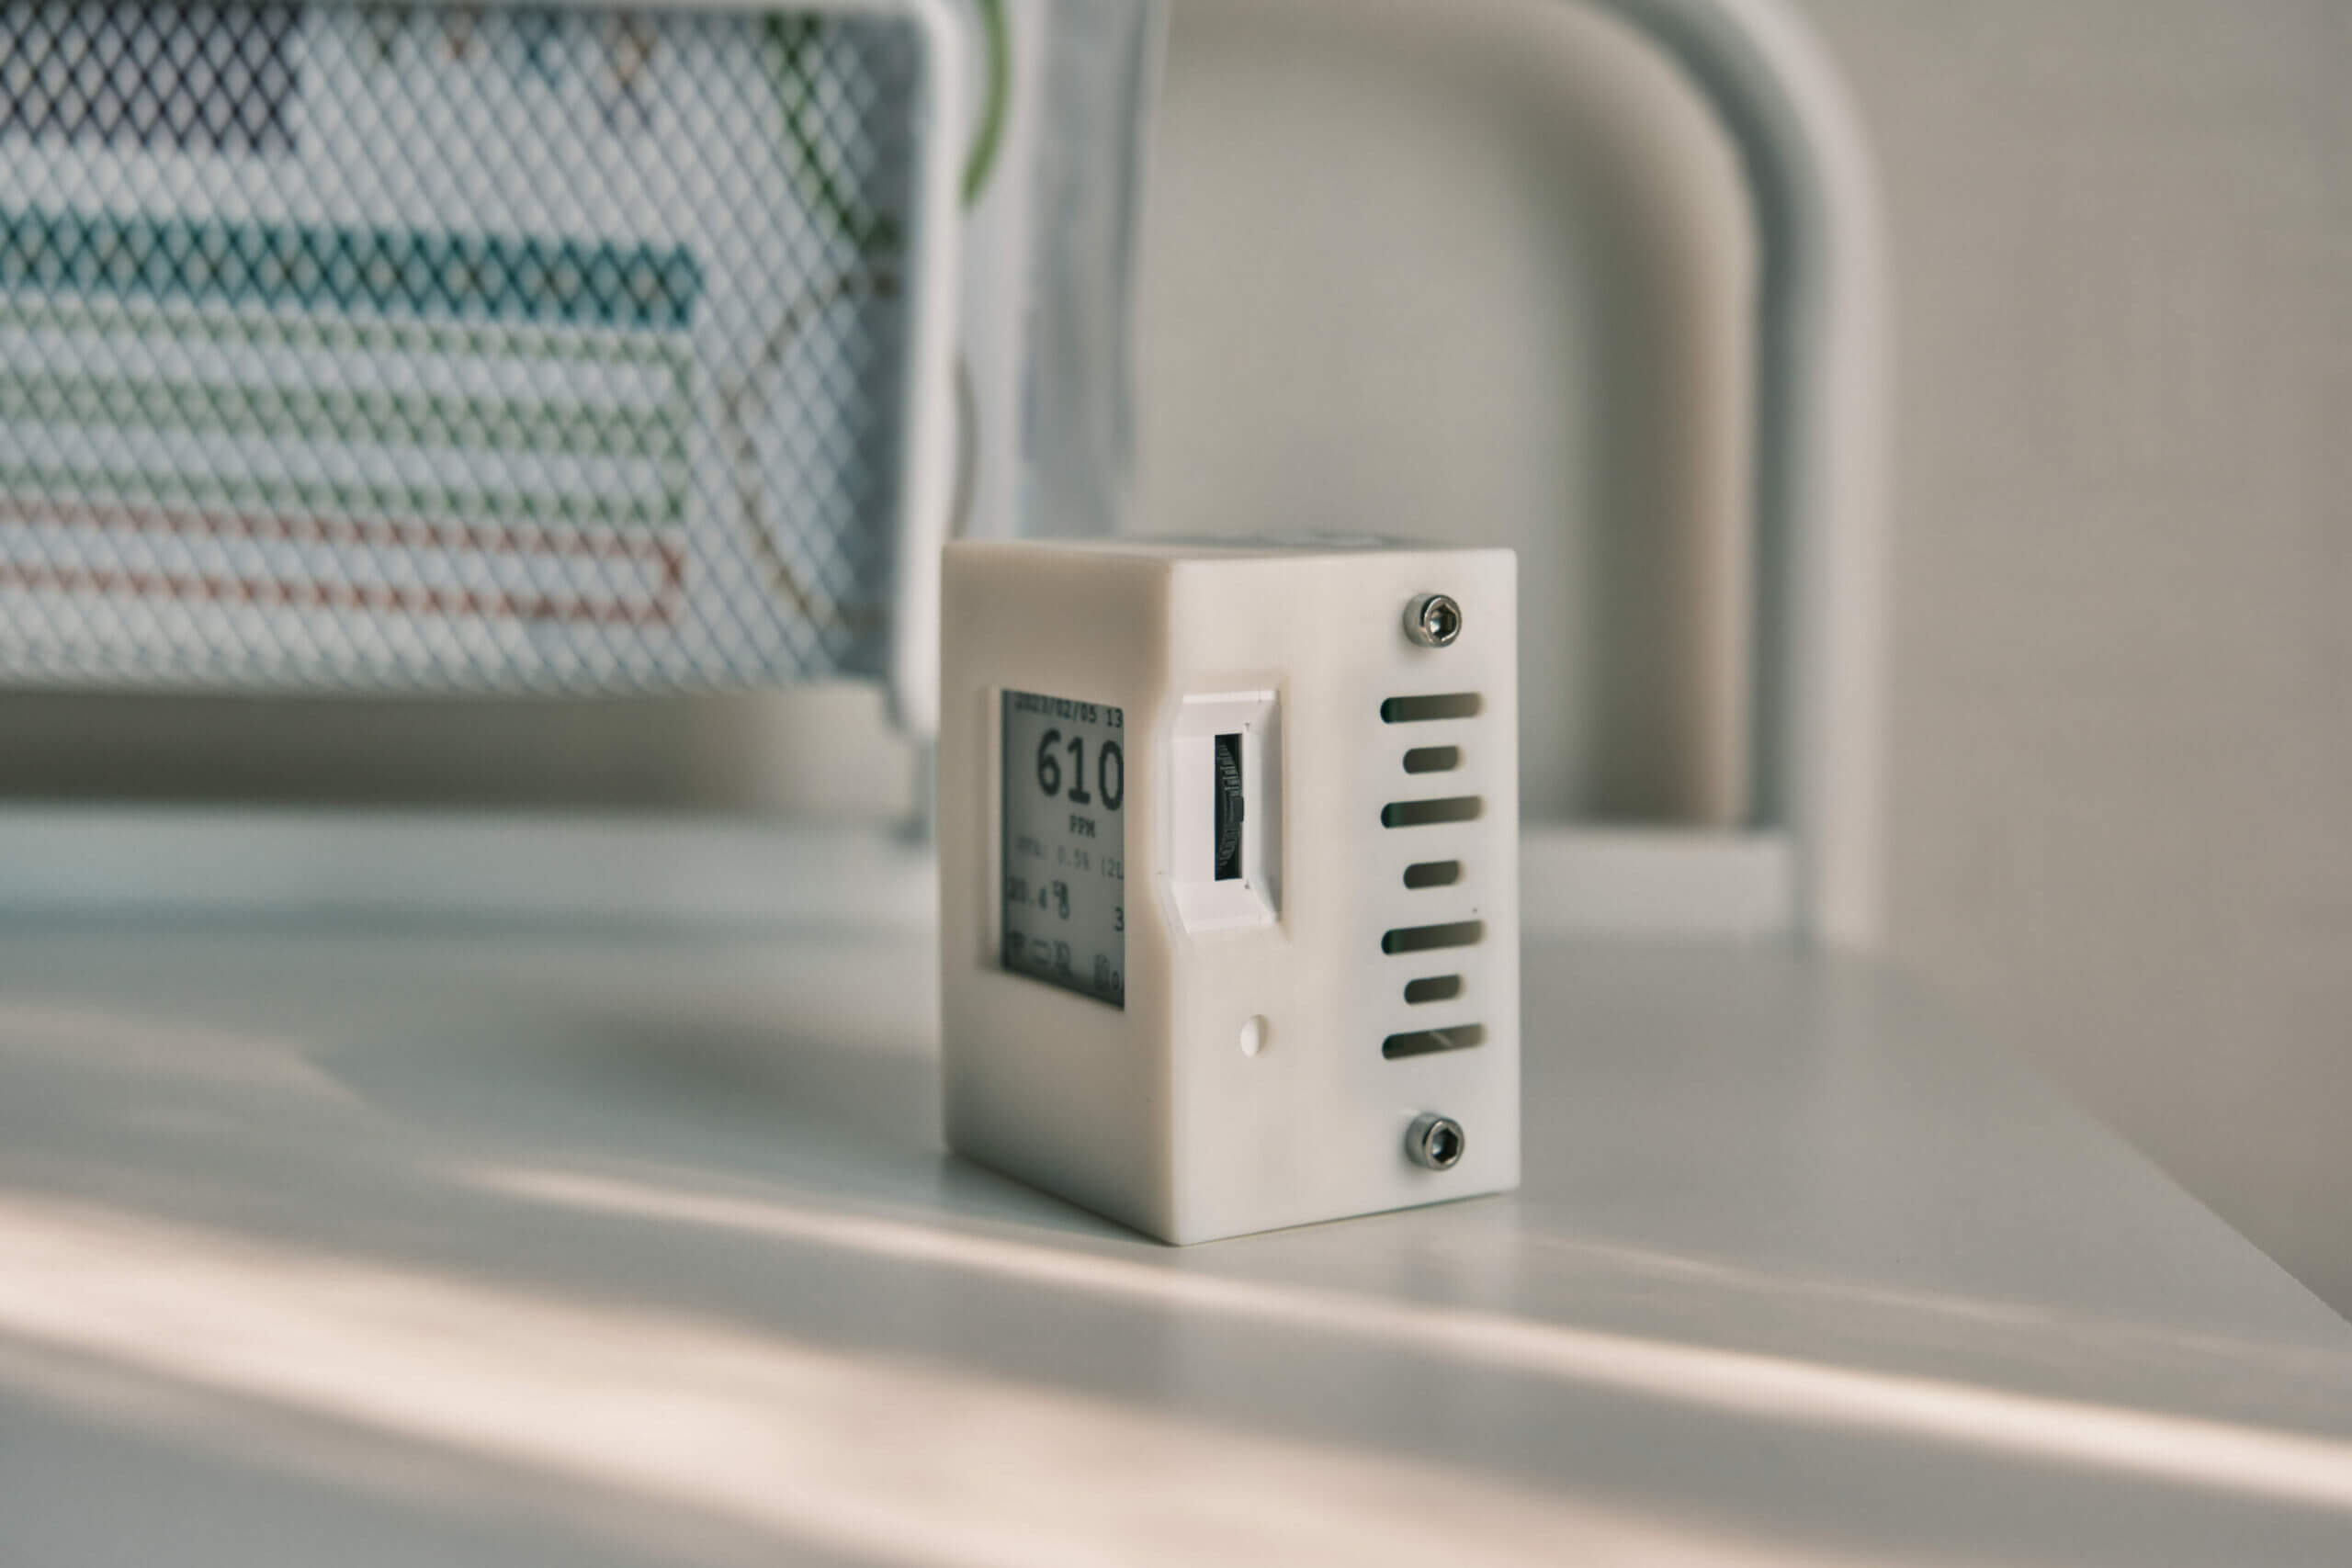
You’ll find the command wheel on the right side of the device. This wheel is how you’ll interact with the device, and it has three functions – scroll up, scroll down, and button press. With these three functions, you can easily navigate the (quite limited) menu on the device.
I like the scroll wheel, and while it’s an unconventional way to interact with such a device, it fits the needs of the VisiblAir Model C perfectly. The only reasons I’ve accessed the menu on the device are to change the date and time and to recalibrate the device. While you can also power off the device and do other basic functions, I’ve never found a need to use these features.
However, I have to note that the wheel does not register my presses frequently. I don’t mind pressing a few times to access the setting I need, but I do find it frustrating sometimes. That said, since I rarely access the menus on the device, I can overlook this.
Overall, the build quality of the VisiblAir Model C, and Model D is good. While there are a few imperfections, the device feels solid and easy to use. I am a fan of the amount of information shown on the E-ink screen, and the control wheel is a great way to interact with the device.

One final note – the VisiblAir Model C comes with a 3D-printed stand included. You can slot your VisiblAir Model C into this stand, and it will display at a 45-degree angle. The stand has a slot at the bottom for a USB cable to pass through, and it’s perfect for propping the device up on a desk or bookshelf.
Connectivity & Dashboard
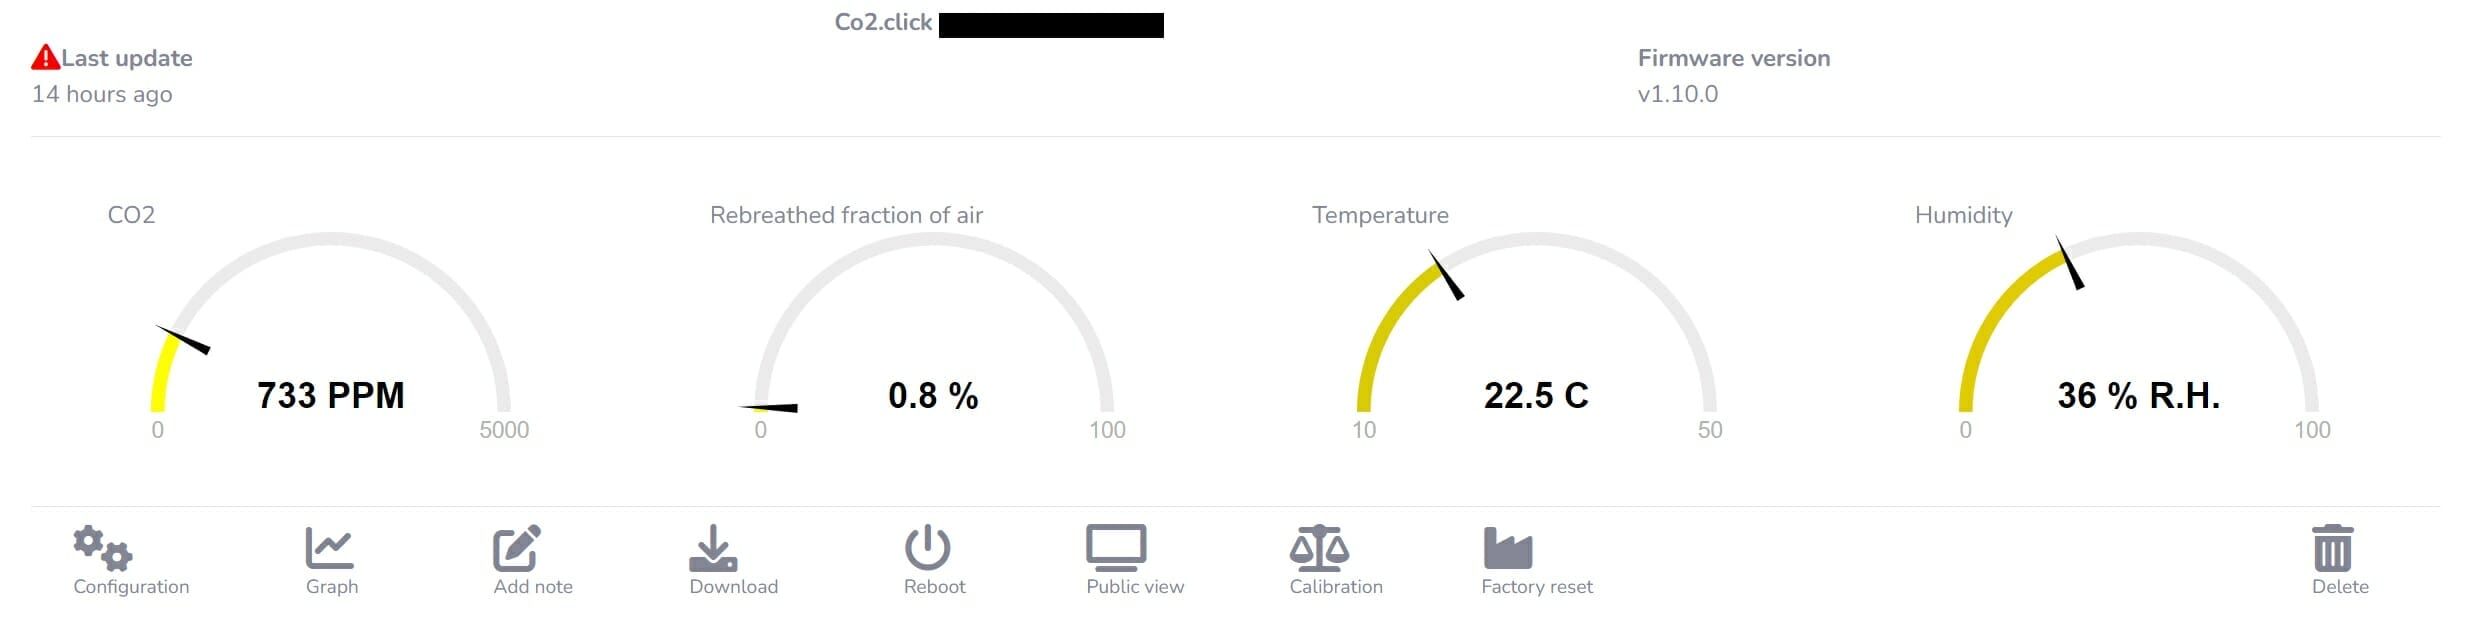
Please keep in mind this section applies only to the VisiblAir Model C – since the dashboard is a very powerful tool, I think everyone should spend a little extra to get Model C as opposed to Model D, which lacks access to the dashboard.
Similar to almost every other carbon dioxide and air quality monitor I’ve tried to date, the VisiblAir Model C only supports 2.4ghz WiFi. This won’t be an issue if you’re using a 2.4ghz or 2.4ghz and 5ghz router. However, if you use 5ghz exclusively, you will need to re-enable 2.4ghz as the VisiblAir Model C can’t connect otherwise.
Luckily, unlike some devices, you do not need to be connected to the same network as the VisiblAir Model C to access it. What I mean by this is you can connect the VisiblAir Model C on 2.4ghz WiFi and then use your laptop or phone on your 5ghz network and still be able to access the dashboard. I’ve had very frustrating experiences in the past with some monitors requiring my laptop to be on 2.4ghz too, and I’m glad this is not an issue here.
Connecting the Model C to WiFi was a painless process for me, but there are a few quirks with the setup. To begin, you need to turn on the device, wait for it to boot, and then swipe the command wheel up. This will turn your VisiblAir Model C into a WiFi hotspot, and you will want to connect to this with your smartphone (a laptop will work, too, if needed).


Two images from the VisiblAir setup process.
Once you’ve connected to the WiFi hotspot, a popup will either appear, or you will need to navigate to neverssl.com – even though you aren’t connected to the internet, this local address will work. At this URL, you will be prompted to select from a nearby network, and you’ll need to enter your WiFi password.
At this stage, the webpage said ‘saving credentials, and after waiting for a few minutes, both my phone and VisiblAir was stuck on the same screen. I assumed the pairing had failed and navigated back to the network selection screen only to find the VisiblAir Model C was connected – it just hadn’t notified me.
Once connected, I was able to navigate to the VisiblAir portal. Here, you can quickly create an account (no details other than an email are needed) and access the free dashboard. Once this was set up, I interacted with the device almost entirely through my laptop, as the dashboard is a quick way to access all the information I need.

On the dashboard, you are able to edit the device’s settings, add notes (that will appear when you export data), download your data, reboot, calibrate, and factory reset your device. Interestingly, you can also get a QR code that can be placed in your store, classroom, or other public areas for others to scan and instantly see the CO2 concentration.
However, most usefully, the dashboard provides dials for quick insights into your current CO2, RFA, temperature, and humidity levels and a graphing function to see how these levels vary over time.
By default, the VisiblAir Model C will upload data to the web portal every 15 minutes. However, this can be changed, and you can upload data every minute if you want – keep in mind this will severely impact battery life though. If your monitor is constantly plugged in, I recommend setting this to a more frequent interval, but leave it at the default if you often use the device on the go.

Dashboard settings menu.
If your VisiblAir Model C does not have a WiFi connection, it will continue to store data for up to 60 data points. This means the device can internally store 15 hours of data (at 15-minute intervals) to be uploaded when it next connects to WiFi. I love this feature as it allows me to see trends in carbon dioxide concentrations even when the device isn’t connected.
In the settings, you can adjust the sensor display refresh period (how often a new reading is shown on the device) and how often data is sent to the cloud portal. I appreciate how these settings are separated, as it’s not always essential to upload every data point to the cloud portal.

Once you’ve collected data, creating graphs in the dashboard is possible. If you’re looking for more flexibility, the data can be exported as a spreadsheet. However, for basic viewing, the graph on the dashboard is enough. With that said, it’s with the graphing I noticed a quirk with the software.
As of the time of writing, the graph does not reflect periods of missing data. Instead, if your VisiblAir Model C runs out of battery and doesn’t report data for a set period, the graph will skip this data and continue from when your device next collects data. I wish the graph would reflect a lack of data as it’s confusing to have the graph show 15-minute intervals followed by an 8-hour interval with no obvious note this has happened.
One of the biggest promises Andre makes with the VisiblAir Model C is that they are updateable and well-supported. Since I received the device, an update appeared on the dashboard, which was painless to install. I selected the update button (which appeared when an update was present), and the device was up to date within a couple of minutes.
While I only have one monitor on hand, the dashboard allows users to add further devices if they wish. While I can’t speak about how this works, I assume adding a second device is the same as the first, and this process is both easy and quick. Accessing all these devices in one place is incredibly useful and is a feature usually only seen on higher-end devices such as the Aranet4 Pro.
Many of the other features on the dashboard may seem redundant as you can perform many of the actions on the device itself. However, I appreciate having two ways to calibrate the device and reset it. In particular, calibrating the device remotely is very useful because my exhaled CO2 won’t impact the calibration process.
Pricing & Competition

Regarding pricing, the VisiblAir Model C sits right in the middle of consumer-grade carbon dioxide monitors. There are cheaper monitors, such as the Vitalight, Qingping Air Monitor, and Forensics Detectors CO2 Monitor, but there are also significantly more expensive monitors, such as the Aranet4.
The Model D sells for CAD 189, while the Model C, with its WiFi capabilities, goes for CAD 199. I will say this once again – it’s worth springing for the Model C because a 5% price increase is absolutely worth the extra features you will get access to.
This means that using the current exchange rate, the Model C costs around USD 150 – $100 cheaper than the Aranet4 Home. With the dashboard capabilities, however, the Model C almost competes more directly with the Aranet4 Pro, which costs $50 more. This isn’t to mention the Aranet Base Station, which adds $500 to the overall price to allow for the same connectivity.
| CO2 Monitor | Price |
|---|---|
| VisiblAir Model C | (approx) $150 |
| VisiblAir Model D | (approx) $140 |
| Aranet4 Home | $250 |
| Aranet4 Pro | $290 |
| Qingping Air Monitor Lite | $90 |
| Qingping Air Monitor | $130 |
| Forensics Detectors CO2 Monitor | $100 |
Table comparing the pricing of a few popular CO2 monitors. All prices are in USD.
It’s also worth noting the VisiblAir Model C uses a dual-beam NDIR sensor, which nothing else I’ve reviewed does. This sensor is the most accurate currently offered by Sensirion, and these don’t come cheap. I’m impressed to see such a high-end sensor in a relatively affordable product!
At this price point, it’s fair to say the Aranet isn’t directly competing with the Model C. However, I’ve seen many people trying to decide between the two. From my experience with the two products, the decision between these two is easy. Here’s how I would approach it:
Get the Aranet4 if:
- You need a portable monitor. While the VisiblAir Model C can be used portably, the incredible battery length of the Aranet and the form factor make it a better portable device.
- You primarily want to interact with the device through your smartphone. The Bluetooth connection and app of the Aranet4 are suited more for your phone – another reason it’s a better portable monitor.
Get the VisiblAir Model C if:
- You want a desk-based solution that can be portable when needed.
- You want or need an online dashboard that can easily be shared with others – the VisiblAir Model C is a great inexpensive solution for stores, offices, and classrooms.
- You need to monitor multiple devices. The Bluetooth connection of the Aranet4 is short-range and finicky, and for better connectivity, you will need to get the Aranet4 Pro. VisiblAir supports multiple devices in its dashboard by default.
- You want to save some money!
In this comparison, I believe the VisiblAir Model C is a compelling offer, and I only recommend the Aranet4 if you want a portable monitor. If you are looking for a monitor for your home (or another indoor area), the VisiblAir Model C feels like an easy recommendation from me.
So, how does the VisiblAir Model C compare to other, cheaper monitors designed for the same use case? Compared to the Forensics Detectors CO2 Detector I recently reviewed, the biggest difference is the dashboard. The Forensics Detectors device has no connectivity or dashboard, and the VisiblAir Model C is a much better choice if you want to be able to access the device and its data remotely.
Compared to the Qingping Air Monitor and Air Monitor Lite, the VisiblAir Model C is a better carbon dioxide monitor because it has a more accurate sensor and a more useful dashboard. On top of this, it also has a few small benefits that I appreciate, such as the inclusion of an RFA reading on the screen.
However, the Qingping monitors are a better choice if you want an all-around air quality monitor, as they also offer PM2.5, PM10 and tVOC sensors depending on the model in question.
Overall, I feel the VisiblAir Model C is a very compelling offer. It’s an accurate device with a high-end dual-beam NDIR sensor inside (which none of the competition mentioned has), and it does its one job of monitoring CO2 very well – whether you want to use the online dashboard or the device itself.
The only time I wouldn’t recommend the Model C as a model to consider is if you want a primarily portable device. In this case, I would recommend the Aranet4 for the same reason I recommend it over the Vitalight. For me, 8 hours of battery life is not enough for a truly portable product.
Conclusion
After using the VisiblAir Model C for a few weeks, I can say that it has become one of my favourite carbon dioxide monitors. If you’re looking for a carbon dioxide monitor to use at home or in an office, store, classroom or other indoor environments, the VisiblAir Model C is a fantastic choice. It’s powerful, with a well-implemented online dashboard, and provides a wealth of data.
If you are looking for a portable monitor, I recommend a device such as the Aranet4 or Vitalight. While the VisiblAir Model C and Model D do have an internal battery and can be used as somewhat portable devices, I prefer the much longer-lasting Aranet or the small and cheap Vitalight Mini CO2 Detector.
When it comes to desk-based monitors, however, the VisiblAir Model C has my recommendation. The screen is smaller than devices such as the Forensics Detectors CO2 Monitor, but it provides more information and has far better connectivity (the Forensics Detectors device has none).
With that said, the VisiblAir Model C isn’t a flawless product – for example, I would like to see the graphs on the online dashboard represent a lack of data, and the control wheel isn’t particularly responsive and often requires multiple repeats of the same action to register.
However, even with these flaws, the VisiblAir Model C is a good choice. It uses high-end and accurate tech from Sensirion, allows for data exporting and graphing, and is significantly more affordable than other similarly-featured products.
On top of this, the VisiblAir Model C is a device that looks to be regularly updated in the future, and Andre even takes suggestions for features to add with these updates. If there’s a feature missing that is preventing you from purchasing the product, it’s worth getting in contact with him to see if it’s something that can be implemented!
If you’re interested in purchasing a VisiblAir Model C, please check out the link below. If you own a VisiblAir, I would love to hear your thoughts! What do you like and dislike about the product? Are there any features you want to see added? Please share down below!
VisiblAir Model C FAQ
Is the VisiblAir Model C Accurate?
Yes. The VisiblAir uses a Sensirion SCD30 sensor with an accuracy of ± 30ppm + 3%. In my testing, I found it to provide accurate results.
What Does the VisiblAir Model C Monitor?
The VisiblAir Model C and Model D monitor carbon dioxide, temperature, and relative humidity.
What’s the Difference Between the Model C and Model D?
The Model C has WiFi and can use the cloud dashboard, whereas the Model D lacks this connectivity.
Where Can I Buy the VisiblAir Model C?
You can purchase the device from VisiblAir.
How Does the VisiblAir Model C Compare to the Aranet4?
The VisiblAir is similarly accurate and has similar connectivity. However, the Aranet has a longer battery life and better shape for portability. On the other hand, the VisiblAir Model C is more well-suited to live in a home or other building due to its stand and more detailed screen.
What Alternatives Are There to the VisiblAir Model C?
Some alternatives you might want to consider are the Forensics Detectors CO2 Monitor, Qingping Air Monitor, Qingping Air Monitor Lite, and the Vitalight Mini CO2 Detector.


