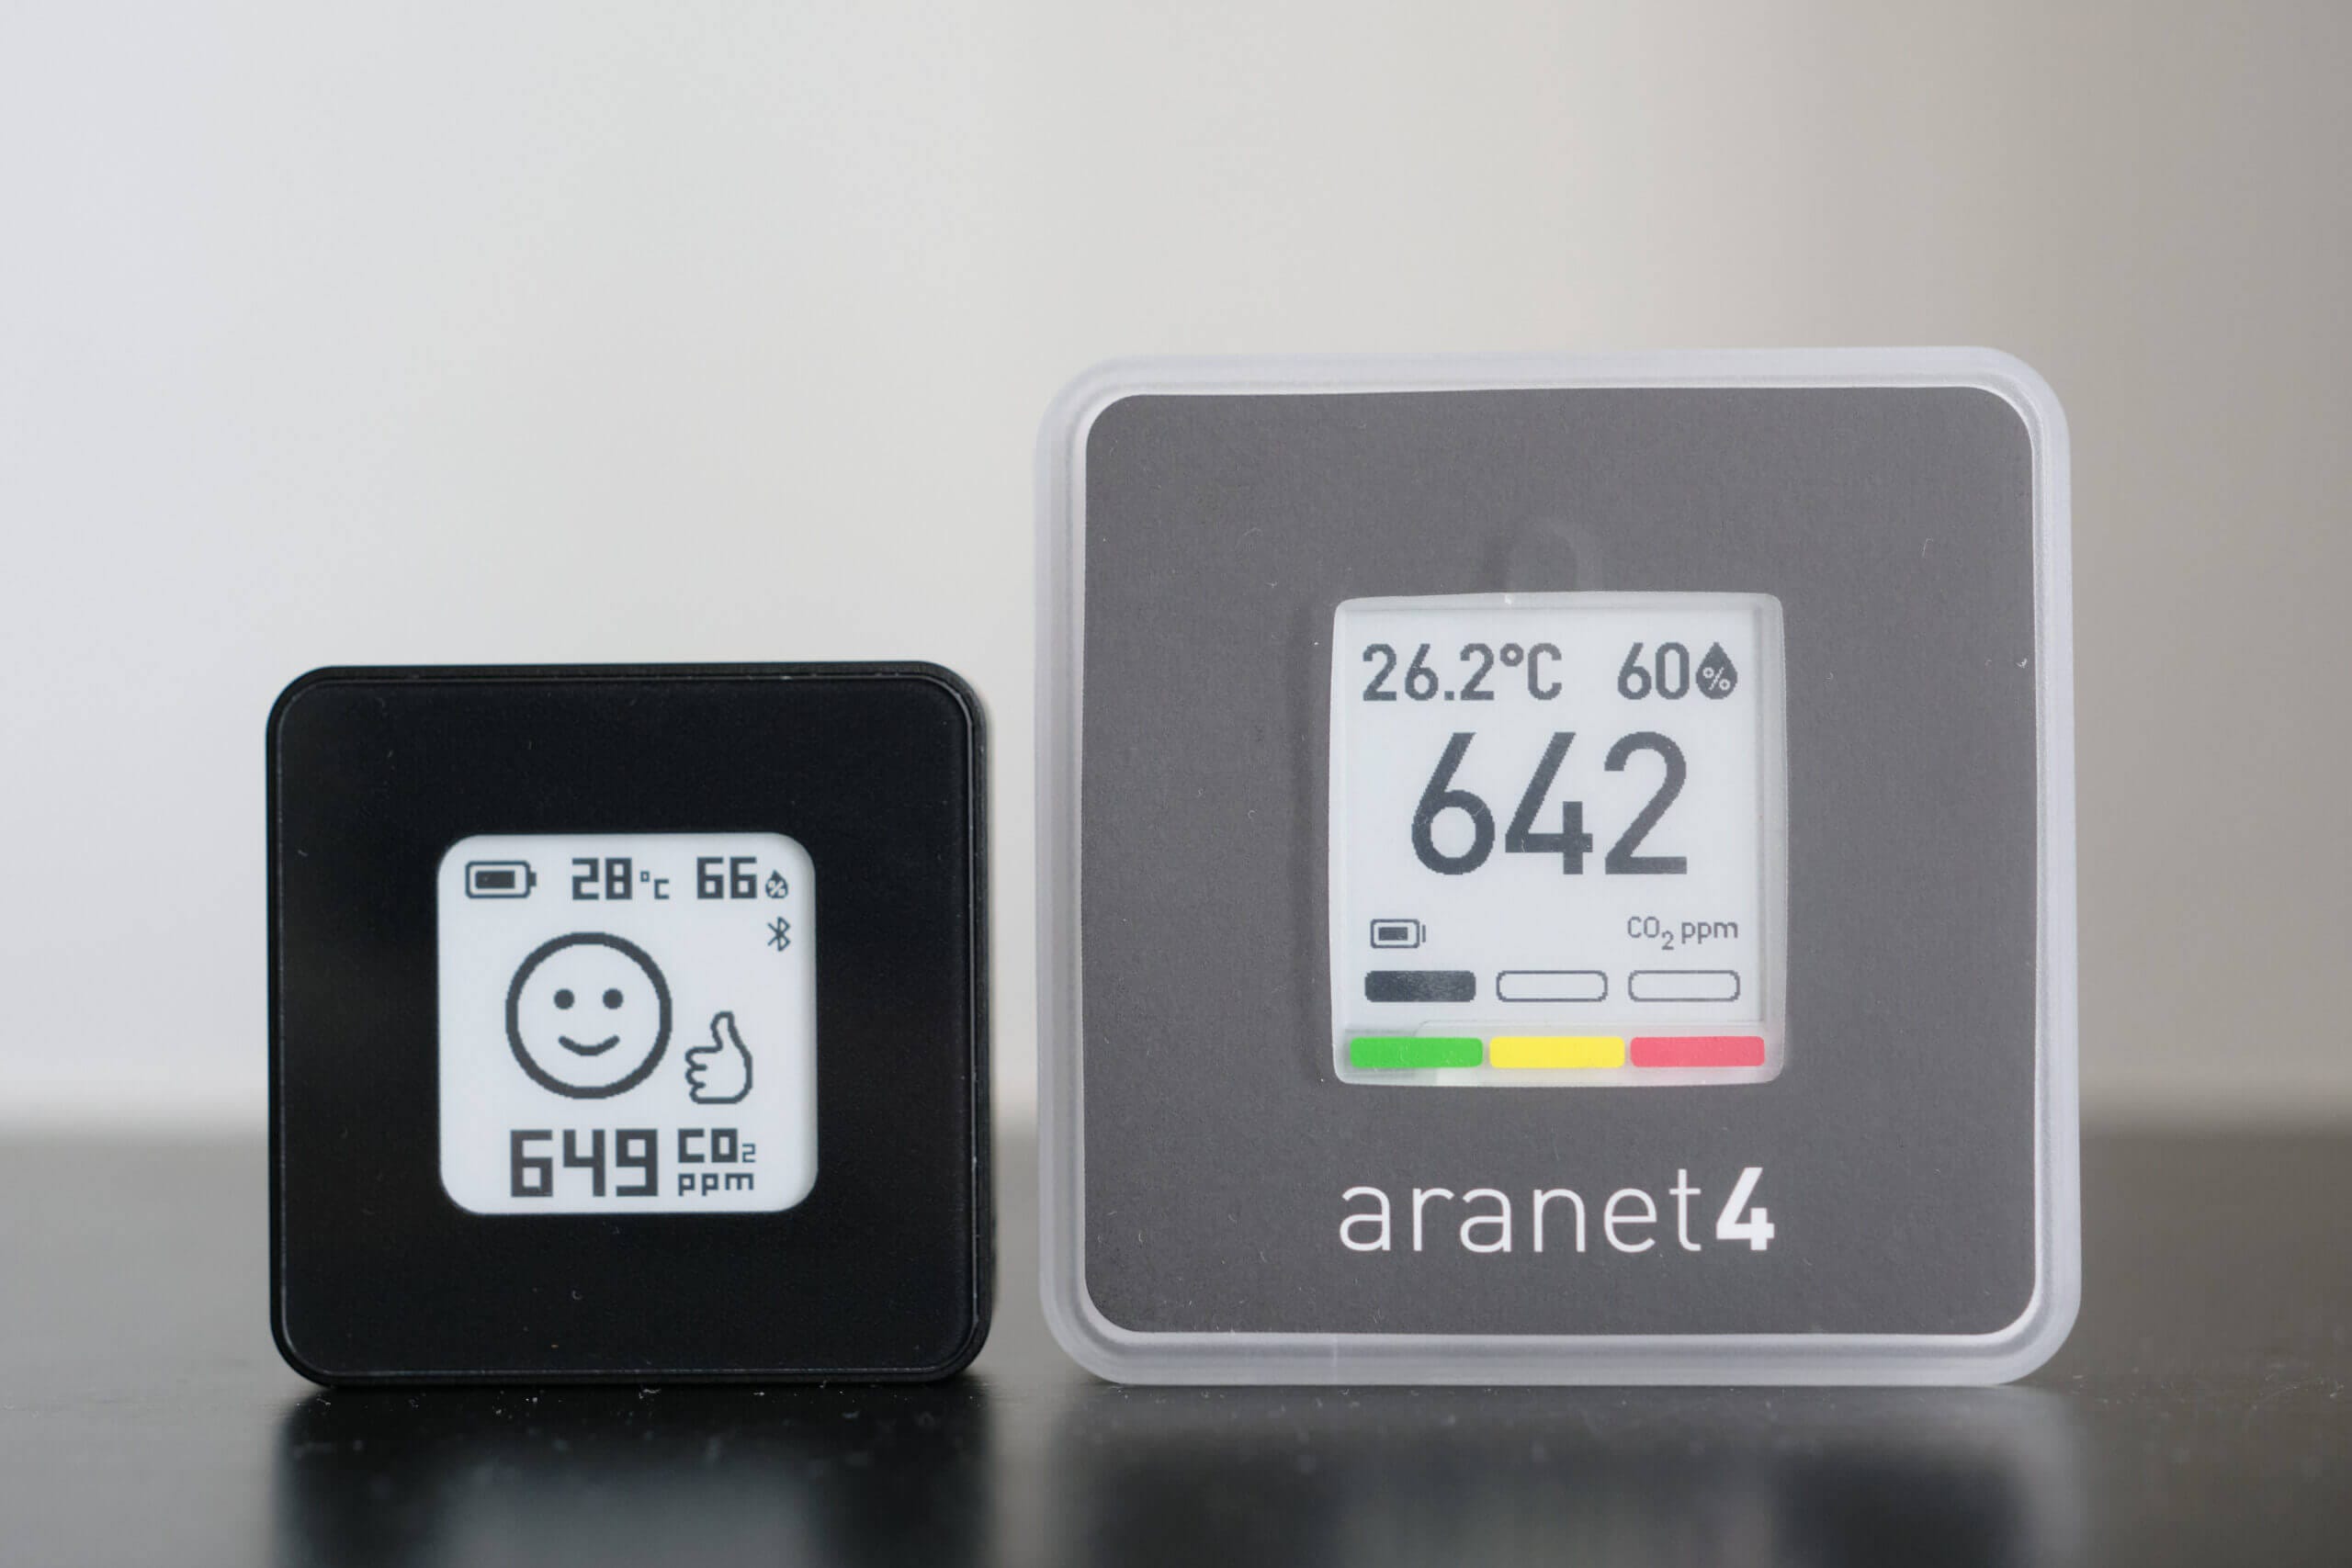
As carbon dioxide monitors have become an integral part of many of our lives, the need for smaller monitors has become apparent. While popular monitors such as the Aranet4 Home are quite compact, they’re not exactly small or inconspicuous. That’s where the newest carbon dioxide monitor on the market, the AIRVALENT, comes in.
While there are some small monitors on the market – the Sensirion dongle (SCD4X CO2 Gadget) and Vitalight Mini CO2 Detector come to mind, they are both imperfect portable options. The Sensirion Gadget because it doesn’t contain a battery and must be externally powered, and the Vitalight because the battery life is minimal and so is functionality.
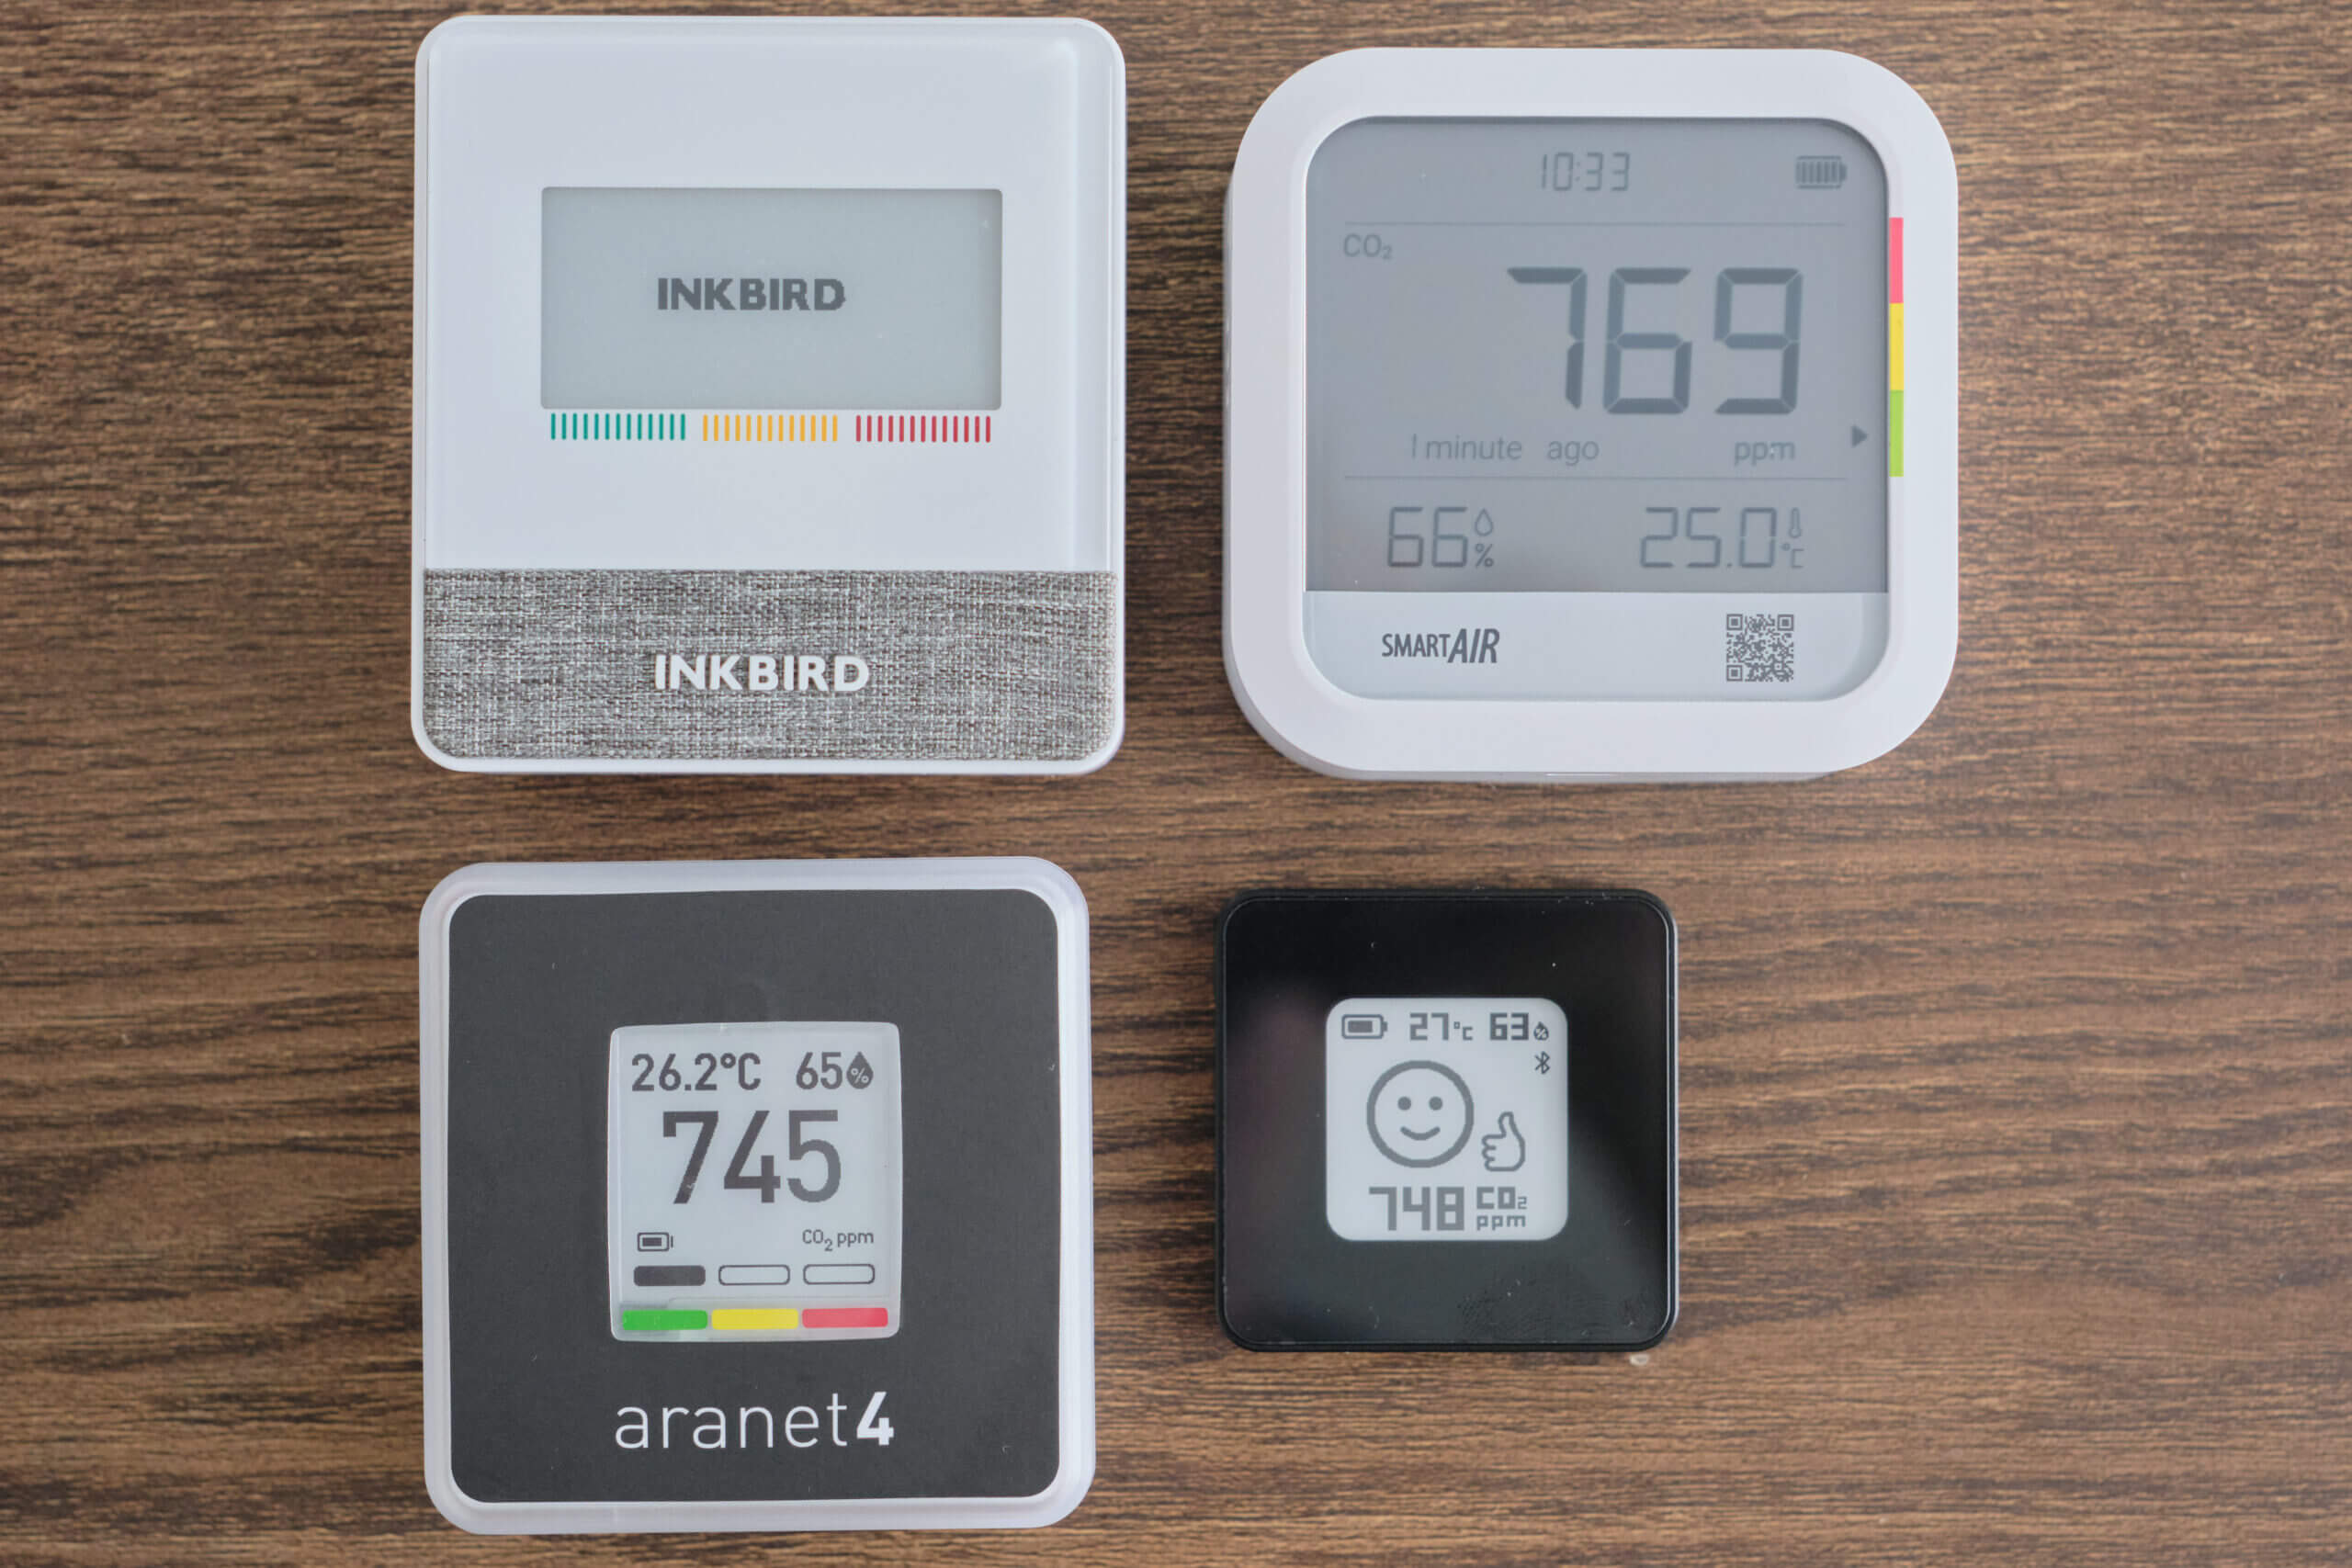
Therefore, when I learned about the AIRVALENT CO2 monitor, I was very curious. Not only is it very small (about half the size of an Aranet4 Home and Vitalight Mini CO2 Detector), but it uses a high-quality sensor and has all the functionality of much larger monitors such as the INKBIRD IAM-T1, SmartAir CO2 Monitor, and, of course, the Aranet4.
From first impressions, this monitor looks ideal for hiding in a child’s backpack, keeping your handbag, or placing alongside your wallet in your pocket. However, when I first saw it, I knew I had to take a deeper dive to see how it performs and if it really is the perfect portable solution.
Two aspects particularly interested me – the battery life and the sensor. The battery life is important because this device is tiny and relies on a rechargeable battery to keep it powered, and the sensor is important because it’s one of Sensirion’s photoacoustic sensors, which prioritises being as small as possible. While I’ve used the SCD40 in the SmartAir CO2 Monitor, I was curious to see how the updated SCD41 compares.
So, with all of that said, let’s get into the review. How does the AIRVALENT CO2 monitor perform, and is it as promising as it looks? Let’s first examine the device’s accuracy and see how it compares.
Subscribe to BreatheSafeAir
Learn about the best carbon dioxide monitors, get discounts, and more!
This post contains affiliate links. For more information, please refer to my affiliate disclaimer. I was sent a product for review, but the article is not sponsored. All opinions expressed in this post are my honest thoughts. I only recommend products that I genuinely believe in.
Information on this blog is for informational purposes only. Readers are encouraged to confirm the information herein with other sources. Furthermore, this information is not intended to replace medical advice from professionals. This website assumes no responsibility for the accuracy of the information, and information is subject to change without notice. Devices mentioned on this website are not medical devices and do not guarantee protection.
Accuracy & Sensor
Regarding device accuracy, we first need to discuss the sensor used in the device. Most carbon dioxide monitors and air quality monitors use sensors from third-party companies, and when it comes to carbon dioxide sensors, these usually come from SenseAir and Sensirion, with some cheaper alternatives coming from brands such as Cubic. Among the brands creating carbon dioxide sensors, SenseAir has the best reputation and is closely followed by Sensirion (although the SCD30 dual-channel sensor found in devices like the CO2.Click Model C is fantastic). Both of these companies have a range of sensors that are trusted and well-liked.
The AIRVALENT CO2 Monitor uses a sensor from Sensirion, and it’s quite an interesting one at that. If you’ve researched carbon dioxide monitors before, you will know that NDIR (non-dispersive infrared) sensors are the gold standard. These sensors are a bit more expensive than electrochemical and metal oxide sensors, but they’re also more reliable as other substances won’t throw off the readings and are less prone to drift. However, within NDIR sensors, there are a few subcategories.
Most traditional NDIR sensors in devices such as the Aranet4 Home and INKBIRD IAM-T1 are transmissive NDIR sensors. These sensors work by firing infrared light across a chamber towards an optical detector. Since carbon dioxide absorbs this light, the detector detects the amount of light energy that reaches the other end of the chamber. As the carbon dioxide concentration increases, the light reaching the detector decreases, and the sensor can then calculate the carbon dioxide concentration.
While this method is accurate, it also means the sensors have to be large, as there is a minimum required distance between the emitter and detector in order to get accurate results. For example, one common NDIR sensor, the SenseAir S8, has the following dimensions: 8.5 x 33.5 x 20 mm. While this might seem relatively small, it means devices housing this sensor have to be able to house the sensor alongside all the other required components. When coupled with a battery, screen, mainboard, and other components, carbon dioxide monitors quickly turn from small products to thick and relatively large devices.
However, there is a way to decrease the size of the sensor – in this case, photoacoustic NDIR. The AIRVALENT CO2 Monitor uses a Sensirion SCD41, one of two models in Sensirion’s current photoacoustic range. Most interesting, this sensor is tiny compared to typical transmissive NDIR sensors.
| Sensor Name | Type | Dimensions |
|---|---|---|
| SenseAir S8 | Transmissive NDIR | 8.5 x 33.5 x 20 mm |
| Sensirion SCD30 | Transmissive NDIR | 7 x 35 x 23 mm |
| SenseAir Sunrise | Transmissive NDIR | 11.5 x 33.5 x 19.7 mm |
| Sensirion SCD40/41 | Photoacoustic NDIR | 6.5 x 10.1 x 10.1 mm |
Photoacoustic NDIR sensors operate using a slightly more complex concept. First, they fire an infrared light into the chamber, which will be absorbed by the carbon dioxide molecules. This will cause the molecules to vibrate, which leads to a pressure change in the chamber. This pressure change will cause a sound, which can be picked up by a microphone inside the chamber. Since the placement of the microphone isn’t as important in a photoacoustic sensor (since sound is omnidirectional), and since there isn’t a minimum distance needed for measurements to be taken, these sensors can be much smaller than transmissive NDIR sensors.
However, this miniaturisation isn’t without its own issues, and I will discuss them in detail soon. However, the key takeaway is that the AIRVALENT CO2 Monitor uses a different sensing technology, allowing it to be much smaller than most competing monitors on the market.
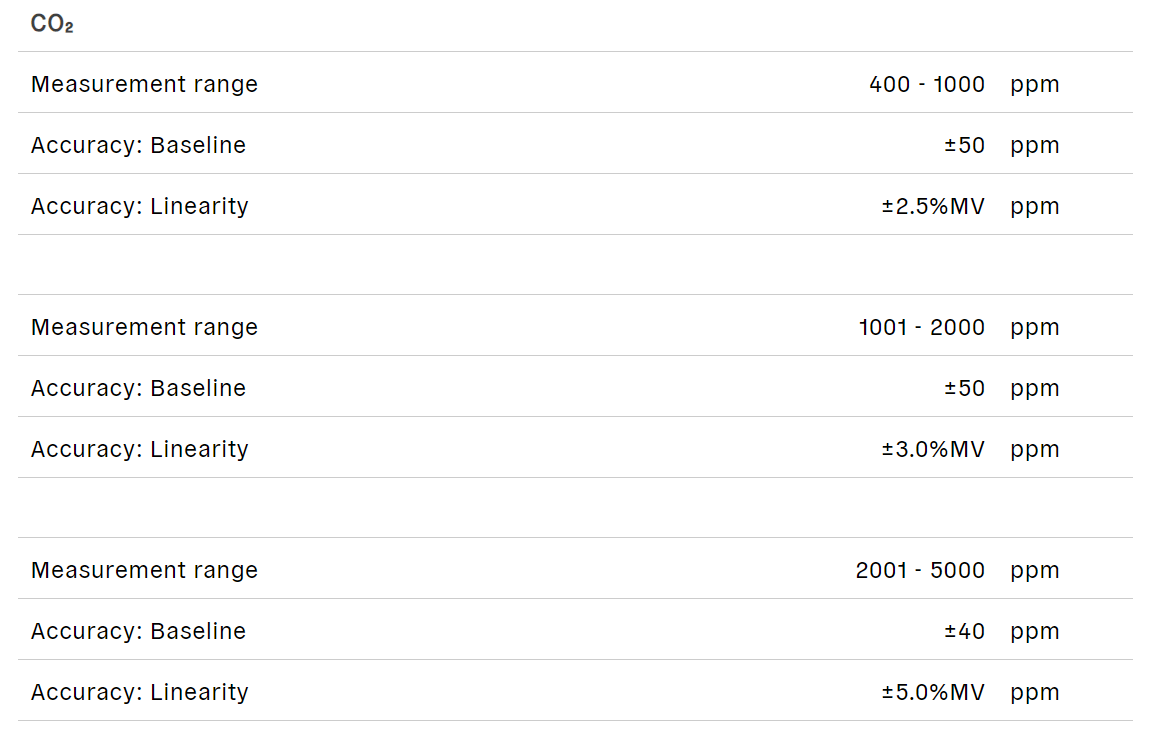
Now that we’ve discussed the difference between transmissive and photoacoustic NDIR sensors let’s examine the accuracy of the AIRVALENT CO2 Monitor and the Sensirion SCD41. I’ve included Sensirion’s stated accuracy above, but I’m always interested in how these devices perform in real-life usage. With this in mind, I wanted to run my own tests, and these quickly sent me down quite the rabbit hole!
Now, it’s worth mentioning that these tests aren’t scientific and shouldn’t be considered conclusive. However, my experiences led to some interesting findings, and I discovered a few downsides with photoacoustic sensing technology. Let’s start with the graph below, which shows the AIRVALENT recorded readings compared to two Aranet4 Home devices. All of these devices were calibrated simultaneously and in the same conditions.
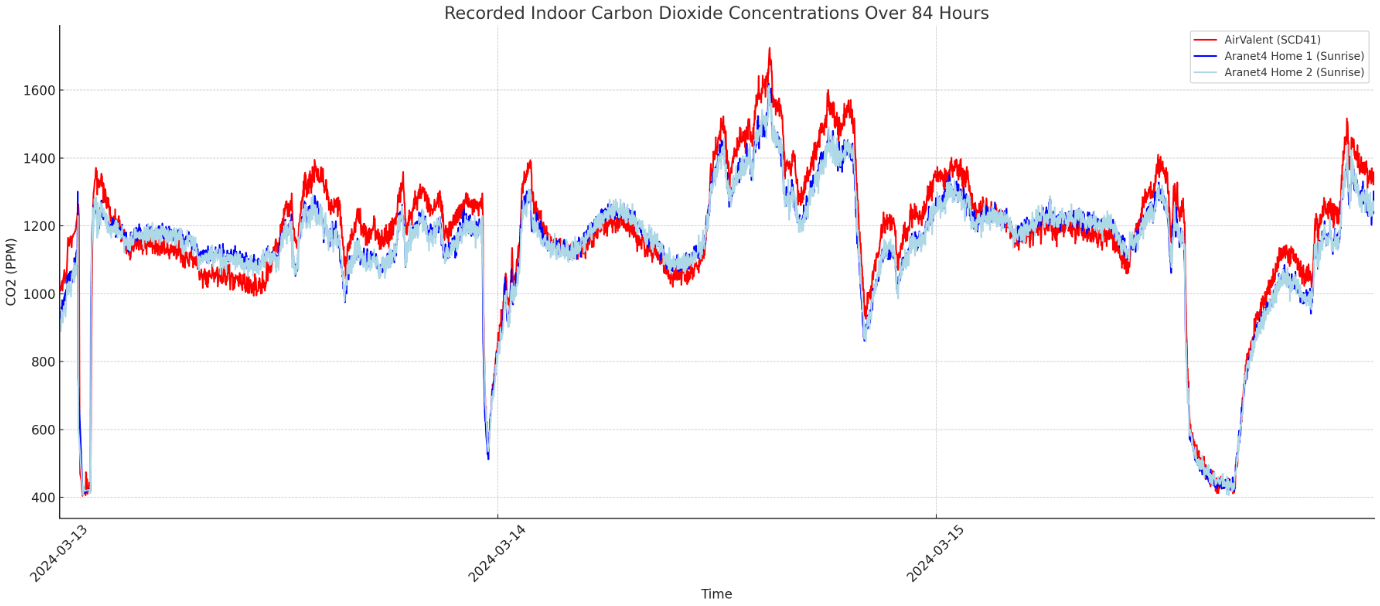
The graph shows that the readings between the three monitors were quite similar overall. Since the Aranet4 Home is the most accurate monitor I have access to, I used it as a baseline, but with that said, it’s not a reference monitor. While the Aranet4s read very closely to each other at all times, the AIRVALENT monitor fluctuated a bit more but stayed mostly within 100ppm of the other two devices.
This graph interested me because the AIRVALENT monitor is not consistently reporting above or below the Aranets. Rather, it stays consistently above before dropping and showing consistently lower readings based on some other variable. At first, I thought it could be influenced by the AC and fridge noises in my apartment. However, after turning both off, I discounted this theory. Next, I checked relative humidity and atmospheric pressure but couldn’t find any relationship between them and this phenomenon.
Next, I tried graphing the CO2 concentration alongside temperature and came up with the graph below. As you can see, when the temperature is higher (temperature reading averaged across all three monitors), the AIRVALENT monitor reads higher than the Aranets. When the temperature drops, the readings drop too.
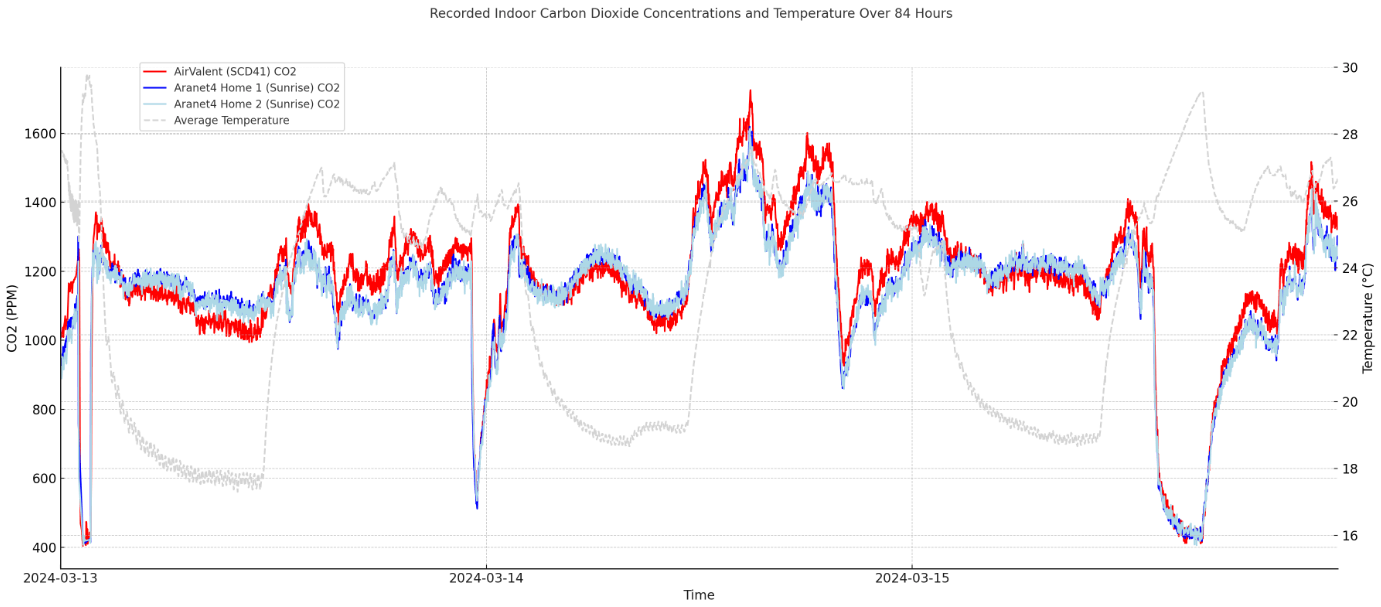
To further isolate the issue, I placed five monitors in an airtight container – three monitors with SCD41s and two Aranet4 Homes (SenseAir Sunrise sensor). Unfortunately, I could only graph one SCD41 monitor as the other two don’t have connectivity. However, from visually checking the concentration every hour or two, I can confirm this difference was common across all three photoacoustic sensors. Below is another graph showing the recordings from the three monitors in three different settings – room temperature, hot temperatures, and cold temperatures.
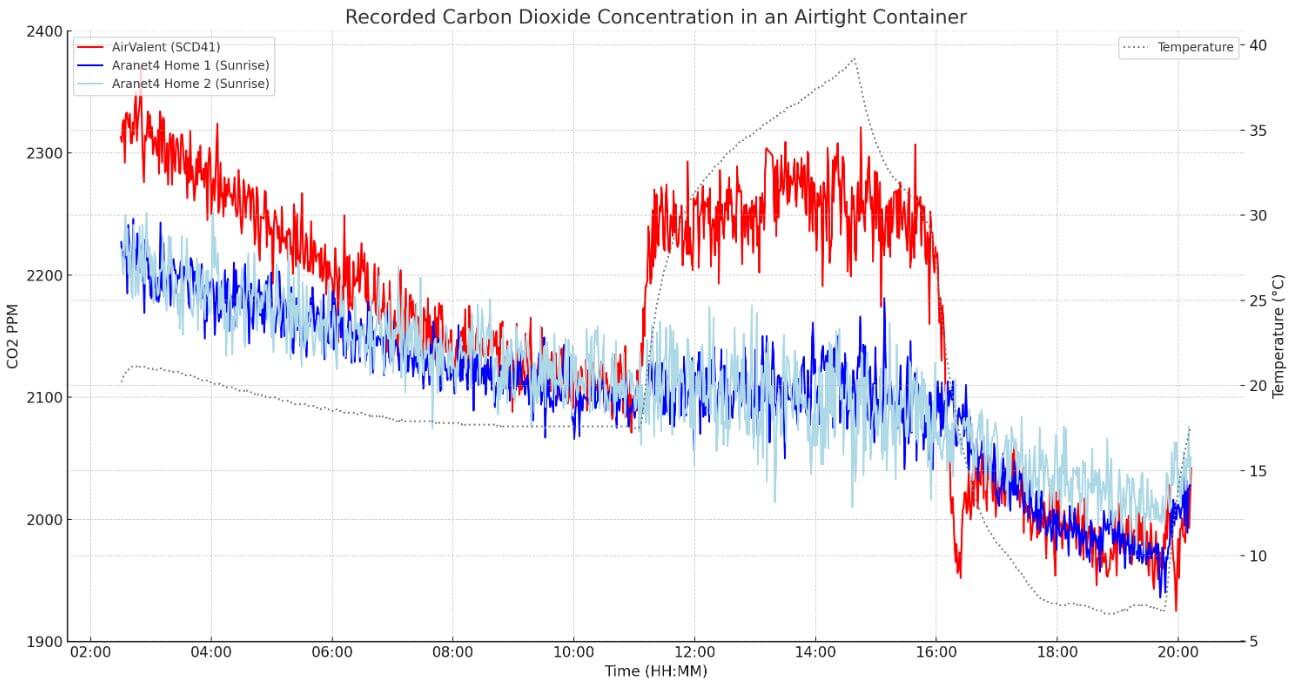
The temperature changes here are quite drastic because I don’t have a controlled environment to test the monitors in. However, around room temperature, you can see that the SCD41 and AIRVALENT CO2 monitor read very similarly to the Aranet4 Homes. However, when the temperature increases, the readings become significantly different. Since I would expect a slight decrease in CO2 concentrations (the airtight container was clearly not entirely airtight), I can conclude that the trend shown by the Aranet4s is accurate and there is another factor influencing the AIRVALENT monitor.
I then asked some experts about the matter and did some research. This is a known issue with photoacoustic sensors, as higher temperatures lead to signal loss. While I don’t fully understand the technicalities, there are a couple of papers on this matter that you can read if you’re interested, here and here.
So, what does this mean? Well, it might not mean much for you if you intend to use the device indoors. The device’s accuracy becomes quite poor above around 30 degrees Celsius, and these are temperatures you’ll usually only experience outdoors or during summer. Indoors and in controlled environments, you likely won’t notice this issue much as the device is accurate. However, it’s essential to know about this issue so you can compensate for it. Unfortunately, nothing in technology seems purely beneficial, and the SCD41 makes a few compromises to be incredibly small.
As you can tell, I went down a bit of a rabbit hole with this sensor. However, it was interesting to learn about the benefits and disadvantages of a sensor type I don’t have much experience with. Now, let’s discuss calibration. As you’re likely already aware, carbon dioxide sensors can drift over time, causing them to become inaccurate. Therefore, it’s important to calibrate them from time to time.
The SCD41 supports autocalibration and manual calibration, which can be operated through the AIRVALENT app. While the device has an autocalibration feature on a 7-day cycle, I recommend disabling this unless you frequently take the monitor outdoors. That’s because the device expects to be exposed to ambient air for at least a few hours every week, and it will use this exposure to ambient air to set a new baseline, which it will reference for future measurements.
If you regularly take the device outside or leave it in an empty building (such as your home, if it’s regularly empty during the day – remember, pets can also cause the device to become inaccurate), you might be interested in autocalibration, as it should keep the device accurate. However, if not appropriately managed, auto-calibration can lead to the device becoming wildly inaccurate.
Thankfully, the app allows you to disable autocalibration and manually calibrate the monitor. This calibration process is a bit different from that of most monitors, so it’s important to pay attention to both the app and the Sensirion instructions. What are these? Well, first, you will want to leave the monitor outside for 30 minutes before calibrating it. Yes, before, not after.
That’s because the calibration process is instant once you press the button on the app, and I believe this is because it recalls recent readings to use as the baseline instead of setting them in a process that begins after starting the process. There is another caveat to this calibration process – you will want to ensure there is little to no airflow in the location where you calibrate the monitor.
Photoacoustic sensors are very sensitive to airflow, and even a little airflow over this calibration period can lead to inaccurate baselines. I’ve also been told that calibrating this sensor at under 10 degrees (Celsius) is very difficult. Therefore, you will want to calibrate the monitor in a warm area with minimal airflow, if possible.
While this calibration process isn’t quite as straightforward as that of transmissive NDIR sensors, which aren’t so susceptible to influences such as airflow and temperature, you will want to be careful when calibrating the SCD41 inside the AIRVALENT CO2 Monitor. However, I found this process easy to manage if I calibrated it somewhere sheltered but outdoors.
Overall, the AIRVALENT monitor has performed well, considering its size. While a traditional NDIR sensor would likely be a bit more accurate, especially at high temperatures, the fact that the SCD41 is so tiny yet performs as well as a transmissive NDIR sensor in most conditions, especially those that I would argue matter most, is impressive. For the best results, you will also want to take particular care when calibrating this monitor, as it is influenced more by other factors than NDIR sensors.
Design
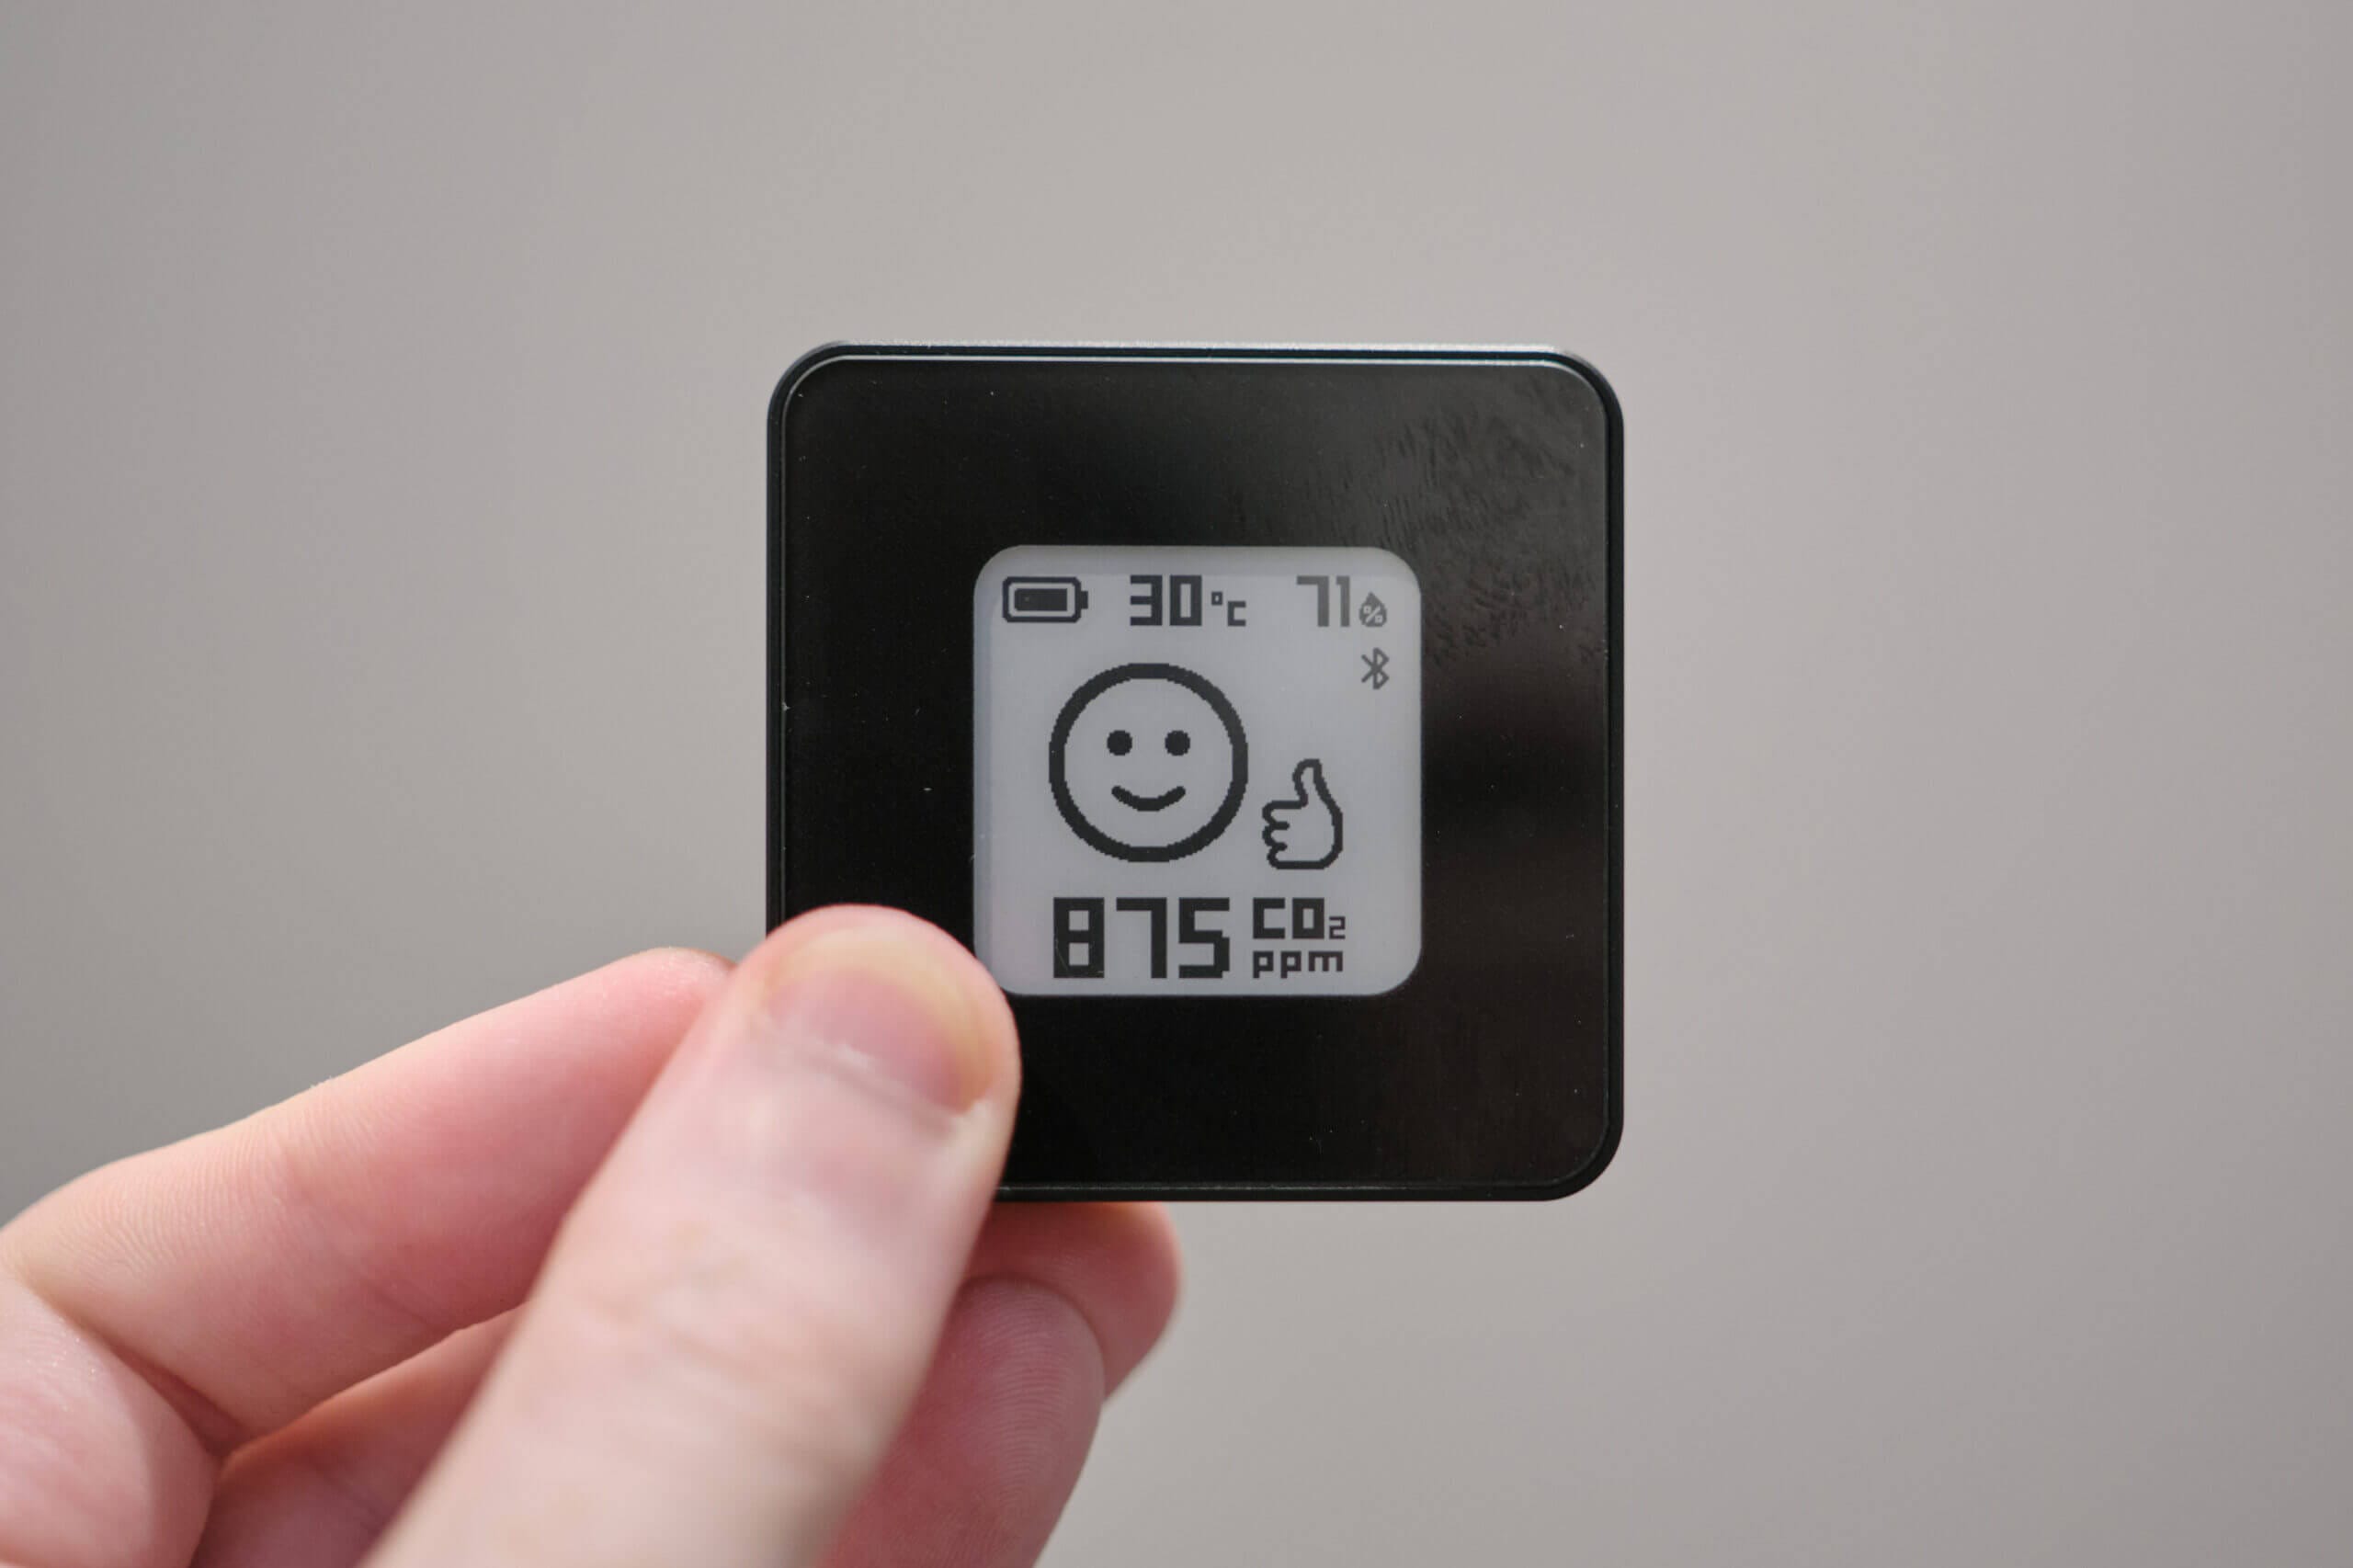
When it comes to design, the AIRVALENT CO2 Monitor excels. Despite being tiny, this monitor has quite a weight, and you will instantly notice that it feels very high-quality. Unlike most carbon dioxide monitors, which use a plastic shell, this monitor instead uses what I believe is glass with metal edges. Whatever the materials, this monitor feels like it was made with quality in mind. Interestingly, this device is also certified IP40.
To conserve battery life, a small E-ink screen is on the front of the device. This screen is small, but it doesn’t feel cluttered or hard to read due to the fantastic contrast and viewing angles inherent to this screen technology. I’m very happy to see an E-ink screen here because while they cost a bit more than a standard LCD screen, they are very beneficial for device usability.
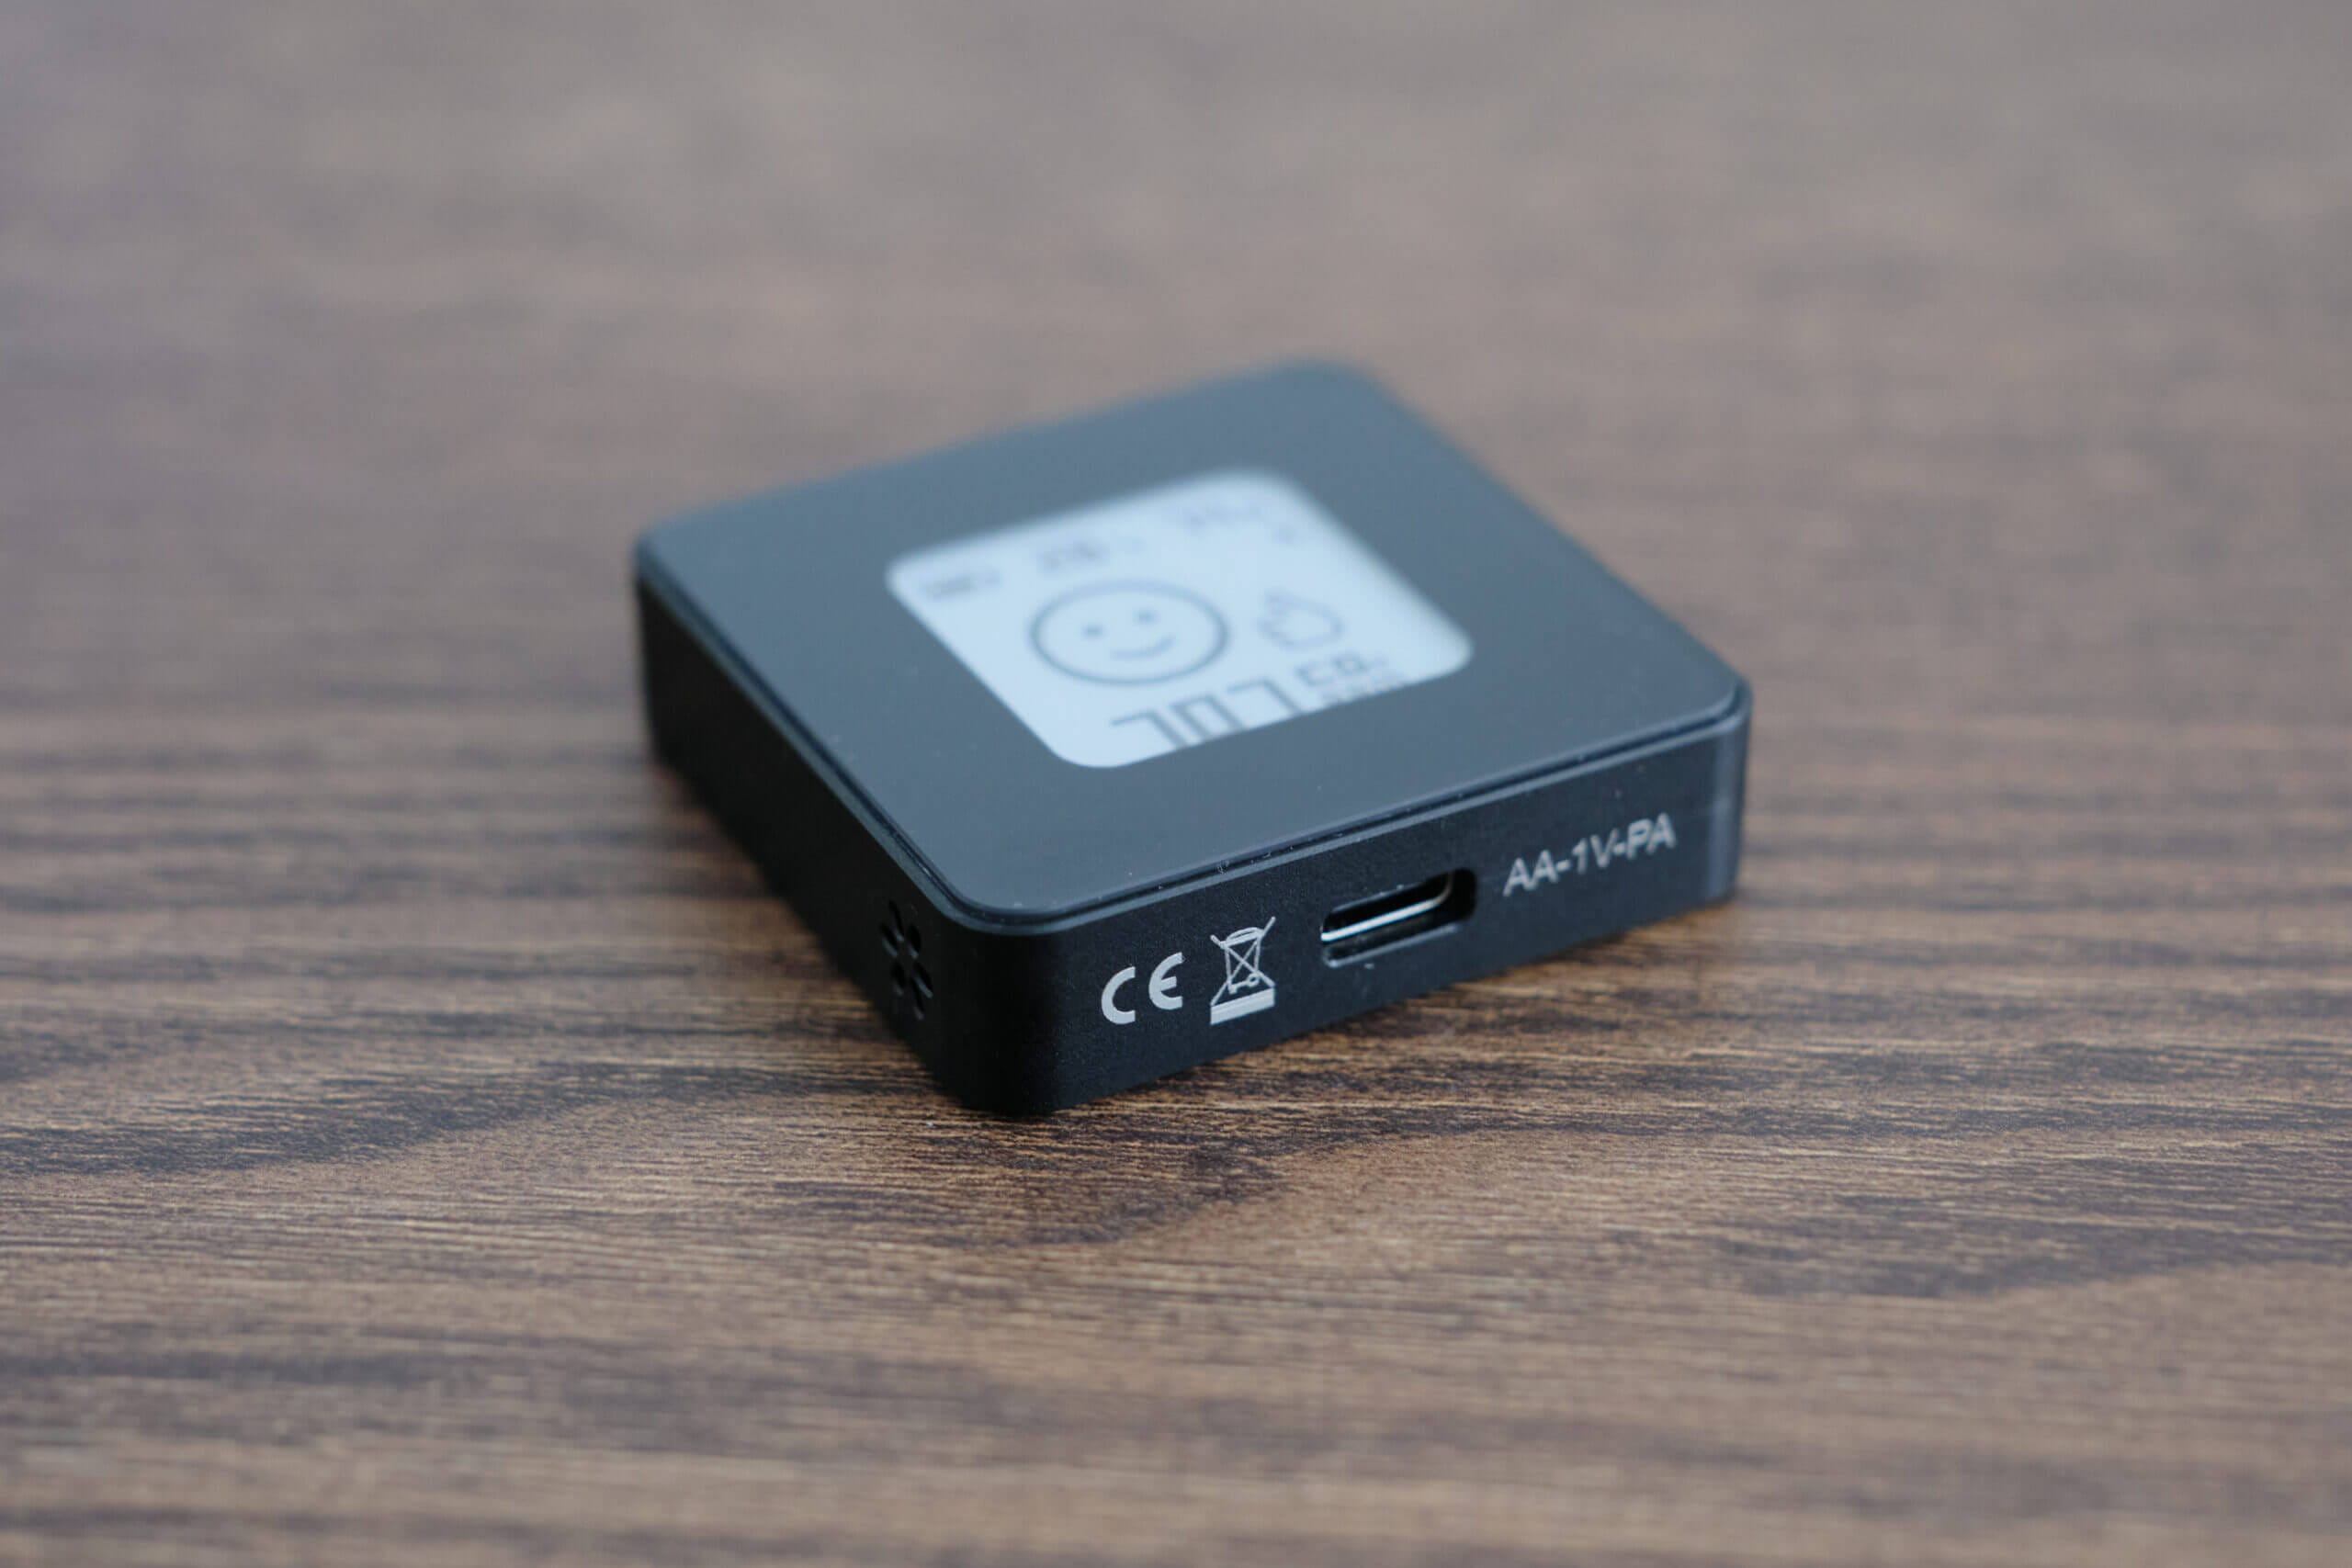
The rest of the device is quite minimal. On the top edge, you will find the ‘AIRVALENT’ branding, but besides this, there is a model number and badges on the bottom. The device is designed to be inconspicuous. Speaking of the bottom of the device, it is here that you will find the Type-C USB port that can be used to charge the device. Once charged, the battery will last 5-30 days, depending on the reading frequency.
On the left and right of the device, you will find two small vents that allow air to enter. As with all carbon dioxide monitors, this means the device isn’t water prior or water-resistant. However, due to limitations in current technology, this is common across all carbon dioxide and air quality monitors. This means you will want to be careful with this device when it comes to water.
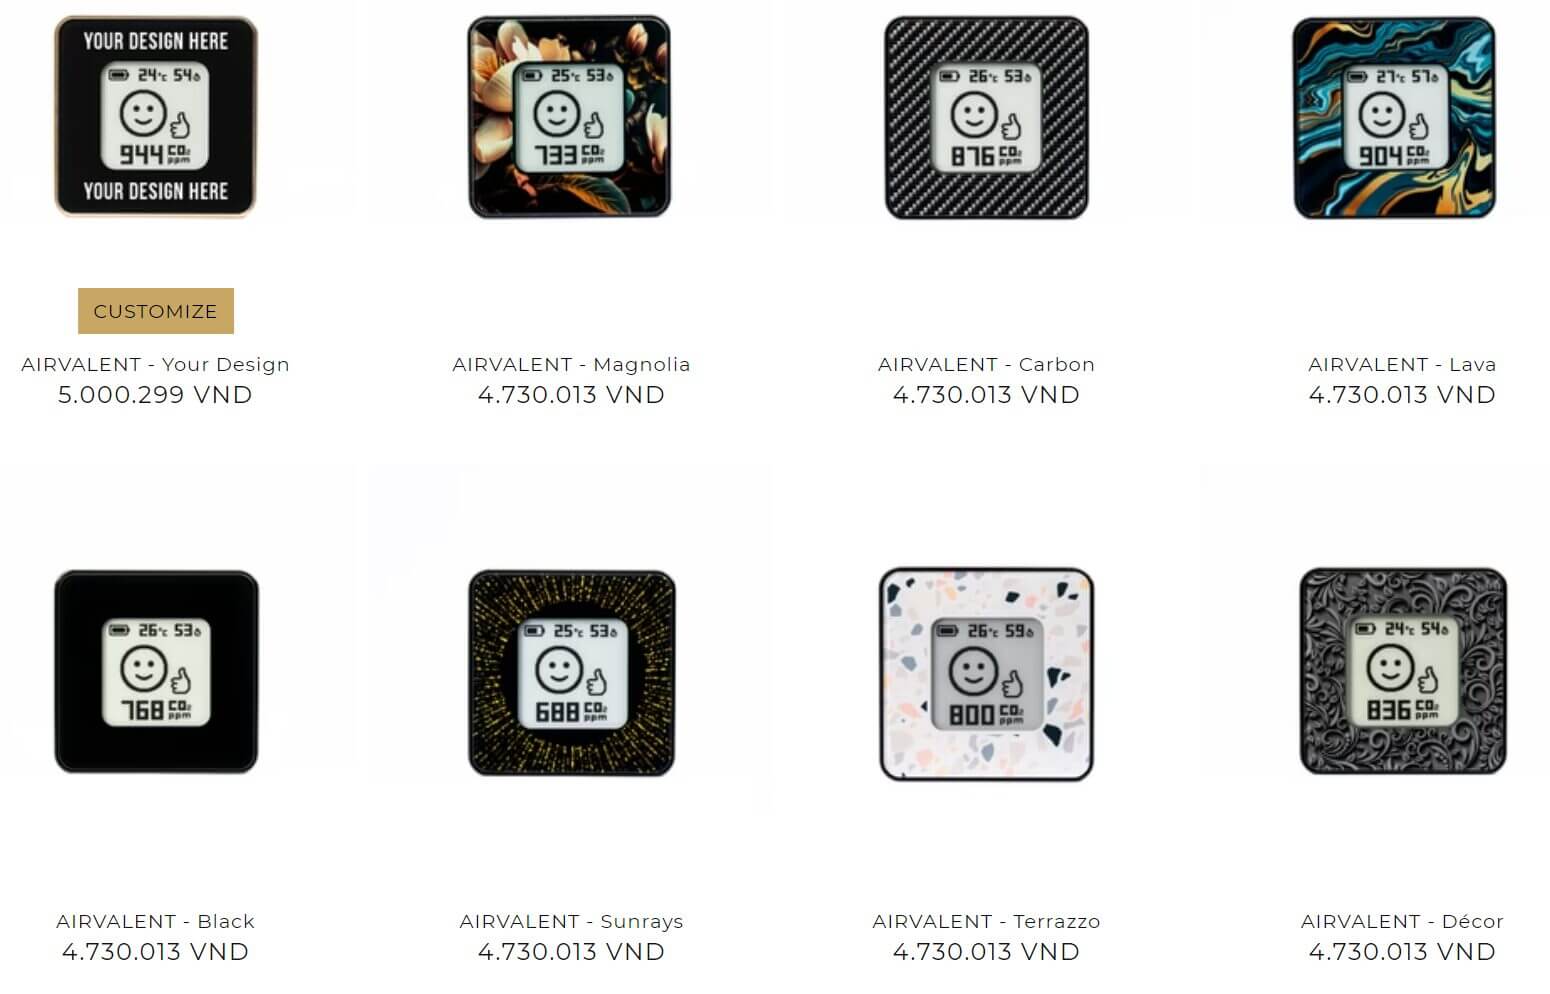
Perhaps the most interesting aspect of the AIRVALENT design is the customisation side of things. When purchasing the monitor from the official website, you can choose three trims for the sides of the device – black, gold and silver. On top of this, you can also pick from a wide range of designs for the front of the device. While I opted for a simple black monitor, I love having this customisation option.
Once you choose your monitor, you can also change the display through the app. This is a second level of customisation that isn’t available on any other carbon dioxide monitors (to my knowledge). The ability to customise both the exterior of the device and the display means you can truly make it your own. This might not be very important for some, but I like adding some flair to an otherwise rather simple tool.
One note: Since I imagine many parents will choose this device to let their children take to school due to its great battery life and small size, it would be good to see some more child-friendly designs. Right now, most of the designs are simple colours, flags, or textures, and I would like to see this concept expanded upon. Of course, there is an option to upload your own designs, but this extra step will likely lead to fewer customers choosing it than if the designs were available by default.
Since there is an option to customise the device, some businesses and other organisations may be interested in the AIRVALENT monitor over the competition as they can brand it themselves. This is quite a unique approach and I haven’t see this on any other monitor.
Connectivity & App

The AIRVALENT CO2 Monitor uses Bluetooth to connect to your Android or iOS device; through this connection, you will get the most out of your monitor. While the monitor can be used without the app, you won’t be able to change the device’s settings, see historical data, update the device, or calibrate the monitor without the app. All of this is to say that while you could technically use the device as a standalone monitor, you will be missing out on so much functionality, and it’s far better to have the device paired with your phone.
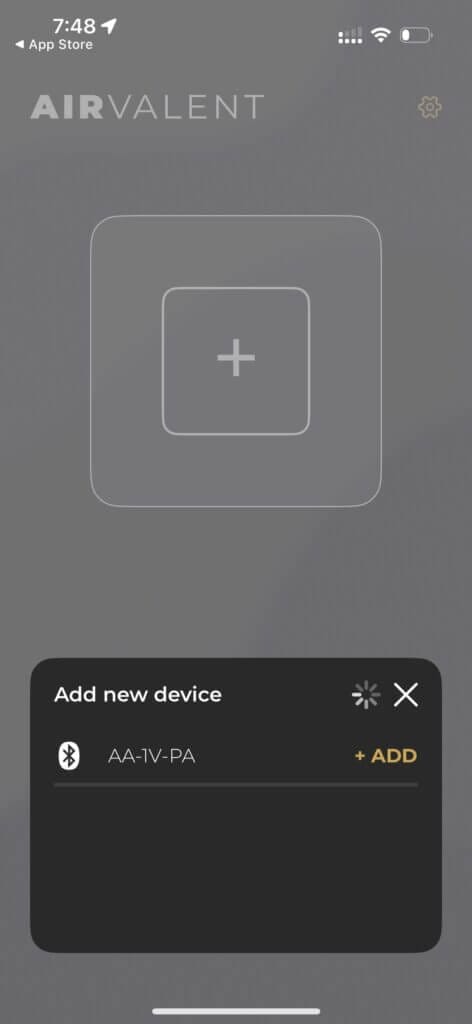
The setup process is very straightforward once you install the AIRVALENT app on your smartphone. If Bluetooth is enabled on your phone, you should see any nearby monitors appear on the app. From here, it’s as simple as selecting the device you want to connect to and then entering the pairing code that will appear on your device. Once you’ve completed this step, that’s it! You’re ready to go.
Before diving into the app’s functions, I want to discuss the Bluetooth connection itself. Since Bluetooth is a short-range data transmission format, you must remain close to the monitor to see data. While this isn’t unlike most portable air quality monitors, this does mean that the AIRVALENT monitor probably isn’t suited to most setups that require multiple CO2 monitors in different rooms. With that said, I found the Bluetooth range of this device to be quite good, and I had no issue sending data between my monitor and smartphone whenever I was in the same room as the device.
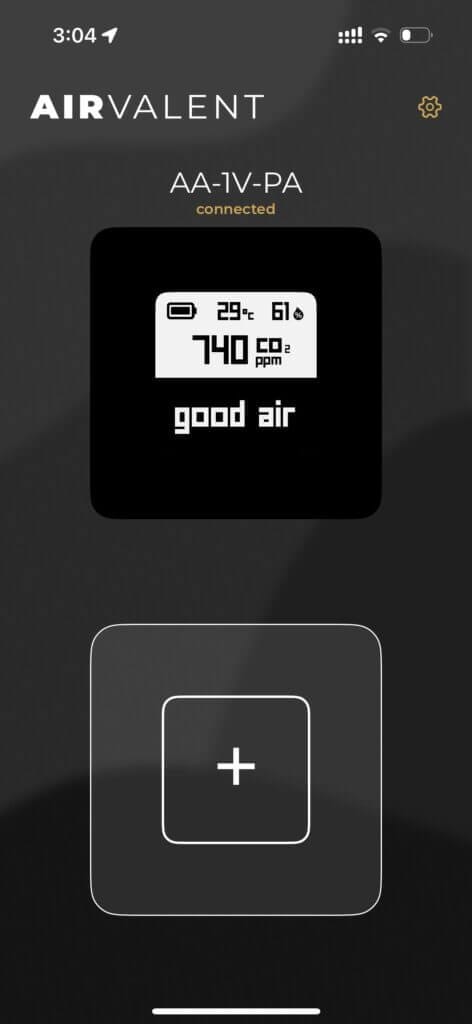
Now, back to the app! After pairing your device, you can choose which monitor you want to access and add more monitors when you first open the app. If you only have one monitor, this screen isn’t important. However, it’s nice to have support for multiple monitors if you plan to purchase multiple or foresee a need for more than one monitor. You can also change basic account-wide settings from the home screen, such as language, temperature unit, and date format.
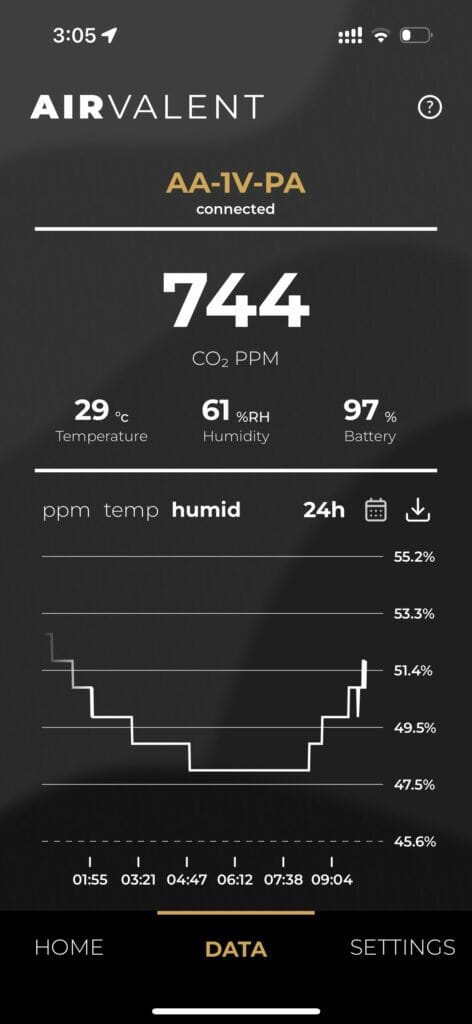
The next tab on the app is the ‘data’ tab, and this is where the fun begins. This screen shows historical data for carbon dioxide concentration (in ppm), temperature, and humidity. Once the unit you want to investigate is selected, you can view the data trends on the graph shown below. You can also zoom in to see smaller fluctuations if needed.
I do think one key feature is missing from these graphs, however, and that is the ability to see the exact CO2 concentration at any given time. Many apps for other carbon dioxide and air quality monitors will give you a cursor to drag over the graph, displaying the exact concentration at any given interval. On the AIRVALENT app, you can zoom in and out to focus on a certain time, but it’s hard to get an exact amount at times as the data range on the y-axis can be large.
Of course, if you do want to analyse your data in a more useful way, you can export it to a spreadsheet via the export function. This will export all data from the device, allowing you to share it using the default share menu on your phone. This is fantastic because you can save the data locally, email it, or even AirDrop it with a nearby device. All in all, I’ve never had any issues exporting data from this app, and it’s a painless process.
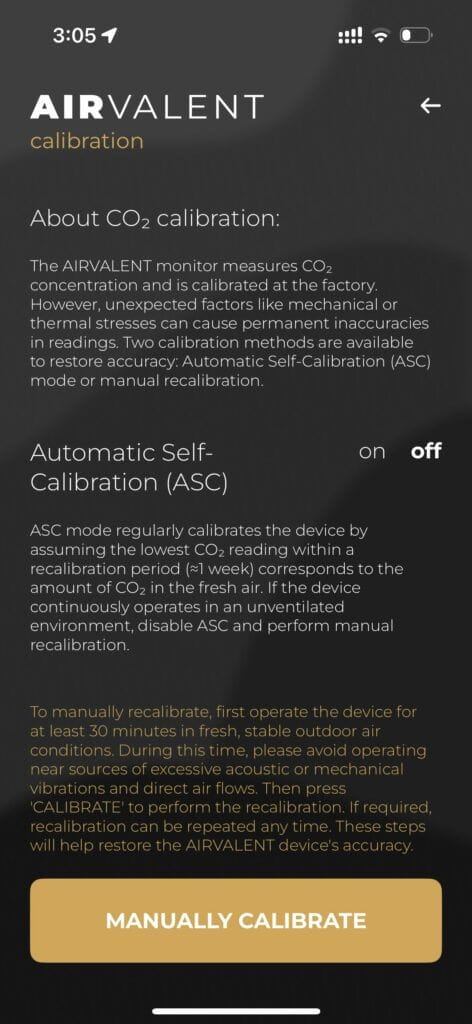
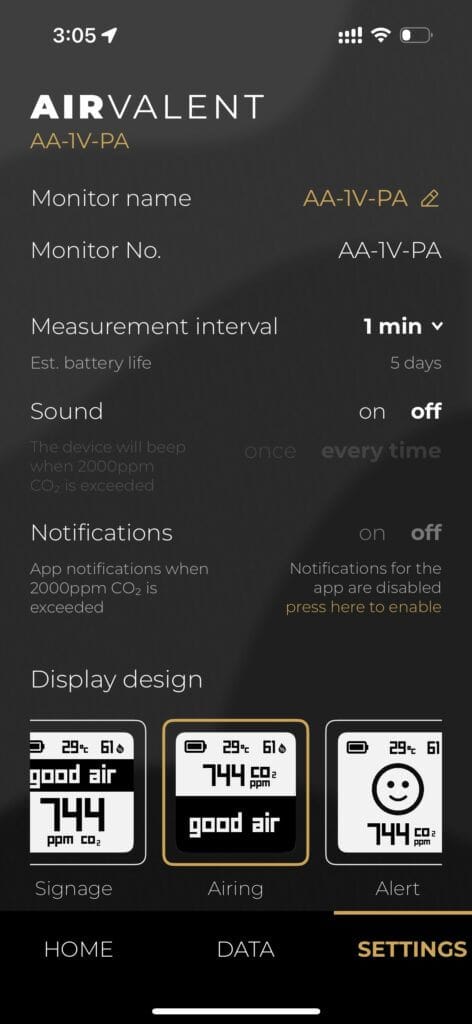
The final tab in the app is the settings tab. This is where you will find every device-related setting, and I find myself coming back to it often. From this screen, you can change the device name, set the measurement interval, turn on or mute sound, enable notifications, change the device’s display design, update the device firmware, and calibrate the monitor.
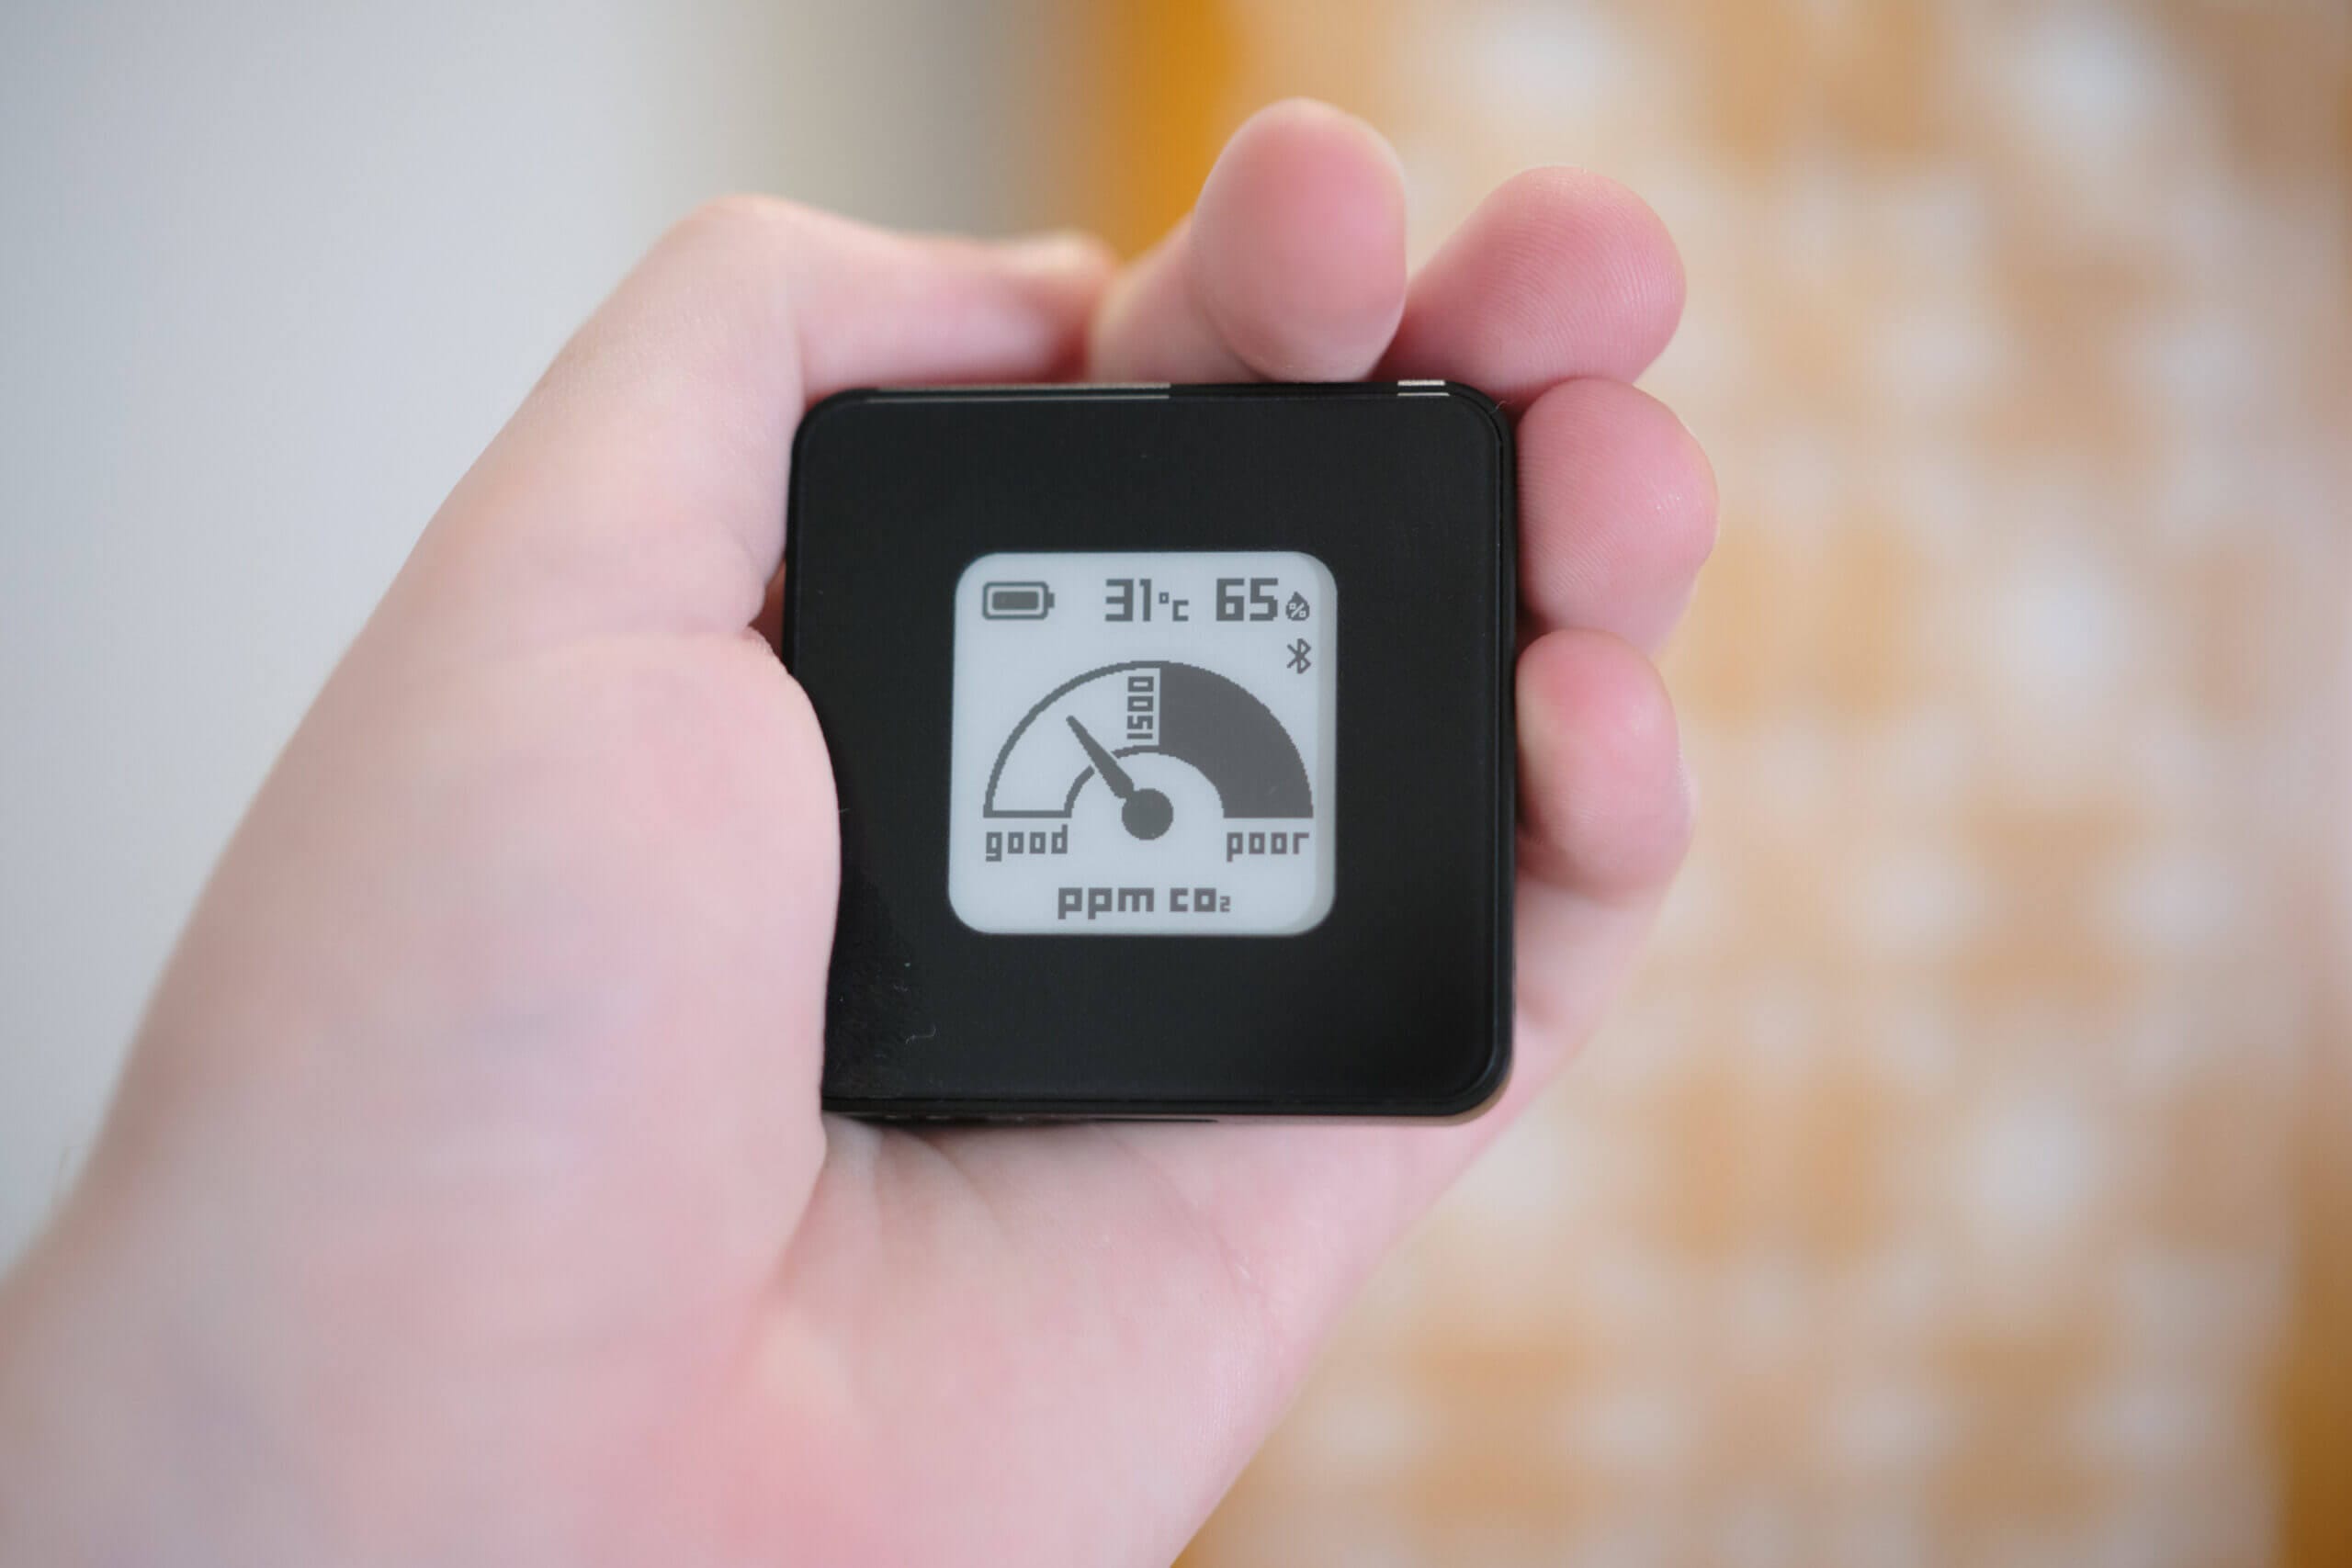
While all of the essential functions that I would expect on a carbon dioxide monitor can be found in this menu, I’ve also been pleasantly surprised by the addition of the display design setting. While I still opt for the default display design, it’s great to have a range of choices, as you can pick a simple design and give it to your child or a friend or family member who doesn’t understand carbon dioxide concentrations. They can easily get the hand of the emoji face and dial screens. Even one screen specifically states the air quality, such as ‘good air’.
Overall, the app is quite simple and has a minimal design, much like the monitor. While I would like to see some improvements to the graph section of the app to make it more readable, it does everything I would expect, and it works flawlessly on my iPhone 14 Pro. I have nothing to complain about in this respect, and it’s an app that does its job well!
Pricing & Competition
The AIRVALENT CO2 Monitor has so far been a solid carbon dioxide monitor, but how does it compare against the competition when it comes to pricing? Well, the AIRVALENT Monitor is expensive and currently costs more than the INKBIRD IAM-T1, and it has pricing similar to the Aranet4. While many aspects of the device reflect this pricing, such as the build quality and size, it is in a difficult spot as it competes directly with the very best monitors from other brands.
If size and ease of use are critical to you, then the AIRVALENT is an excellent choice. As we’ve seen throughout this review, it’s exceptionally small, even when placed next to other monitors I previously considered relatively compact. The device also has an easy-to-use app and a range of displays, which make understanding it easy and intuitive.
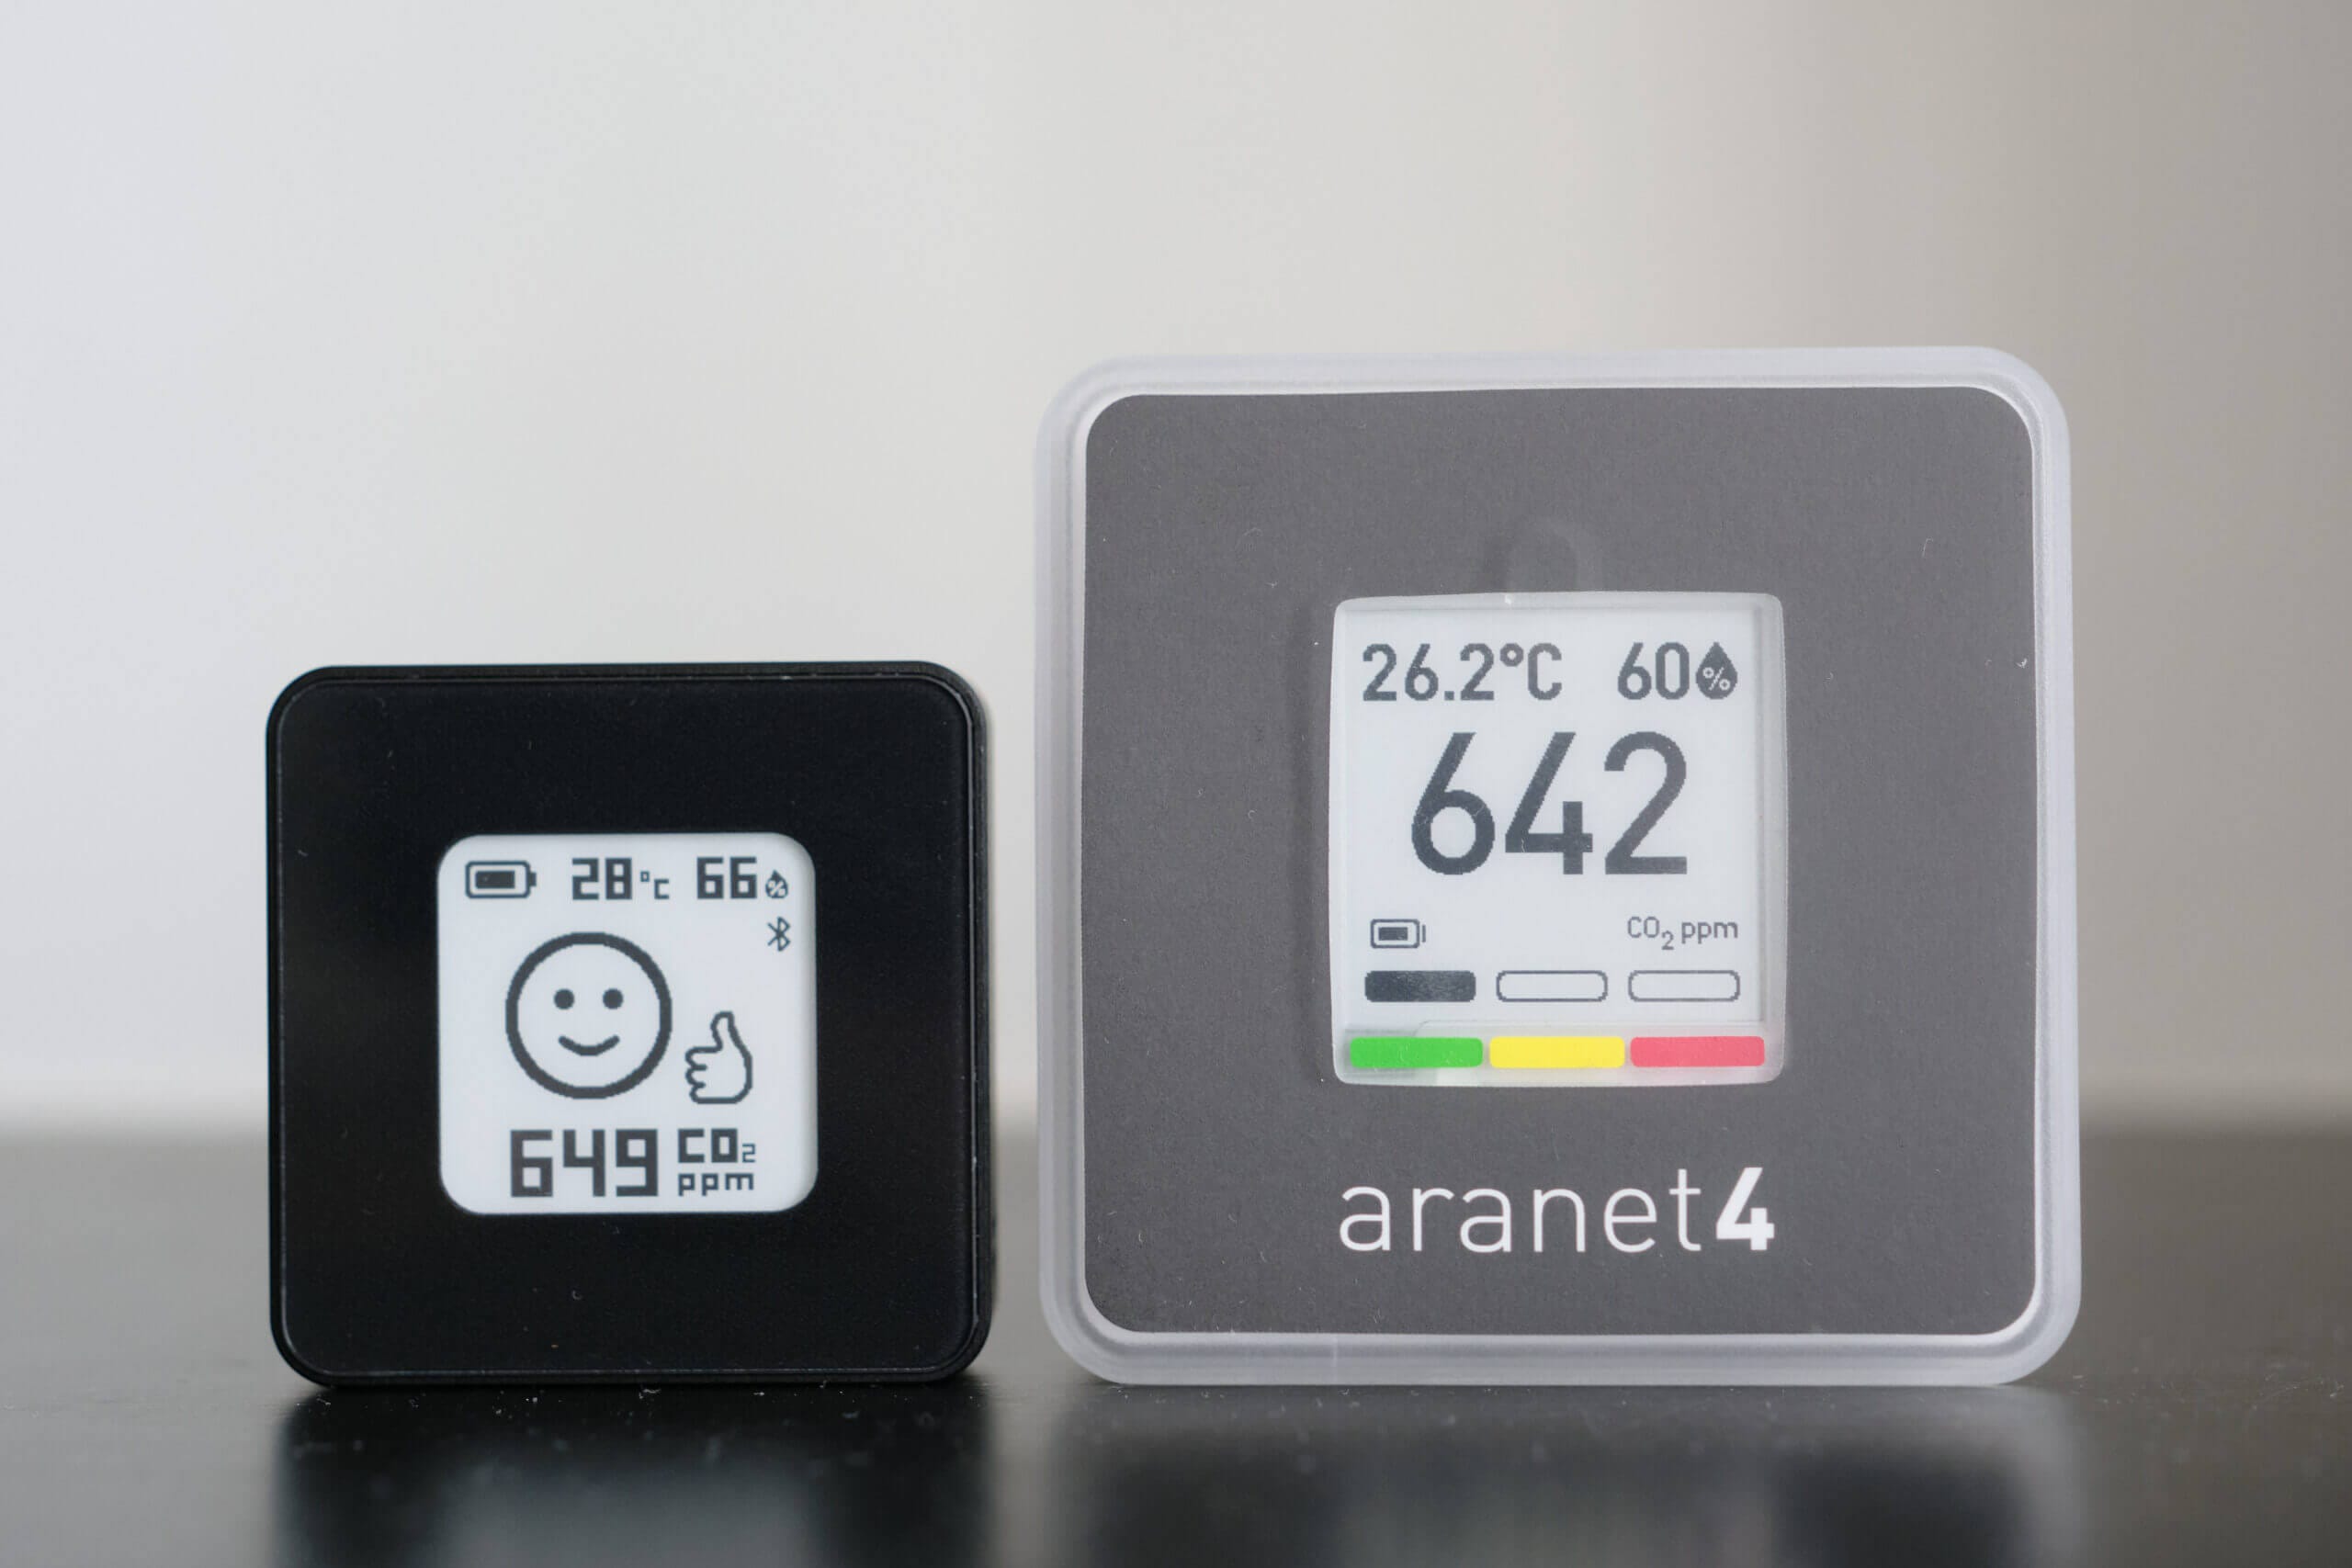
Of course, it’s a solid monitor overall and isn’t just limited to being a great small monitor. That said, if size and ease of use aren’t as important to you, the elephant in the room, the Aranet4 Home, is another excellent choice. While its regular retail price is technically higher than the AIRVALENT monitor, it’s regularly on sale for about $20-$30 less than the AIRVALENT monitor. This makes it a more compelling option for many.
Therefore, I would say this monitor is relatively niche. While I think a wide range of people can use it and find it a handy tool, it’s the people who are looking for a compact and easy-to-use monitor who will be drawn to this product the most. For example, those looking for a monitor that they can give their child to take to school. In that case, this is the perfect monitor because its battery can easily last a few days.
While it’s not important to the device’s performance, it’s worth noting that I do think this is the highest-quality feeling CO2 monitor I’ve used. The build quality feels top-notch, and this certainly feels like a premium device. I’ve also been told this device is made in Latvia without parts ordered from China which is another reason the price of this monitor is a bit higher. However, this likely won’t justify the added price for the monitor over other fantastic monitors that can be found at more affordable prices.
Conclusion – Is the AIRVALENT Monitor Worth It?
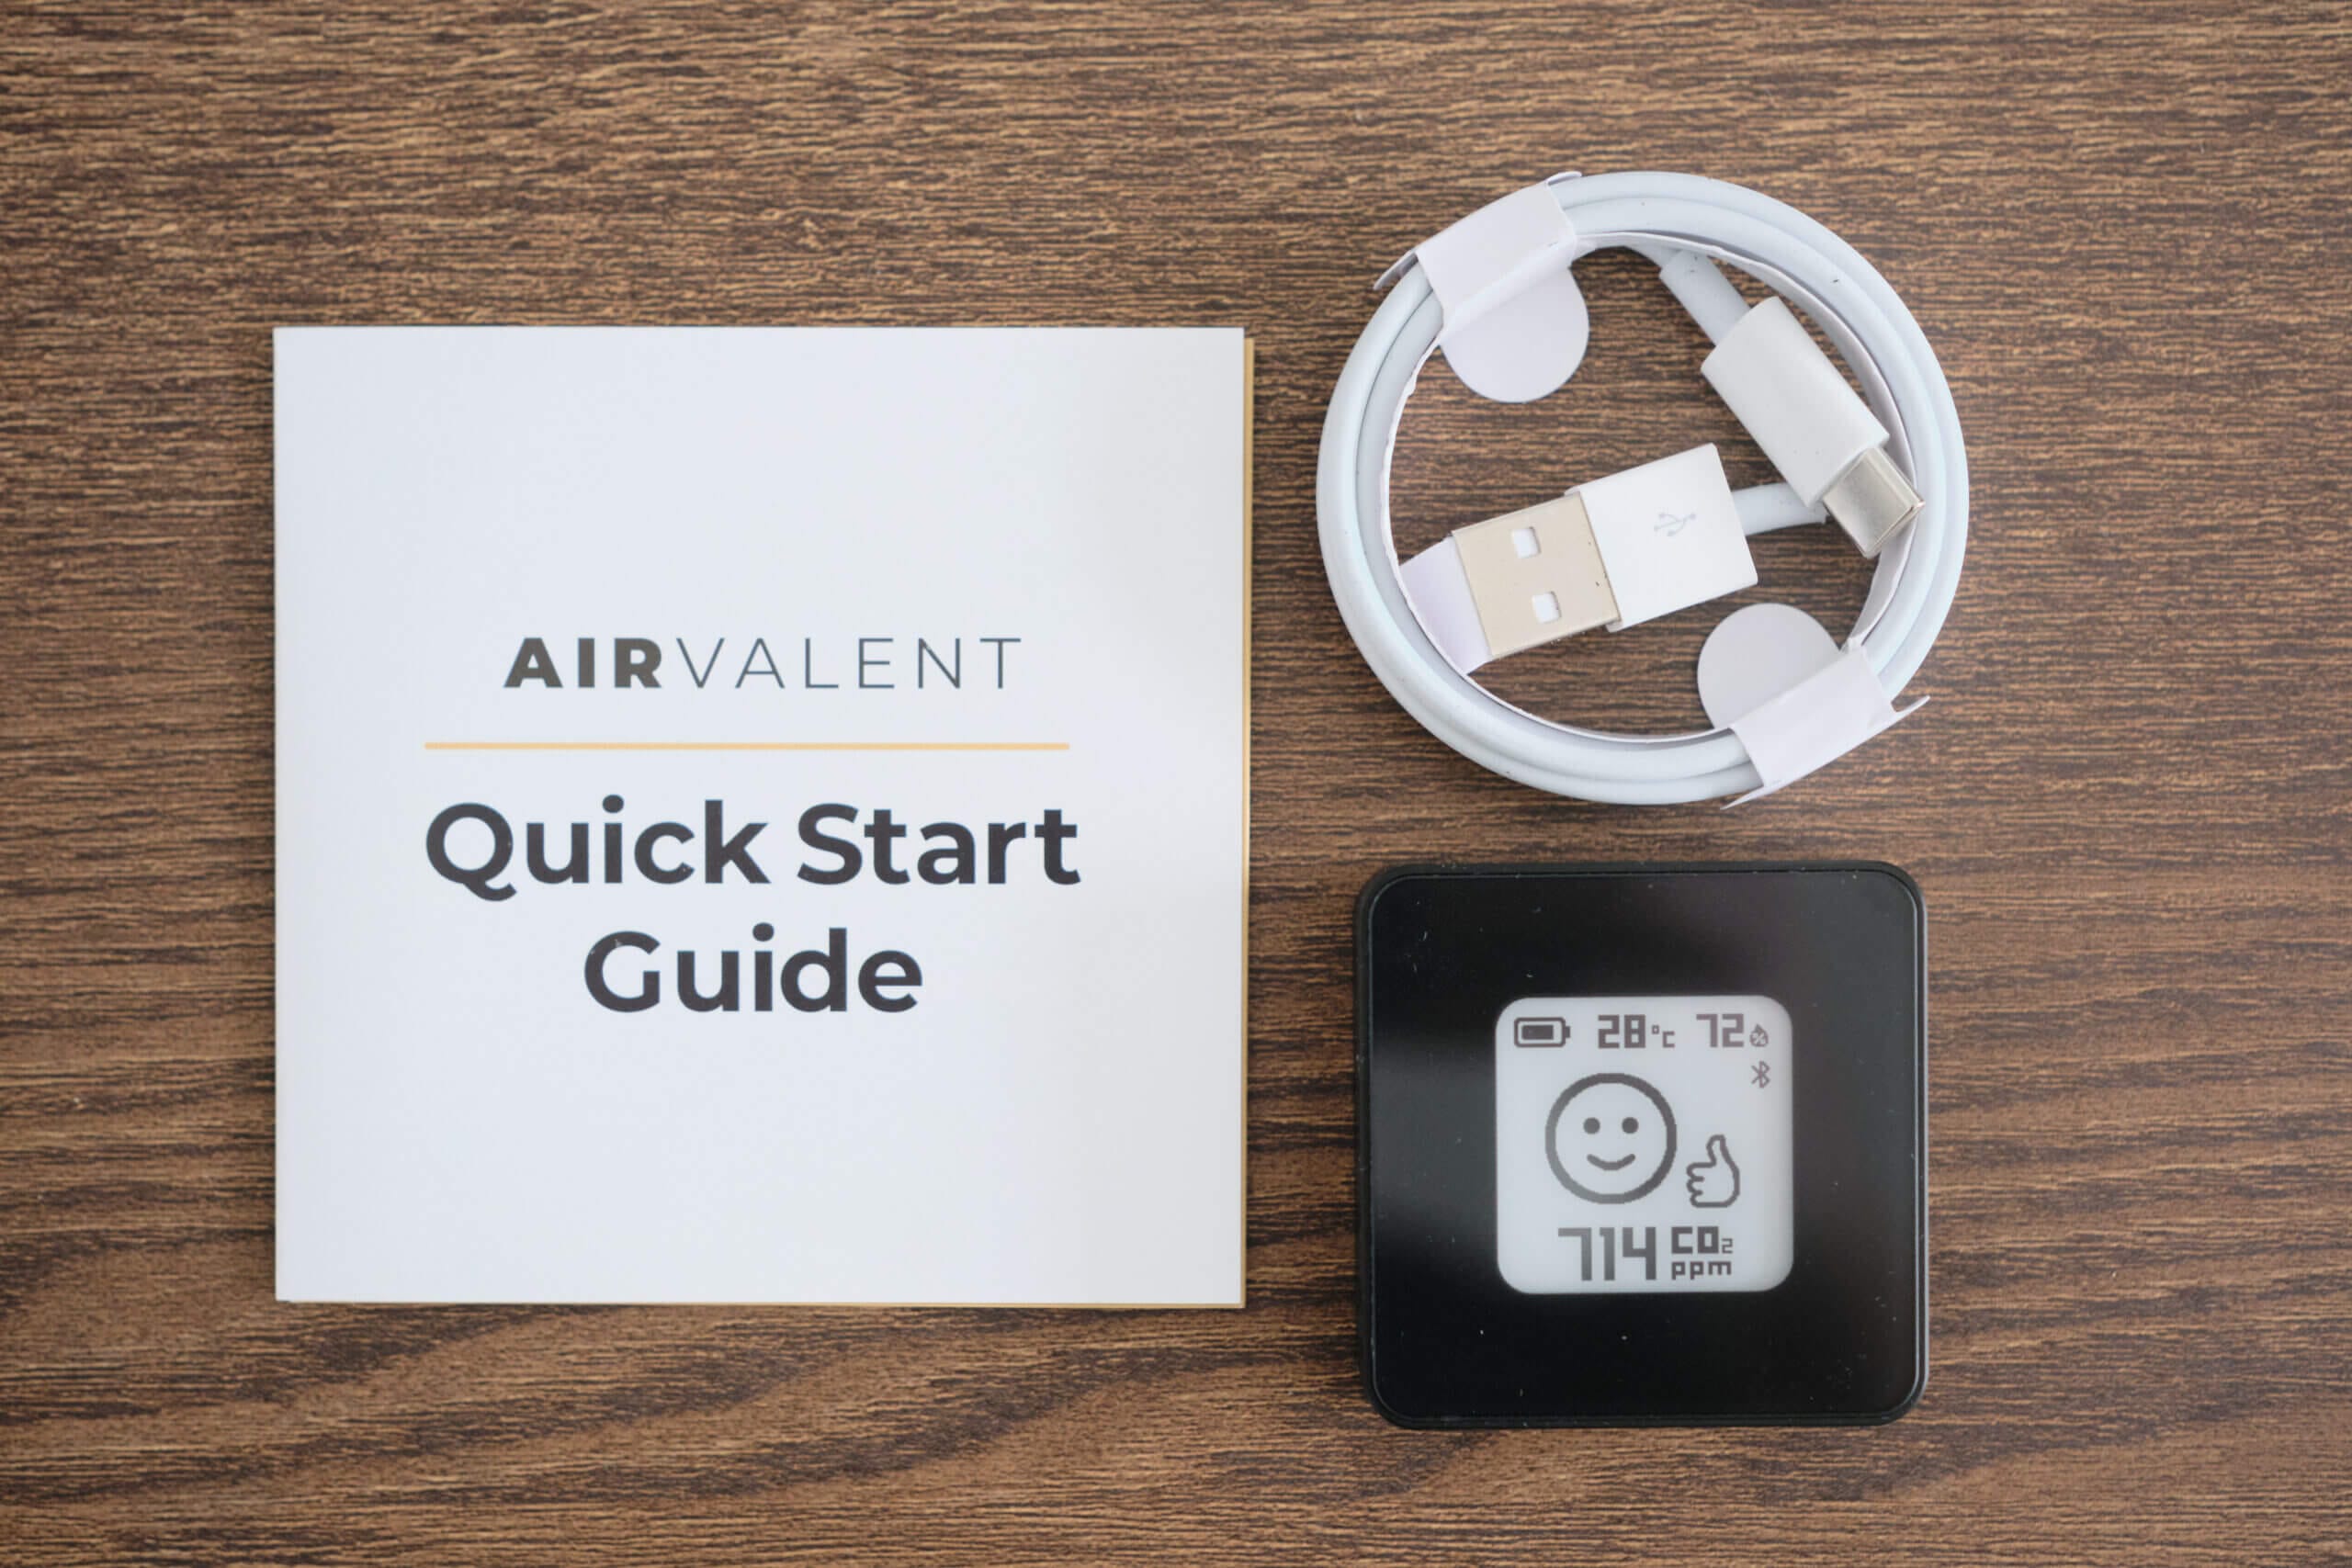
That leads us to the conclusion of this article – is the AIRVALENT Monitor worth purchasing? Well, that depends on how you plan to use it. It’s a fantastic all-around monitor, but there’s no denying it is quite pricey compared to other carbon dioxide monitors. If you are in the subset of customers who need a compact yet accurate monitor with decent battery life, this is the best option on the market right now. However, for more general customers, there is a lot of competition.
Overall, the device is well-built, and I’m impressed by its accuracy, considering how tiny the monitor is. This does come with the caveat that I mentioned earlier, though: you will want to be careful when using this monitor in hot environments and when calibrating it, as temperature and airflow will impact performance in these two cases. When it comes to the temperatures this device will likely be exposed to (10-30 degrees Celsius), it performs quite well and provides readings similar to traditional NDIR sensors, so whether or not this is an issue is up to your individual use case.
The monitor’s battery life is also impressive for such a small device. Only being able to get around 8 hours out of devices such as the Vitalight Mini CO2 Detector has always bothered me, as I hate charging even more devices daily. However, having a five-day battery life (minimum) means that this device can be used for a full working week before it needs to be charged. This is so much more convenient, and I’m happy they fit such battery life in this device.
The device’s connectivity is also a strong point, but I would like to see some improvements to the app’s graphing capabilities. Luckily, this is all updateable, and I hope to see some changes here soon. Since the device itself already had an update ready when I received it, I imagine the company will be good with updates for both the device and the app. Only time will tell, though!
Do you have any questions or experiences about the device that you want to share? Please feel free to jump over to the community forums and ask away!
What Sensor Does the AIRVALENT Monitor Use?
It uses the Sensirion SCD41.
What Does the AIRVALENT Monitor Measure?
It measures CO2 PPM, temperature, and relative humidity.
What Alternatives Are There to the AIRVALENT Monitor?
There are many! Check out this article on the best carbon dioxide monitors for more information.
Where Can I Buy the AIRVALENT Monitor?
You can purchase it from the AIRVALENT website.
Is the AIRVALENT Monitor Accurate?
Yes. However, you should be careful at higher temperatures (> 30 degrees Celsius), as accuracy will decrease.
Have Questions or Comments?
Join the discussion on the BreatheSafeAir Community Forum. Ask any questions you have about air quality or adjacent topics and get quick answers!
AirValent CO2 Monitor
The AirValent CO2 Monitor is the smallest all in one carbon dioxide monitor on the market. However, does it make tradeoffs to achieve this small size?
Product Brand: AirValent
3.5
Pros
- Exceptionally small
- Accurate in most conditions
- Great build quality
- Good battery life
- Type-C charging
- Customisation available both with the monitor look and the display design
- Manual and Automatic calibration
- Updateable via the app
Cons
- Expensive
- Loses accuracy at high temperatures
- Calibration sometimes requires multiple attempts to complete properly