When you check the air quality, you likely open your favourite air quality app or website and check the pollutant levels measured by nearby monitors. While governments or organisations often run these monitors, you may not realise that many platforms also resort to data gathered by locals invested in monitoring their air quality.
Ever since I started this website, I’ve wanted to be able to contribute to some of the fantastic community-driven air pollution data platforms out there. However, until I received my AirGradient Open Air a few months ago, I never had access to the hardware needed to provide data to these platforms.

Community-driven air quality map from OpenAQ.
But let’s take a few steps back. Why are these platforms even needed? After all, there are many governmental and organisational platforms out there that already provide much-needed air quality data to locals. Well, yes and no.
While it’s true that there are many governmental monitors in some regions and countries, air pollution is often very localised. Unless you have a monitor in close proximity to your house, you aren’t likely getting the full story with these monitors. Furthermore, you may have no coverage if you live in a more isolated area.
There is also a range of companies that use air quality maps that are not open and that try to commercialise the data and force users to use only the brand’s monitors. While some of these networks are extensive, they aren’t open, and the data is still commercialised by the company in question. An example of this is the AirVisual map and outdoor air quality monitor. Not only do you need to purchase the brand’s monitor to use these networks, but they’re often very pricey.
That’s why community-driven air quality platforms such as OpenAQ are so important. These platforms allow users to submit data from their low-cost albeit accurate monitors to create a crowd-sourced, community-driven air quality map. The best part? It doesn’t matter what monitor you have.
Of course, to submit data to these platforms, you will still need an outdoor air quality monitor that provides accurate data. That’s where the monitor that I am reviewing today comes in – the AirGradient Open Air is an outdoor air quality monitor from AirGradient that can either be set up to contribute to these maps to provide much-needed information to locals and neighbours or used as a private air quality monitor just by you.
Whichever way you choose to use it, the AirGradient Open Air is a promising outdoor air quality monitor that will allow you to view hyper-localised data on your air quality conditions and allow you to make educated decisions based on this. In this review, I want to take a closer look at the Open Air and find out whether it’s a monitor you should consider.
Subscribe to BreatheSafeAir
We spend 90% of our time indoors. Make sure the air you breathe indoors is healthy.
This post contains affiliate links. For more information, please refer to my affiliate disclaimer.
Information on this blog is for informational purposes only. Readers are encouraged to confirm the information herein with other sources. Furthermore, this information is not intended to replace medical advice from professionals. This website assumes no responsibility for the accuracy of the information, which is subject to change without notice.
Which AirGradient Open Air Is Best?

When choosing an AirGradient Open Air model, there are a few considerations to remember because a range of different variants are available. While this makes it a little confusing (AirGradient is currently in a transition phase, and the offering will soon be more consistent), I am a fan of having choices, and with four options available, it allows the user to choose the model that exactly fits their needs and budget. While a few options are available, each is open-source regarding software and hardware.
There are four Open Air variants because there are three models (the O-1PP, O-1PPT and O-1PST) with different sensor arrangements, and the O-1PST can be purchased either as a DIY kit or fully assembled. This means that, in total, there are four different AirGradient Open Air variants, each with different advantages and disadvantages. I will discuss how the DIY kits differ from the assembled kits soon, but let’s first look at how the O-1PP, O-1PPT and O-1PST models differ:
| Model | Sensors | Price |
|---|---|---|
| O-1PP | 2x particulate matter (PM1.0, PM2.5 & PM10), temperature, humidity | DIY = $95 |
| O-1PPT | 2x particulate matter (PM1.0, PM2.5 & PM10), TVOC/NOx, temperature, humidity | Fully assembled = $170 |
| O-1PST | 1x particulate matter (PM1.0, PM2.5 & PM10), CO2, TVOC/NOx, temperature, humidity | DIY = $120 Fully assembled = $195 |
As you can see, these three models are substantially different and have very different pricing. I received the O-1PP (with two particulate sensors in a DIY configuration) for this review. This monitor is significantly cheaper than the fully assembled O-1PPT and O-1PST models, which have extra sensors. Since the O-1PP, O-1PPT and O-1PST are very different regarding the sensors they house, you will need to decide which monitor is more suited to your needs.
If measuring particles (PM1.0, PM2.5, and PM10) is your primary concern, the O-1PP and O-1PPT will likely have slightly better accuracy because they house two separate PMS5003T particle sensors and report the average particle count measured across the two. While the O-1PP and O-1PPT have two particle sensors, the O-1PPT adds a sensor that measures VOCs and NOx. On the other hand, the O-1PST removes one particle sensor and replaces it with a CO2 sensor (the O-1PST also has a sensor for measuring VOCs/NOx).
It is worth mentioning that while the O-1PP and O-1PPT should, in theory, provide slightly more accurate PM1.0, PM2.5 and PM10 readings, the PMS5003T (the particle sensor used in all Open Air models) is quite accurate and shows low inter-device variability. This means the extra particle sensor used in the O-1PP and O-1PP1 isn’t necessarily needed (which is why AirGradient chose to update the Open Air with the O-1PST, which is the most recent update). While I will discuss the benefit of the extra sensor more in the ‘accuracy & sensors’ portion of this article, you should get accurate measurements with either monitor.
Unfortunately, here is where it begins to get a bit confusing – while the O-1PST is available both as a DIY kit or a fully-assembled monitor, the O-1PP is available only as a DIY kit, and the O-1PPT is available only as a fully-assembled monitor. A bit confusing? I agree. However, many price ranges and needs are covered between these four variants, so I can forgive this somewhat confusing naming scheme. Let’s look at the advantages of the DIY kit compared to purchasing a fully assembled monitor.
| Monitor | Models | Advantages |
|---|---|---|
| AirGradient Open Air DIY Kit | O-1PP O-1PST | – Cheaper – Assembly gives you an understanding of how the device works |
| AirGradient Open Air Fully-Assembled | O-1PPT O-1PST | – Certified CE, FCC, RoHS, REACH – Comes with a 12-month warranty – Tested in-house for accuracy, and a test report is provided |
Having four choices may seem like a lot, but I think the decision isn’t as overwhelming as it may seem. Firstly, you must decide whether to opt for the O-1PP, O-1PPT or O-1PST model. For an outdoor air quality monitor, a particulate matter sensor is the most critical and having a second one for redundancy and extra accuracy is a nice benefit. However, having CO2, VOC, and NOx sensors can give you a much more in-depth overview of your local air quality, which is especially important if you live near a highway, busy roads, or industrial facilities that emit chemical gases. These extra sensors will also be a benefit if you live in a wildfire-prone area that often receives toxic wildfire smoke.
Of course, there is also the price difference between the two models. Opting for the DIY O-1PP with two particle sensors saves you a significant amount of money, and this is the only monitor that comes in under $100. This considerable discount might sway you towards the particle-only AirGradient Open Air. With that said, $25 extra is not much to get the added ability to measure CO2, VOC and NOx that comes with the DIY O-1PST.
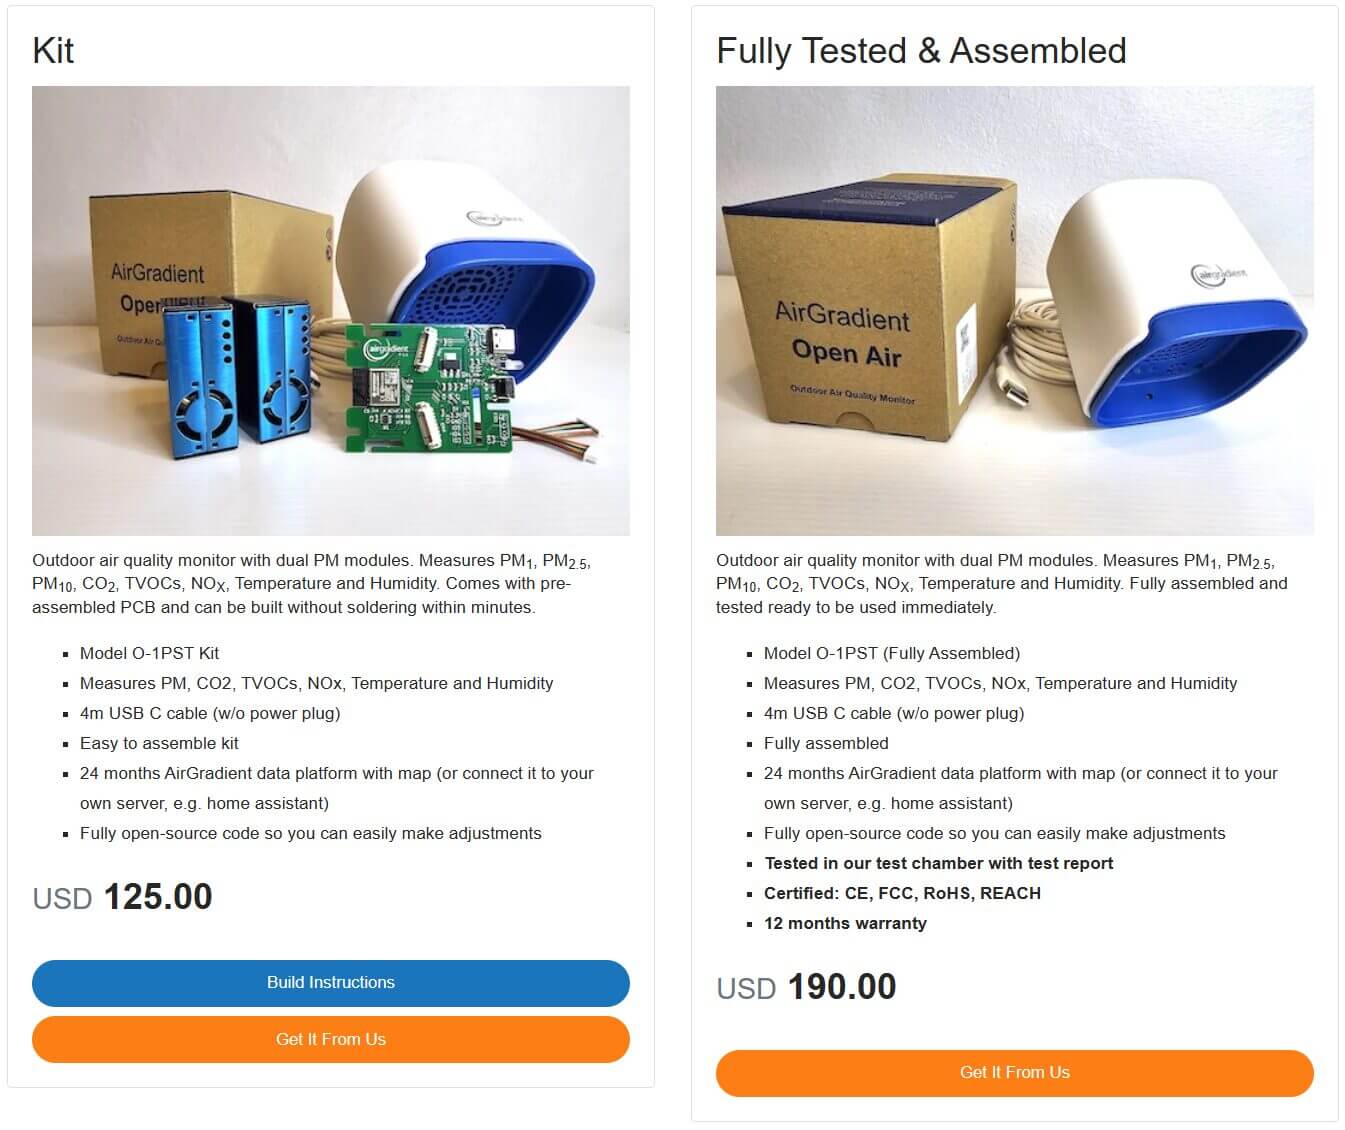
Left: DIY O-1PST. Right: Fully assembled O-1PST.
Once you’ve decided on which model of Open Air is better suited to your needs and wants, you will need to decide between getting a DIY or fully assembled kit. If you’re worried about the DIY aspect of the DIY kit, you don’t need to be. The kit is straightforward to assemble, and everything required to complete the monitor is included in the box. No soldering is required, meaning that assembly takes only 10-15 minutes, and there is minimal risk of damaging any components. In the next section, I will discuss the DIY process so you can see how simple it is!
The fully assembled kits of the O-1PPT and O-1PST also have some advantages over the DIY variants. While they are significantly more costly, this is because not only do they come fully assembled with a 12-month warranty, but they are also certified by/for CE, FCC, RoHS, and REACH. Even further, AirGradient will test the monitor’s accuracy before shipping it to you, and it will come with an accuracy report from the company itself.
That brings us to the conclusion of this section – which Open Air kit should you purchase? Unfortunately, I can’t answer this as it comes down to your priorities. If you consider the extra sensors on the O-1PPT and O-1PST essential, opting for those models instead of the PM-only O-1PP is a no-brainer. If it matters, I would probably choose the O-1PST myself if I had to decide.
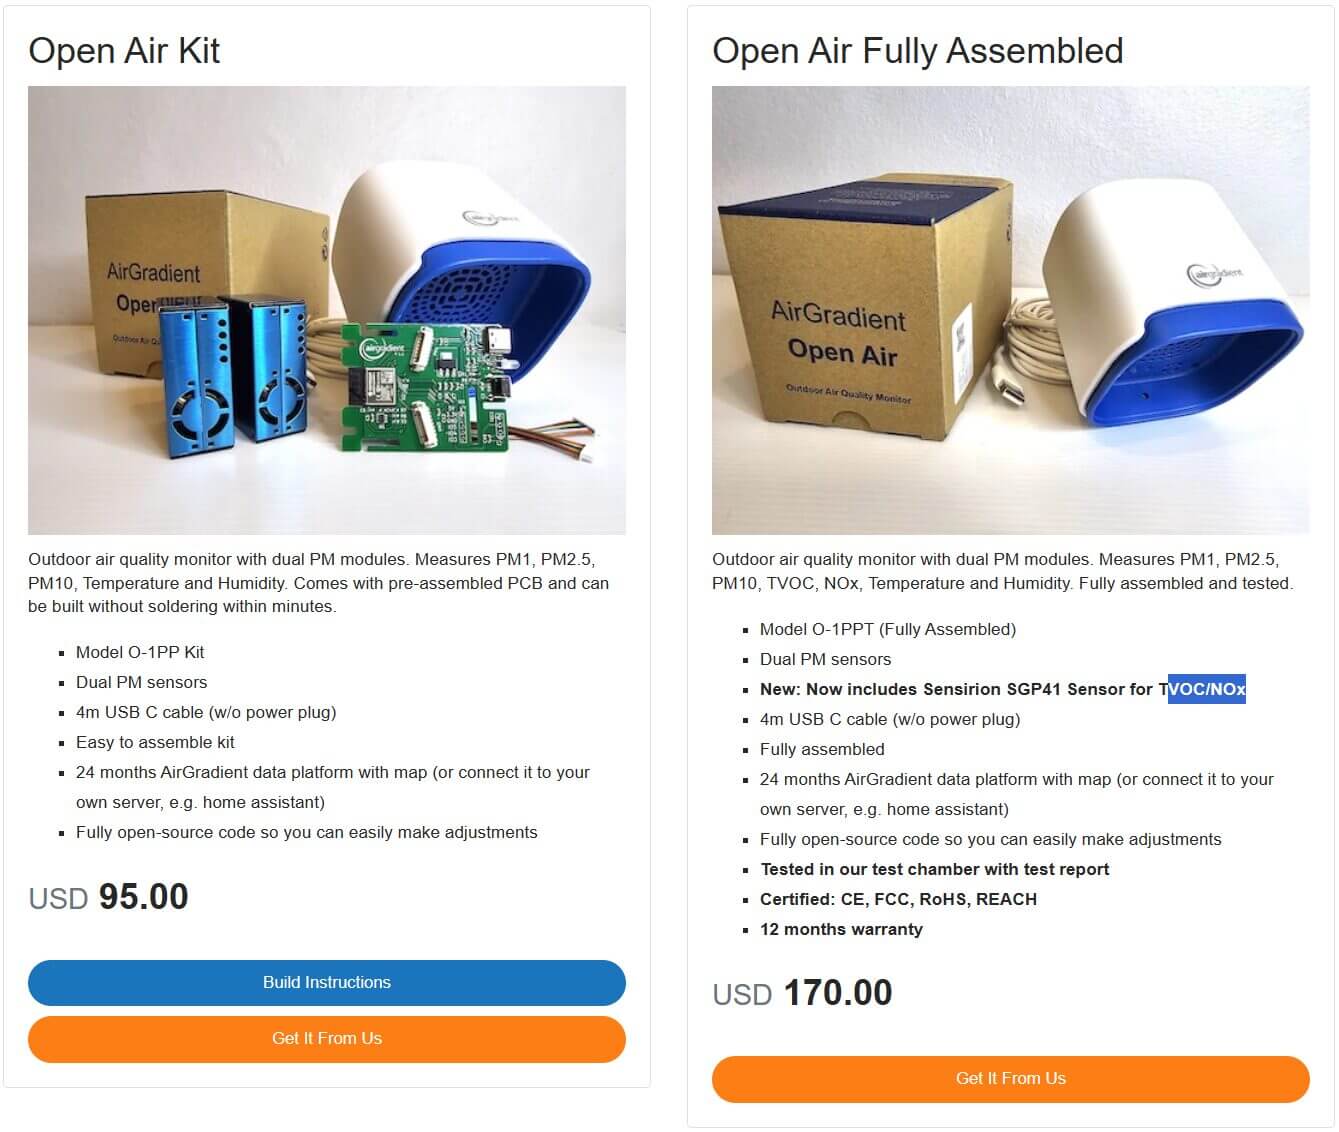
Left: DIY O-1PP. Right: Fully assembled O-1PPT.
Now, for the DIY kit or to purchase the fully assembled monitor? Well, if saving money is the most important thing, the DIY kit of either the O-1PP or O-1PST is the easy choice. Honestly, I would recommend the DIY kits for most people simply because they’re much more affordable and come in at 1/3 the price of comparable monitors.
However, if you absolutely need the certifications (even though you’re getting the same end product), the fully assembled options might be the way for you. That said, I don’t think the warranty should be a compelling reason to get the assembled option, as each component can already be individually replaced, meaning fixing the monitor yourself should be relatively straightforward.
As a last comment for this section, I will say this. The DIY kits for the O-1PP and O-1PST are affordable and vastly cheaper than most other air quality monitors with the same or similar quality sensors. The monitors are competitively priced even if you opt for the fully assembled O-1PPT or O-1PST. For example, Purple Air is one of the most popular competitors on the market, and its outdoor air quality monitors with two particle sensors (PMS6003) go for $299 despite the sensors being very similarly priced and having almost identical accuracy.
DIY Process
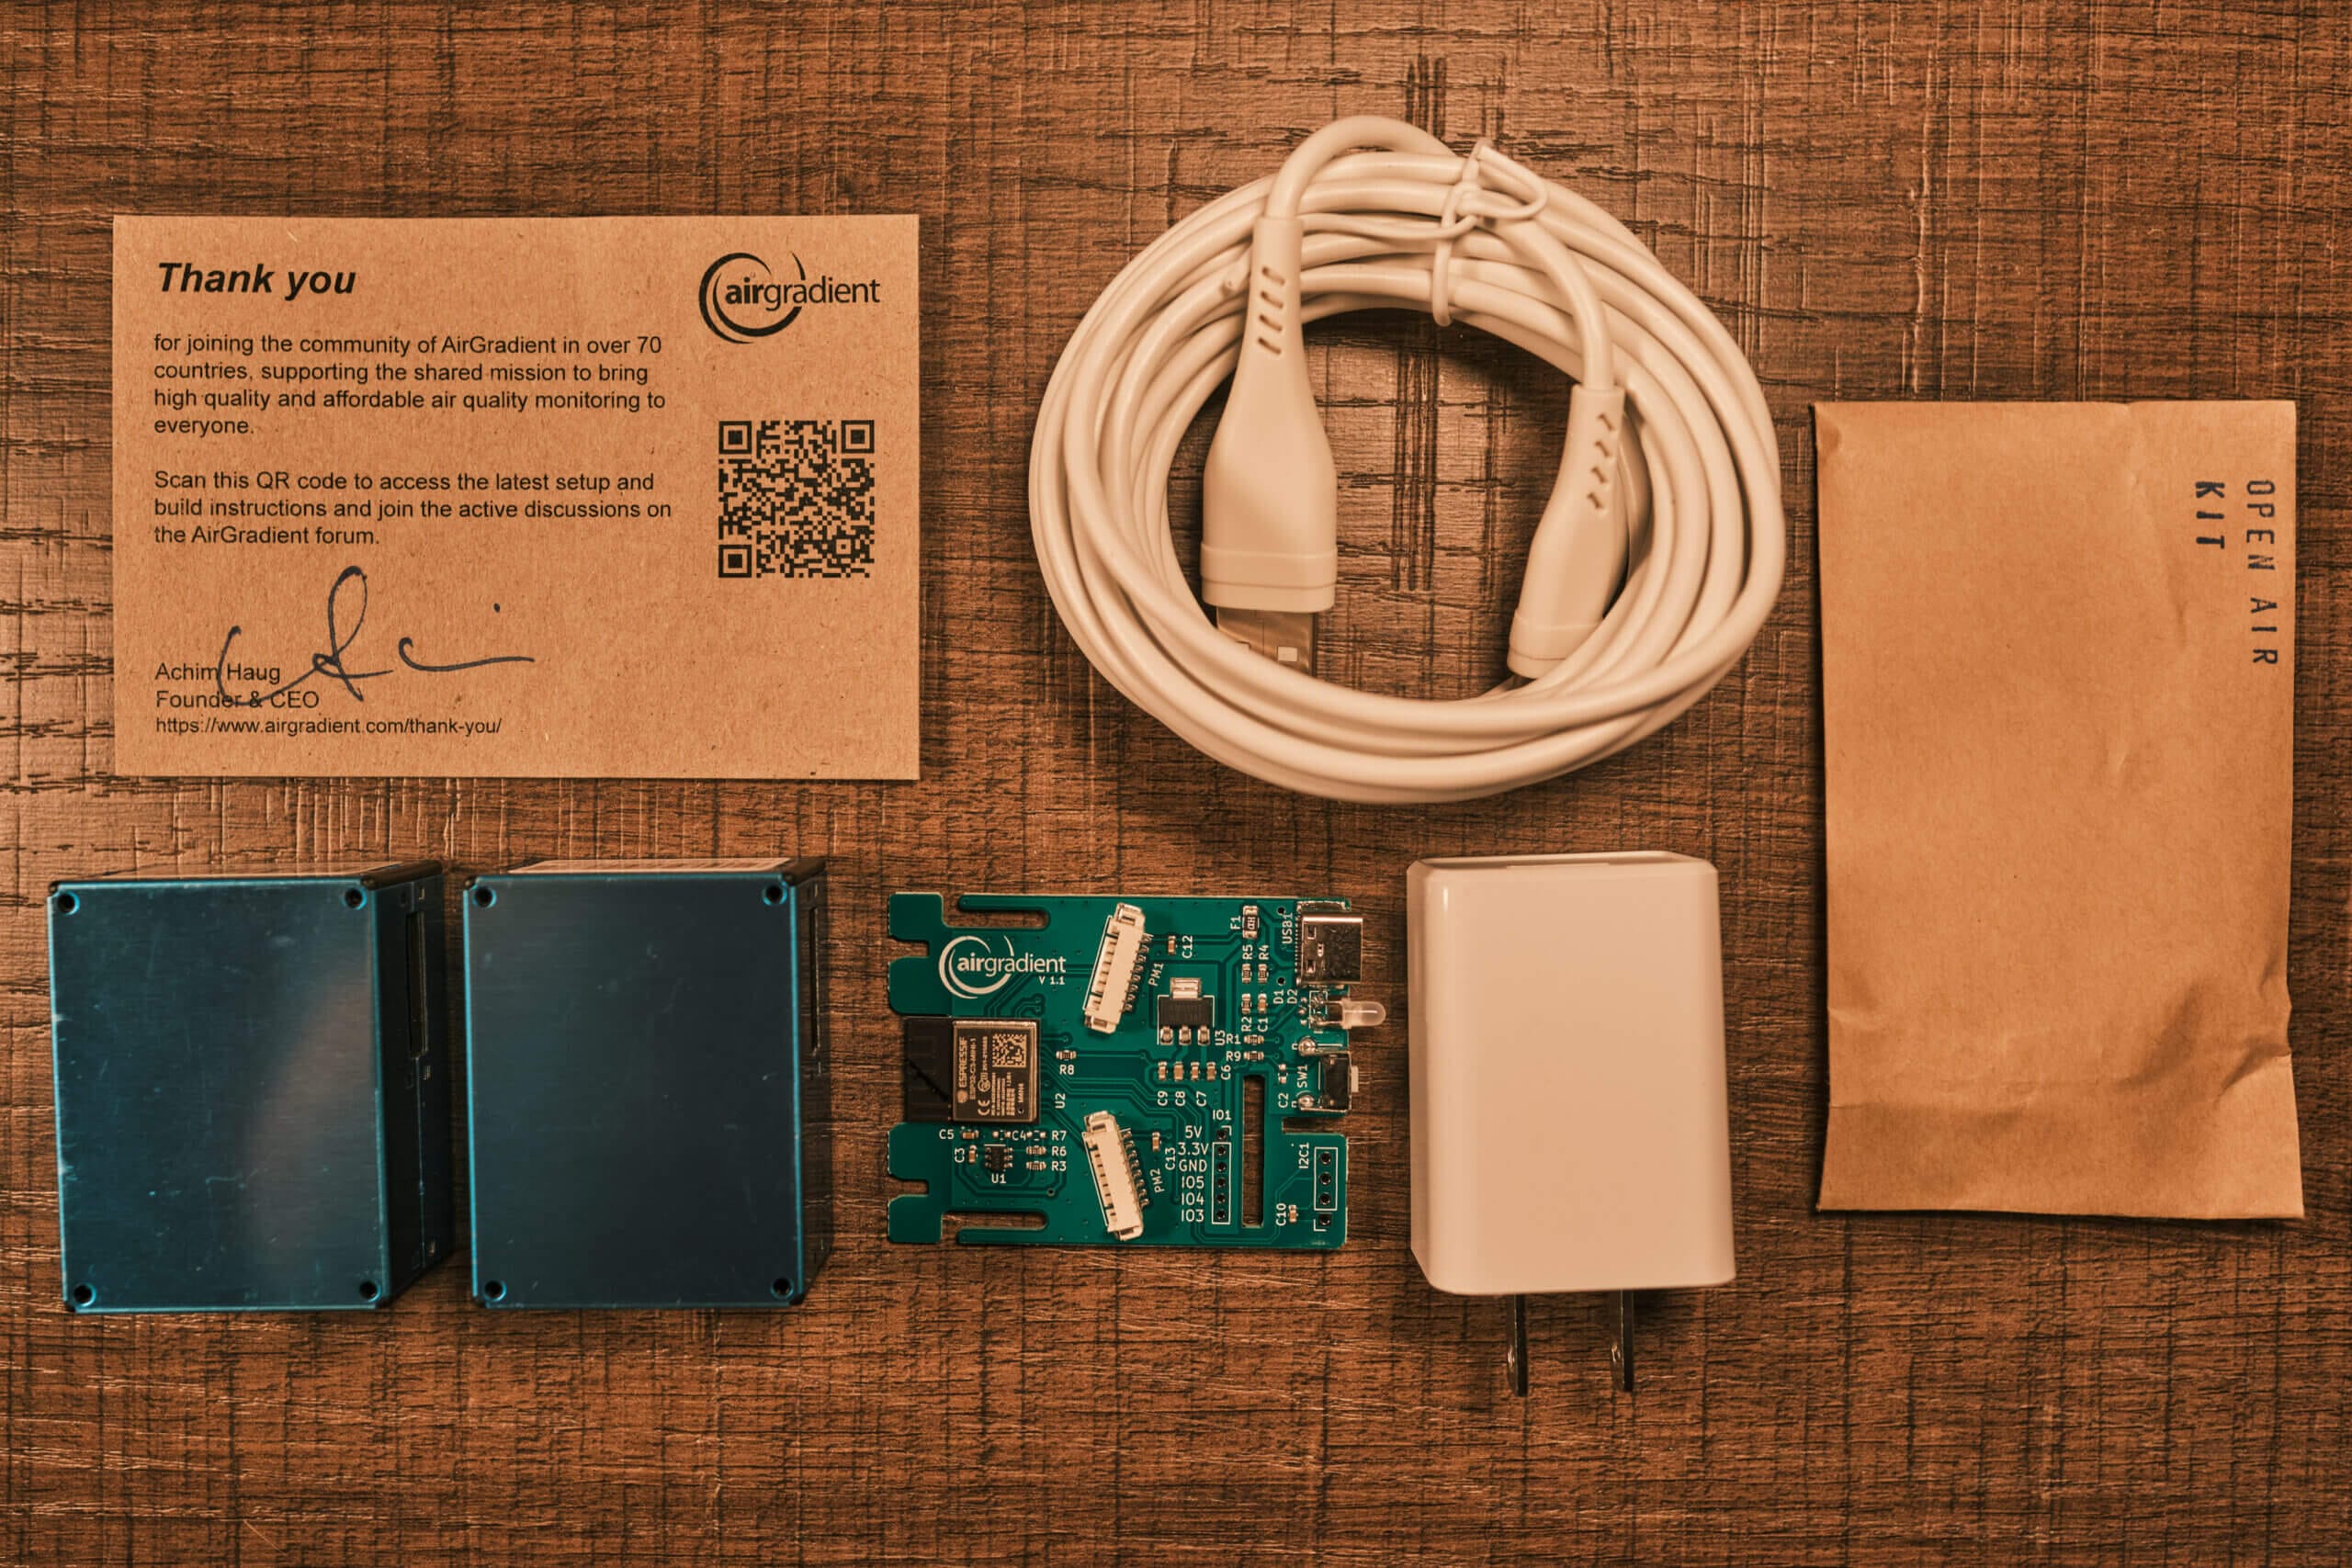
Before going any further, I want to emphasise this point once more: the AirGradient Open Air DIY kit is very easy to put together, and you shouldn’t be scared about being over your head with this kit – regardless of your electronic knowledge. There is no soldering required, and all you’ll need to do is plug in some components and screw the case closed. It’s very straightforward!
The image above shows what you will find when you open the box along with a QR code (included on the ‘thank you’ card), which will show you the assembly instructions, you will find two particulate sensors, a motherboard, a USB cable, a USB adapter and a screw kit. Inside this bag of screws, you will find a screwdriver, a couple of cables (which connect the mainboard to the sensors) and the required screws.
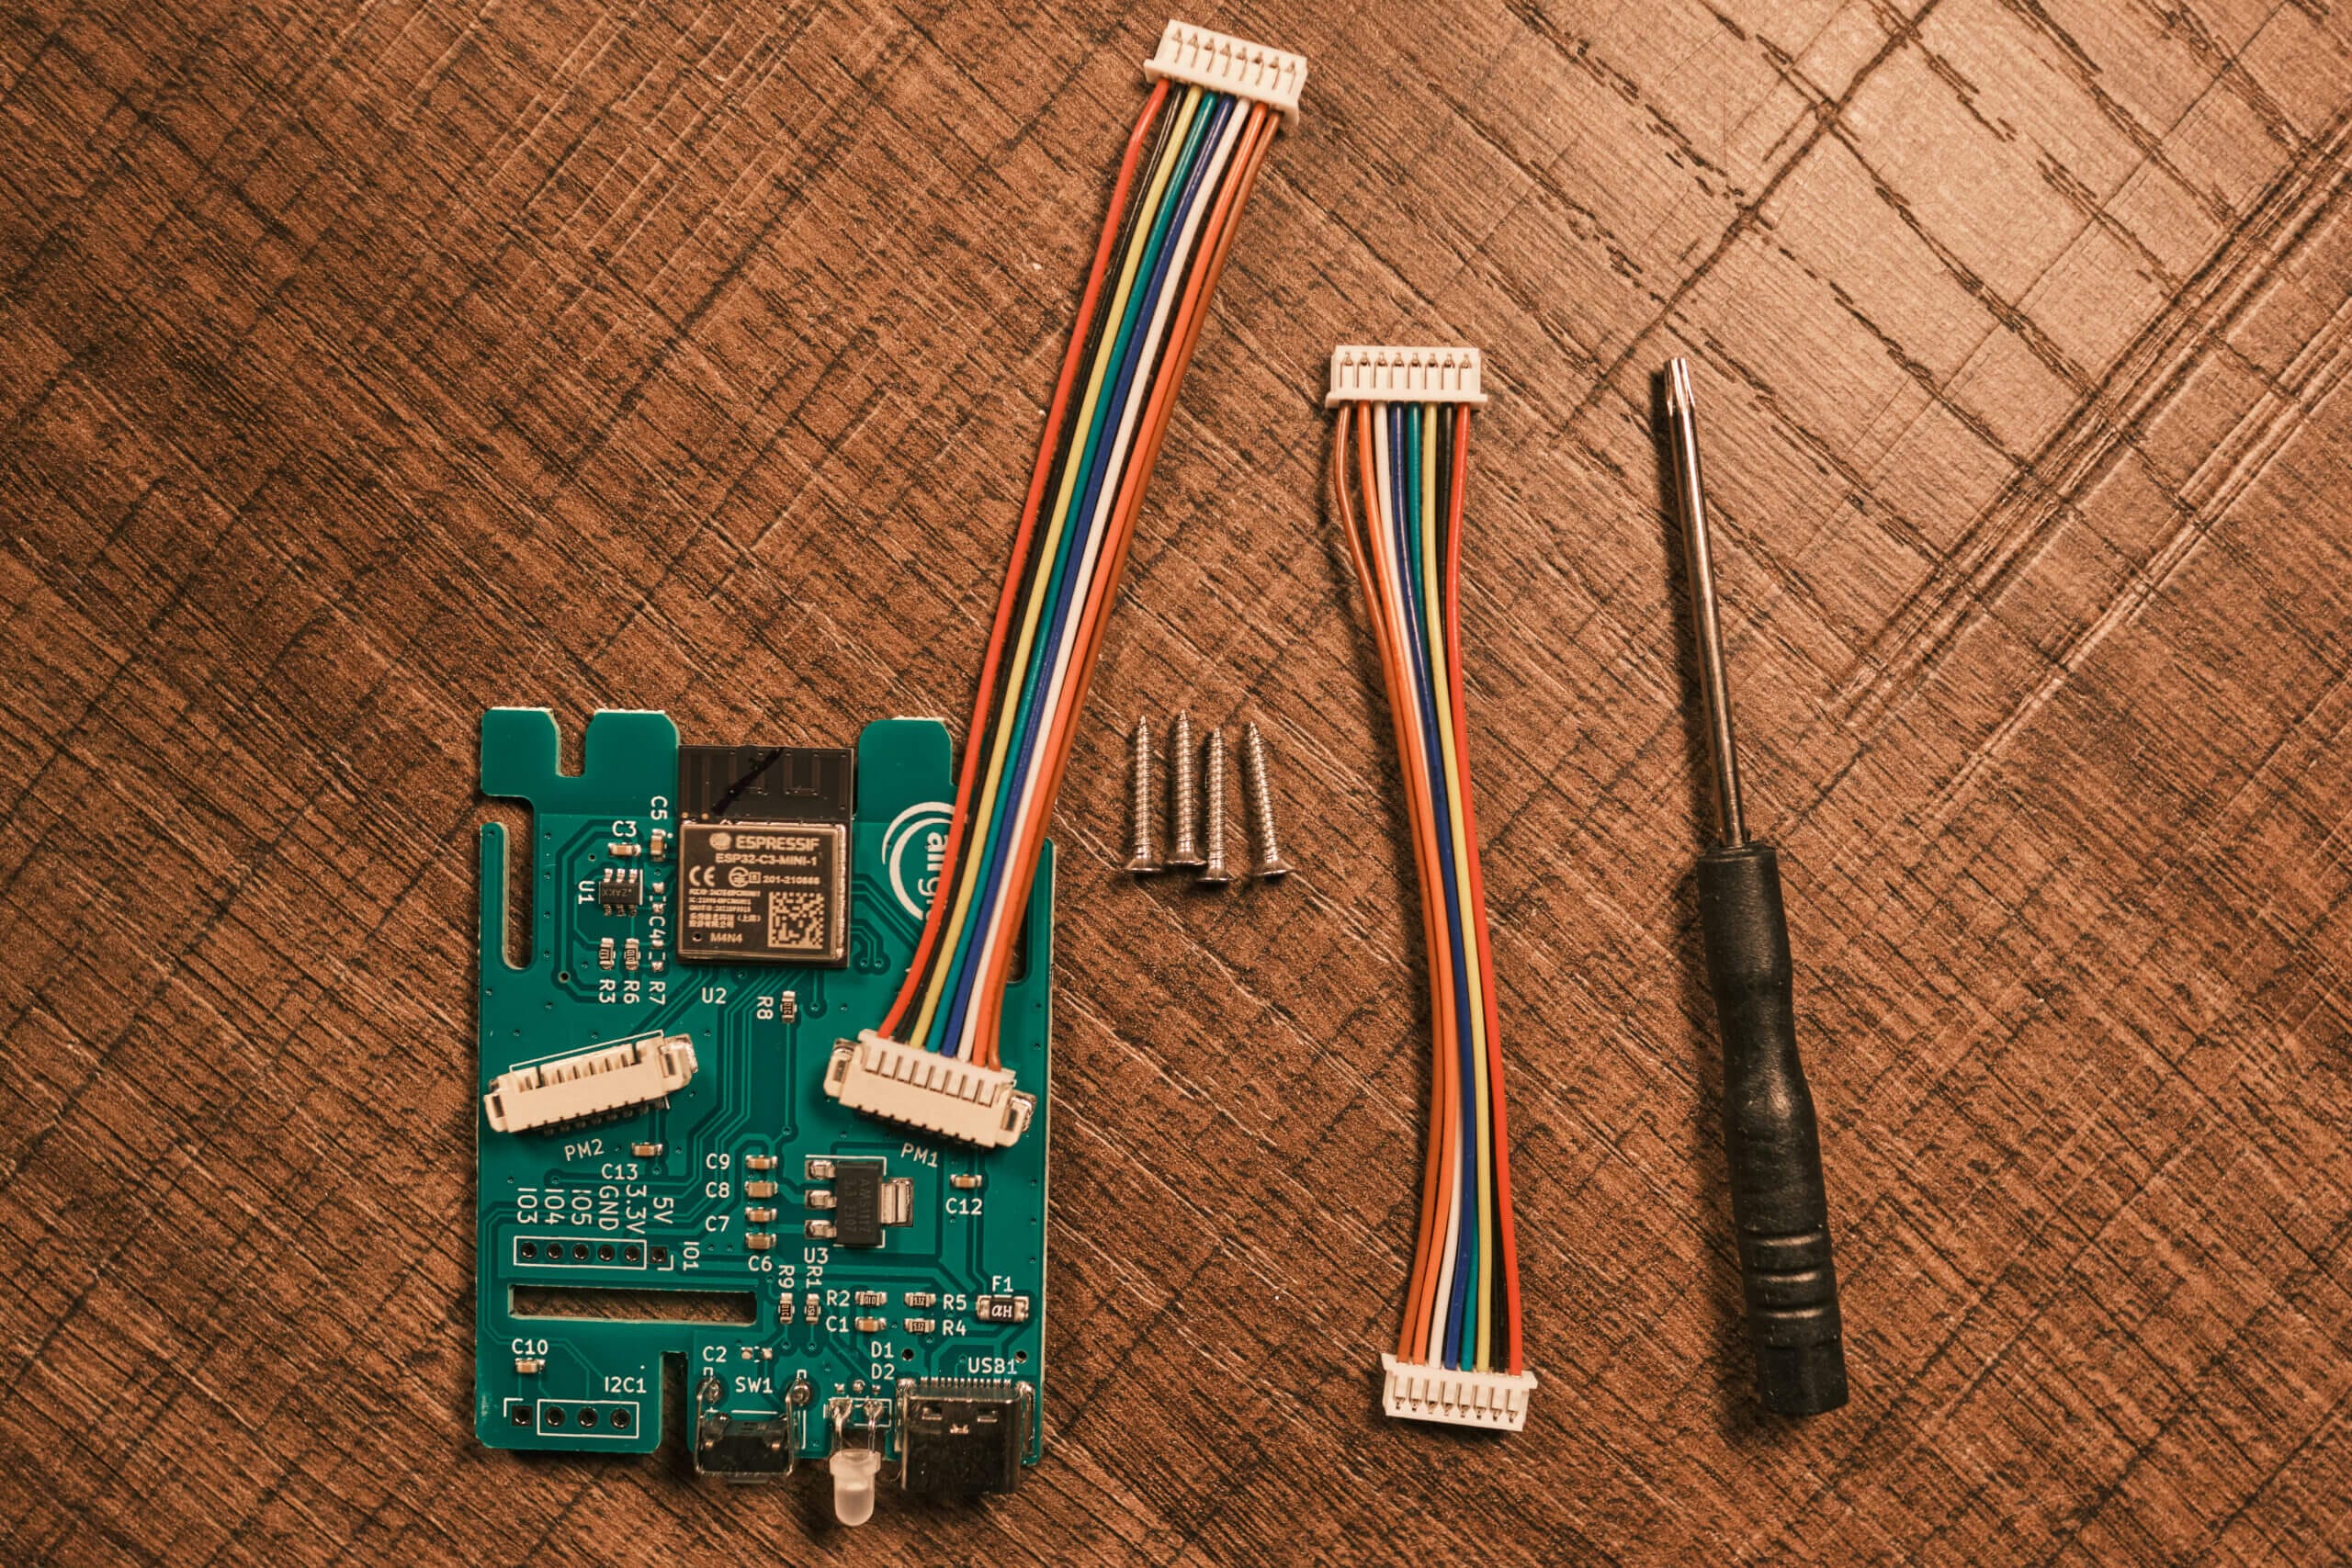
While the instructions from AirGradient explain the assembly process in far more detail (and you should refer to them when building the device yourself), I will briefly cover the process here to show how easy it is to assemble your own Open Air monitor.
First, you will need to connect the two particulate sensors to the mainboard. This can be done by connecting the two tables first to the mainboard. Either cable can be used in either slot, and they only fit into the slot one way, meaning you can’t accidentally reverse the wires.
Once these wires are plugged in, you must slot the board into the blue bottom of the case. There are a few holes in the blue part of the case, and these align with the LED and USB Type-C port found at the bottom of the board. Once you’ve aligned the board and the case, you can slot it in vertically.
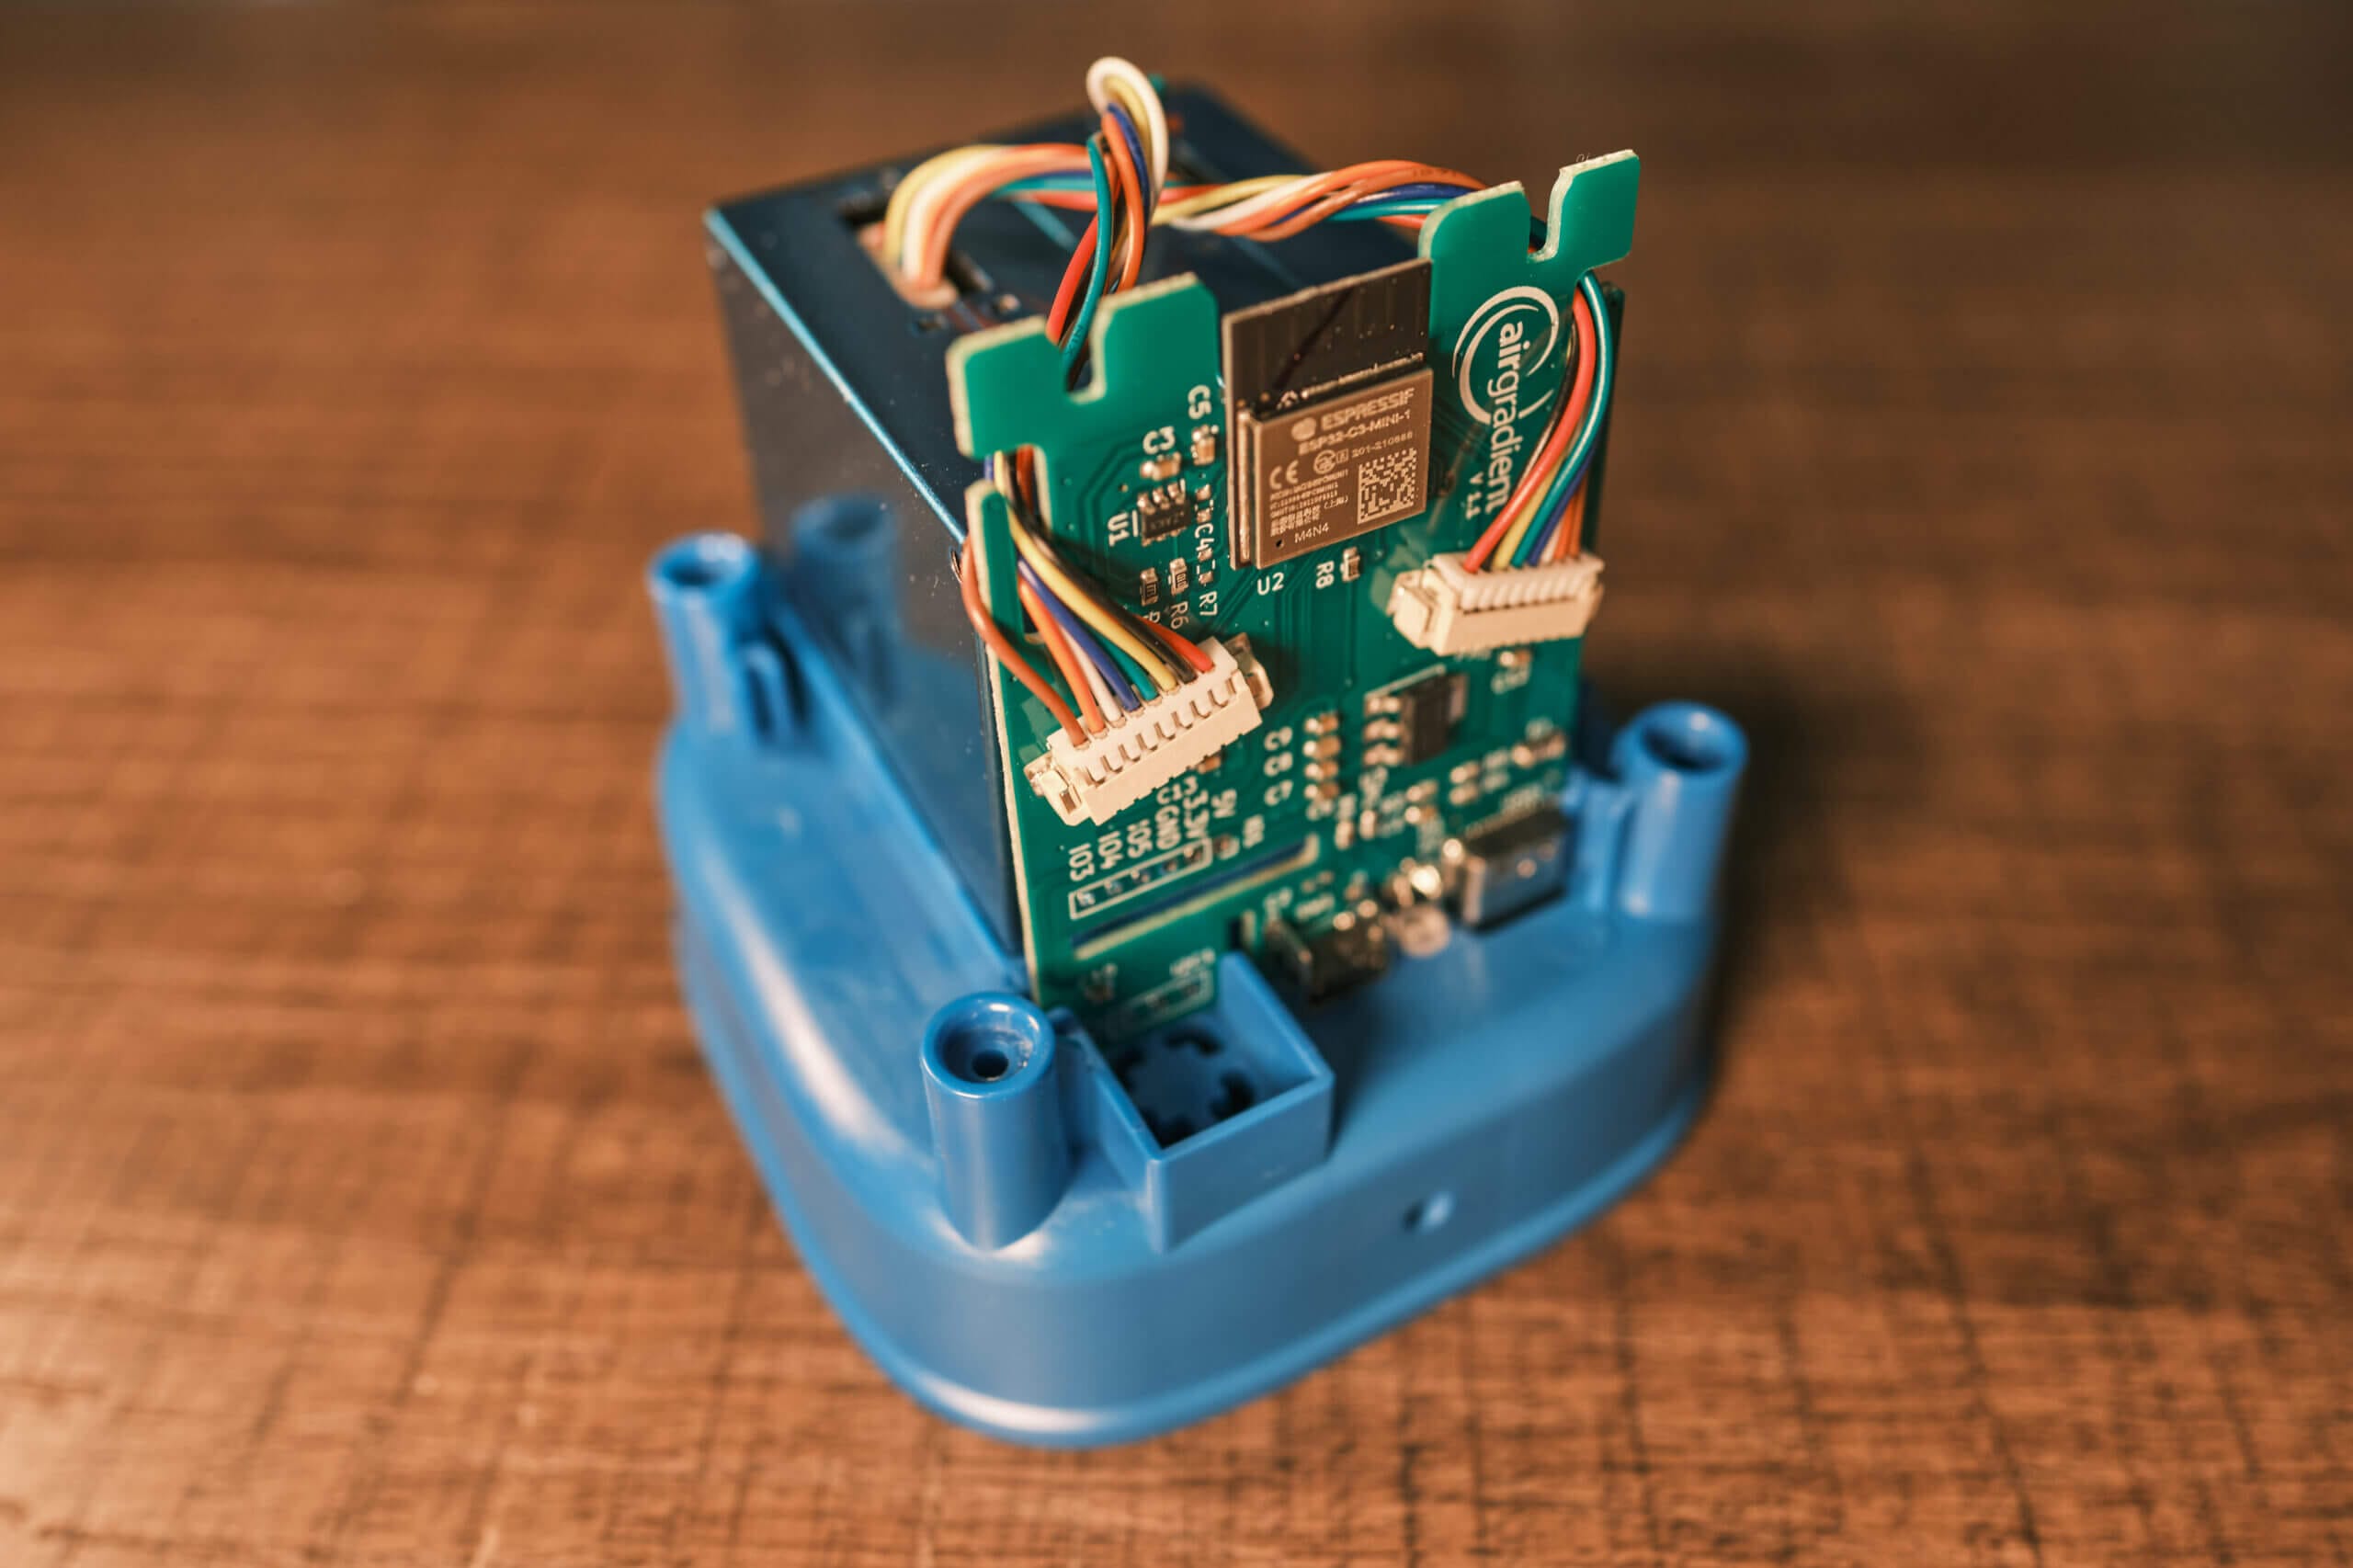
Once the board is inserted, as shown in the image above, you can now go ahead and place the two particulate sensors in the case. There are slots already cut into the case that are perfectly sized, meaning that the sensors should slide in and fit without any issues. You’ll want to ensure that the cable sockets on these two sensors face upwards so you can insert the wires from the mainboard.
To ensure the wires are the right length (and that they don’t get in the way when you put the top of the case on), AirGradient recommends that you twist the wires and cross them to form an X. Fortunately, similar to on the mainboard, the cables will only fit into the sensors in one orientation meaning that they can’t be accidentally reversed.

Once you’ve completed these steps, the monitor should look like the image above when you look down at it. It should look tidy, and the wires should be the perfect length to reach the intended sensor. If you build yours correctly, it should look even better than mine, as I had a loose wire, which I didn’t even notice!
At this point, you’ve finished the hardest part… Yes, really! That was the ‘hard’ part. Now, all you need to do is fit the top of the case over the components and use the screws and screwdriver from the screw kit to screw the base into the top part of the case.
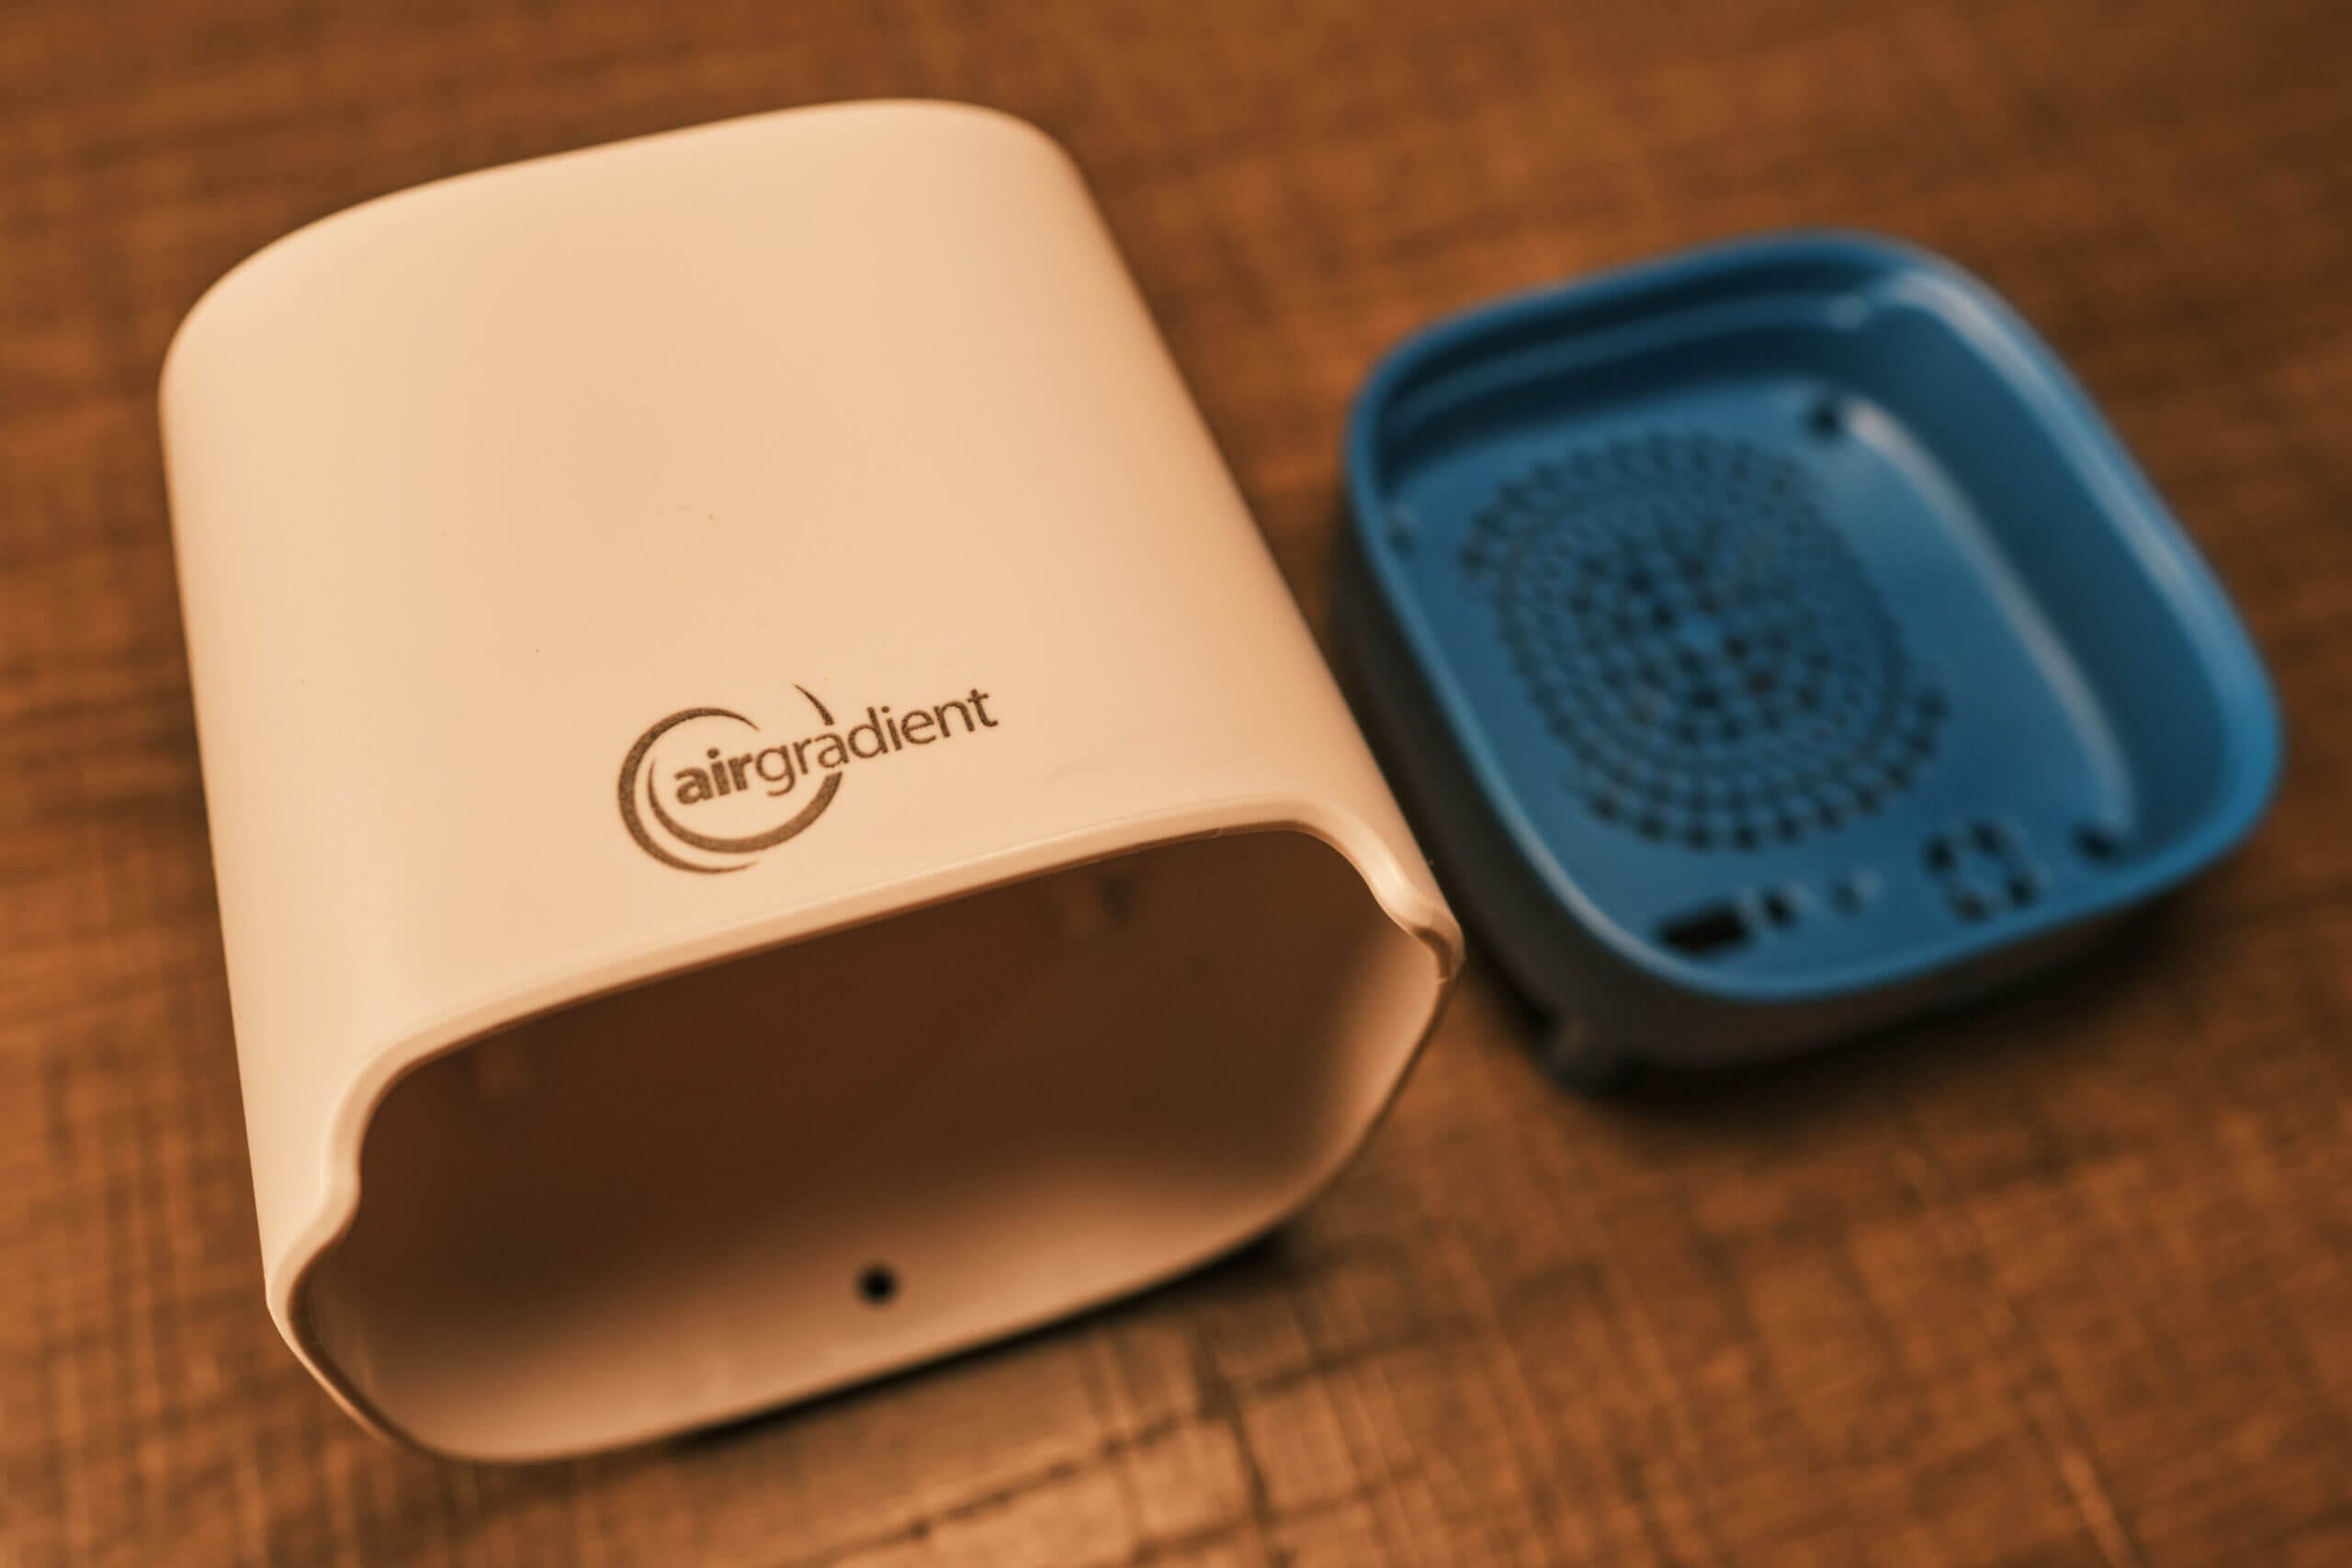
Once all the screws are inserted, the monitor is complete! Despite being a DIY process, every step is straightforward and with the included (online) instructions, I had no issue putting this monitor together. Up until this point, it took perhaps ten minutes to go from nothing to a functional monitor.
From here, you only need to plug in the USB cable and get the device powered up. While you will still need to connect it to WiFi to start recording data, that is also a simple process that I will explain in more detail in this article’s ‘connectivity’ section.
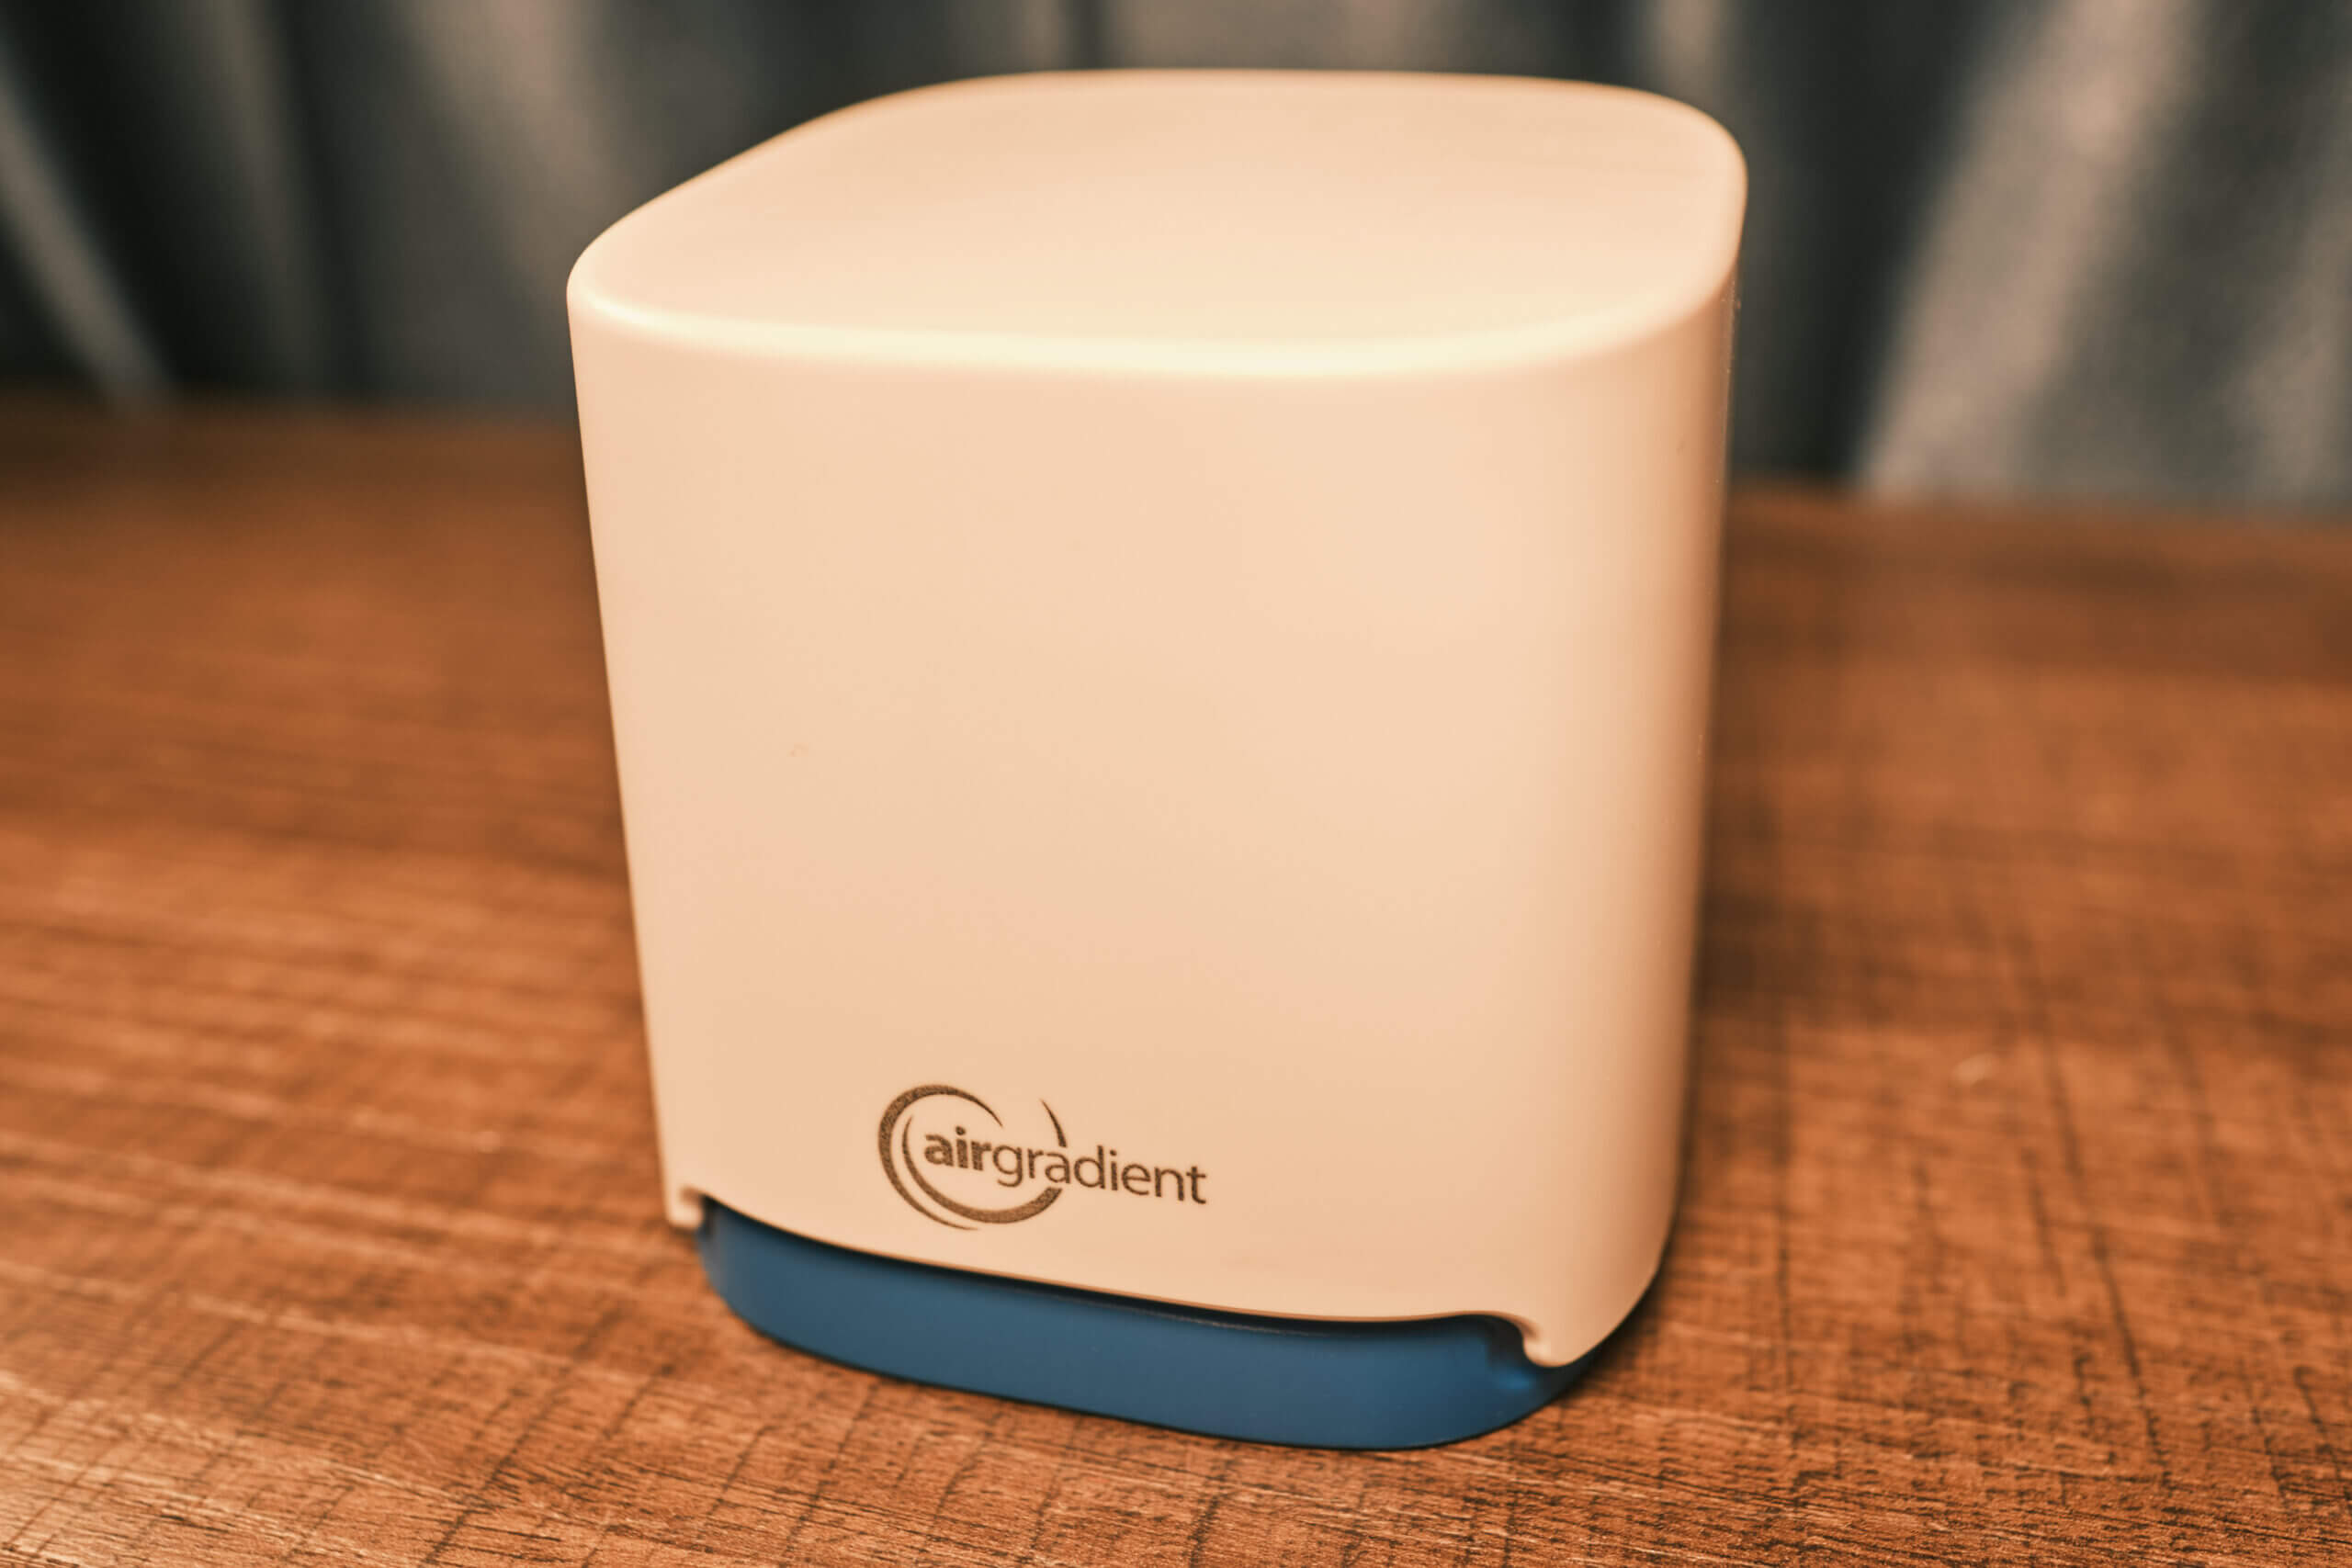
If you’re worried about the DIY kit being hard to assemble, have no fear! It’s very simple, and I’m confident in recommending the AirGradient Open Air DIY variants to everyone. Both the O-1PP and O1-PST DIY are significantly cheaper than the O-PPT and O1-PST, which come fully assembled.
Accuracy & Sensors
Being an air quality monitor, the most important aspect of this device is whether or not it’s accurate and what sensors it uses. Luckily, this is a strong point of the AirGradient Open Air. Considering the price (especially for the DIY kits), you will have difficulty finding an outdoor air quality monitor with better components in this price range.
This section will focus on the particle sensor in all Open Air models. This sensor, of course, is the Plantower PMS5003T, which we’ve already discussed in the previous section. If you’re curious to learn more about the accuracy of the CO2, TVOC and NOx sensors, I recommend referring to this article on the AirGradient ONE, as these monitors use the same sensors.
So, is the PMS5003T accurate? Well, the short answer is yes. Despite being a low-cost sensor, the PMS5003T is well-studied, and it’s accurate both when it comes to inter-sensor variability and when compared to reference sensors. Interestingly, while I tested the O-1PP, which features two PMS5003T sensors and averages the measurements between both, AirGradient chose to replace the second sensor with CO2 and TVOC/NOx sensors on the O-1PPT and O-1PST as its studies found the inter-device accuracy fantastic.
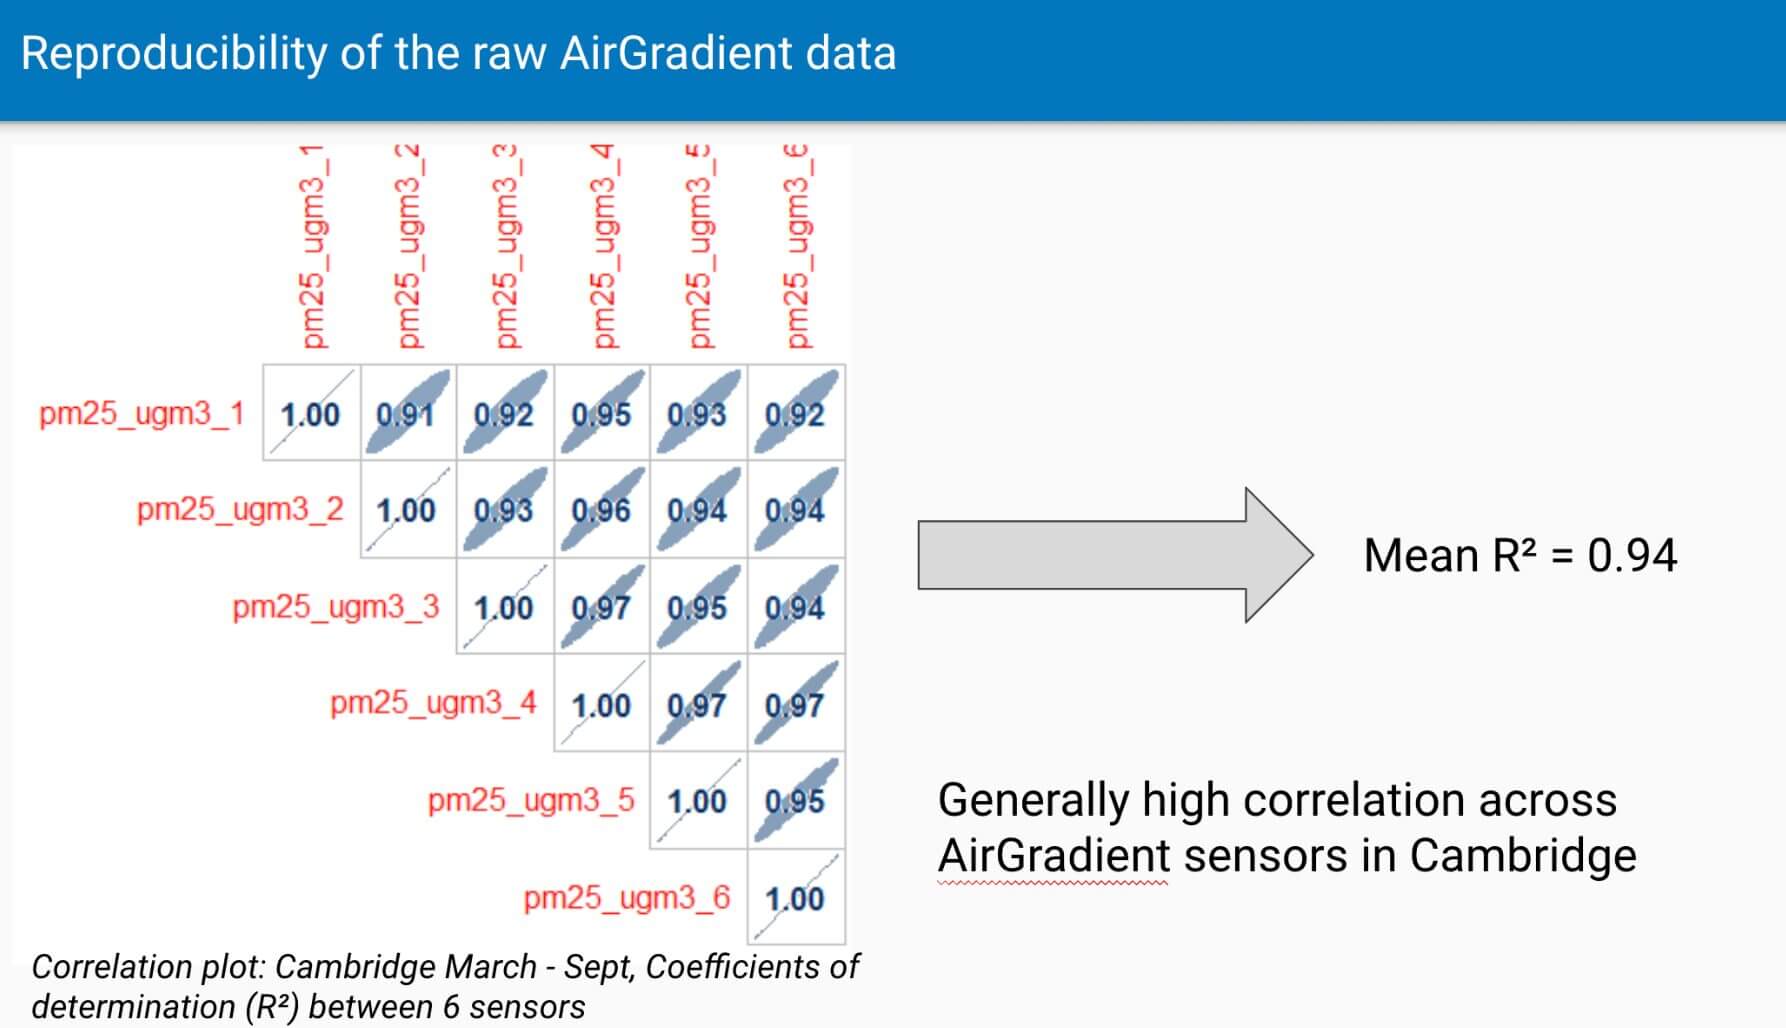
For this reason, the team at AirGradient felt that the second PMS5003T was almost a waste as the accuracy improvement from having two sensors didn’t justify the cost and space requirements of a second sensor. That said, the O-1PP and O-1PPT are the best choices for anyone wanting the most accurate particle measurements.
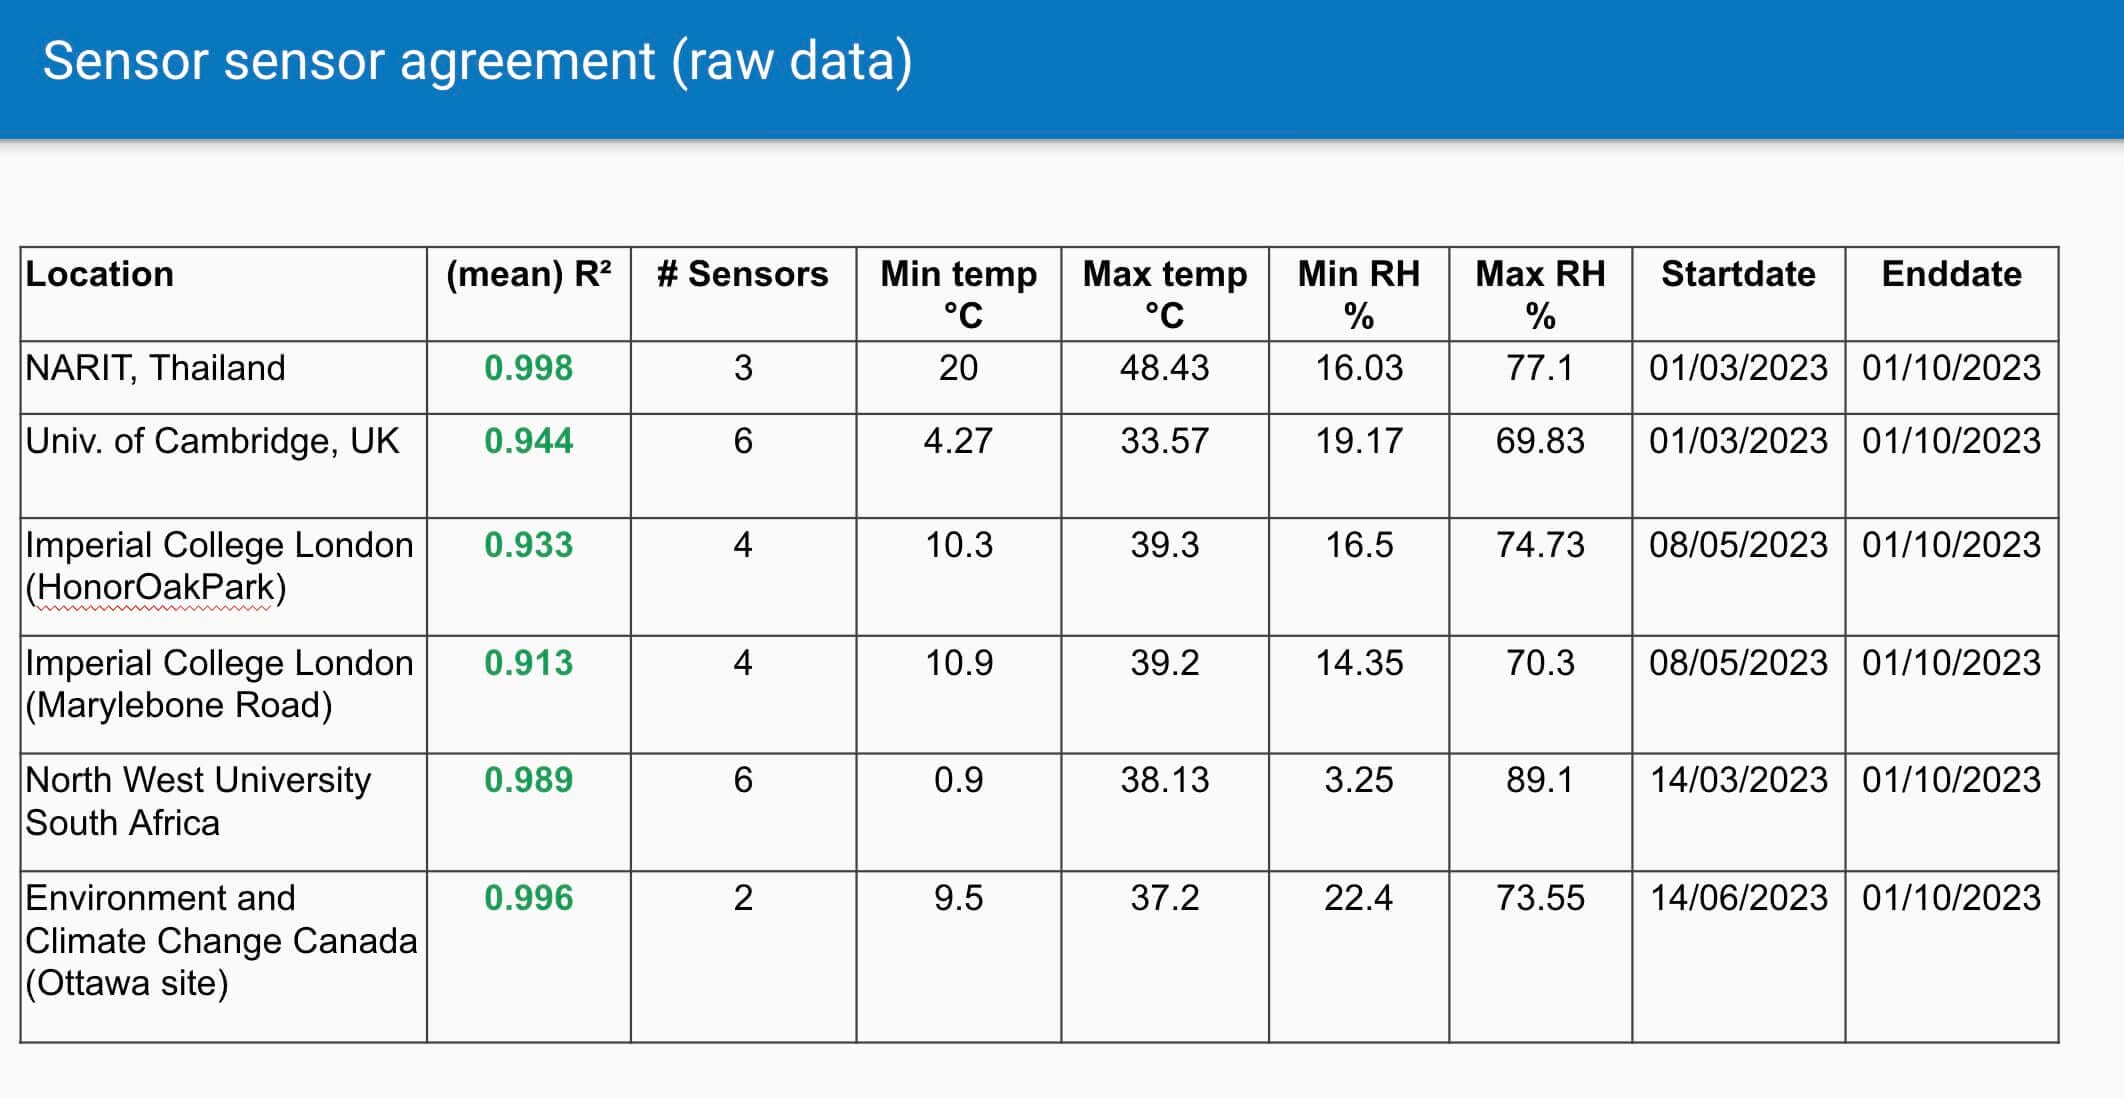
Further tests by AirGradient show that 25 PMS5003T sensors at different locations corroborate these findings as all sensors used in the test reported similar data and, therefore, very high inter-device accuracy. Again, while having a second PMS5003T will improve accuracy, this data shows that the second sensor isn’t necessarily essential.
Of course, it’s important to look into third-party findings as manufacturers stand to benefit by painting their products in a good light. After further research, I found a few studies comparing inter-device variability and low-cost sensors to reference monitors. In most cases, these studies use the PMS5003, an identical sensor but without the included relative humidity and temperature sensors used in the PMS5003T.
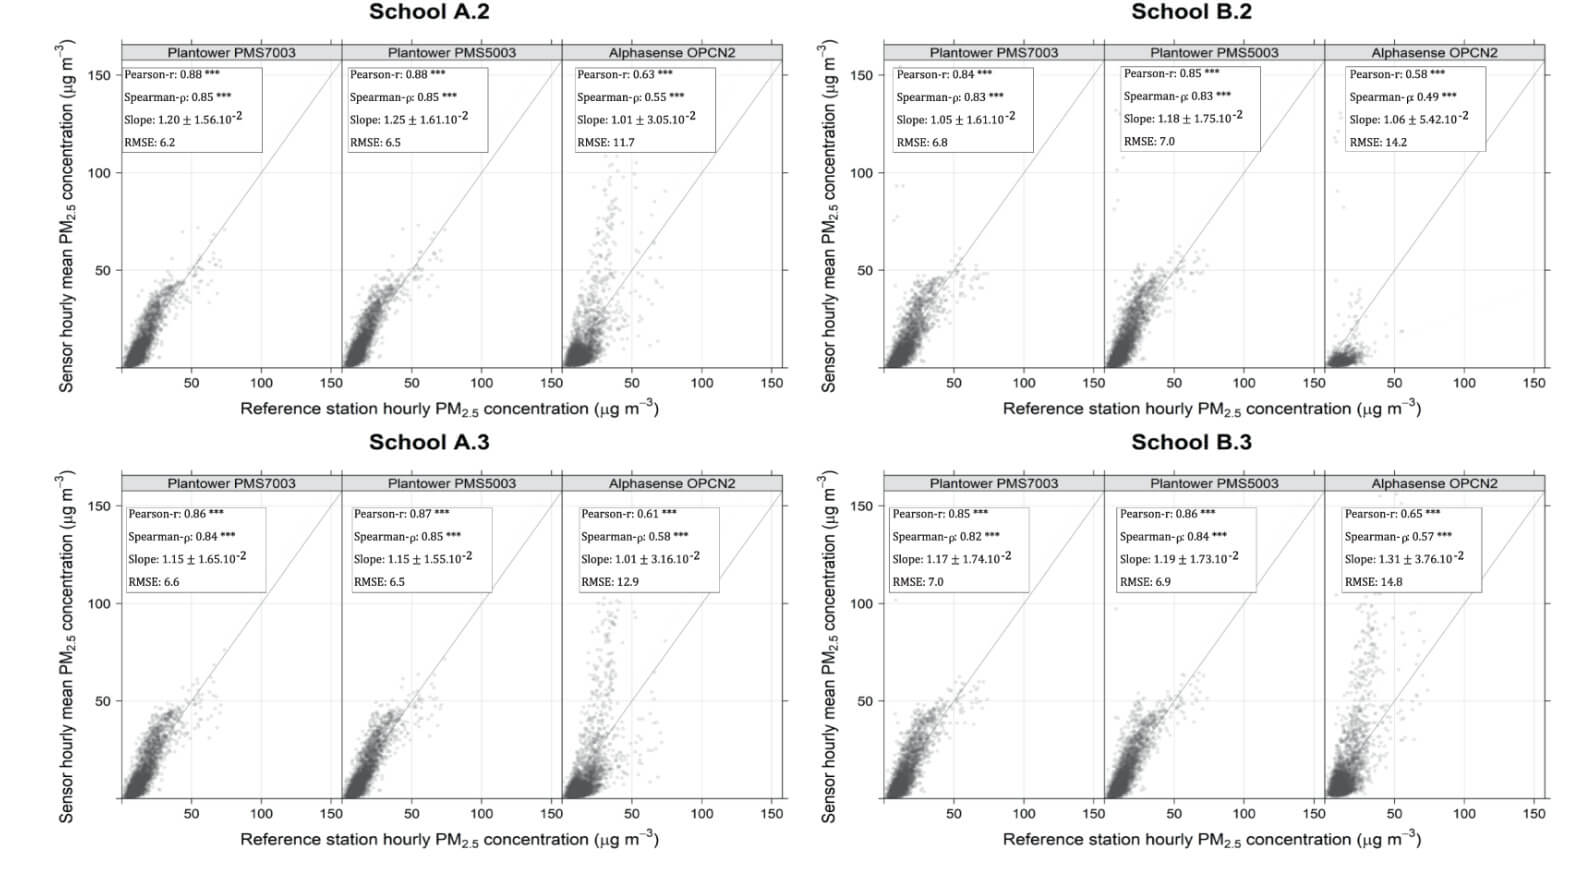
PMS5003 (centre) accuracy vs reference monitor. Study link.
In my AirGradient ONE review, I wrote this about the PMS5003: ‘Compared to a reference monitor, the same study shows that the PMS5003 has a good correlation, although it does lean towards overreporting at higher PM2.5 concentrations. It’s also subject to humidity influences, which can increase or decrease accuracy. At higher humidity levels (76-98%), the PMS5003 presented a better correlation to the reference monitor. However, these humidity levels shouldn’t be found inside and, therefore, aren’t relevant to this air quality monitor in particular’ based on this study.
Interestingly, the PMS5003T should retain more accuracy at high humidity levels as it features a temperature and relative humidity sensor located in the same area where the laser takes PM readings. This allows the sensor to monitor humidity and use algorithms to compensate for these changing environmental conditions. While it’s harder to find studies on the PMS5003T, this should improve its accuracy over the already accurate PMS5003.
Also, from my AirGradient ONE review, but pertinent here, Another study found that ‘inter-device accuracy for the PMS5003 was high, with a relatively small deviation between sensors at PM1.0, a moderate deviation at PM2.5, and a larger deviation at PM10. Furthermore, as particulate concentrations climb, the precision of the sensor decreases’. However, unless you live in a wildfire-prone area, particle concentrations shouldn’t reach levels where the sensor begins to become inaccurate (200µg/m3 or higher). Furthermore, accuracy becomes less important at this point – whether 200µg/m3 or 500µg/m3, you should be taking drastic action to avoid breathing in the outdoor air.

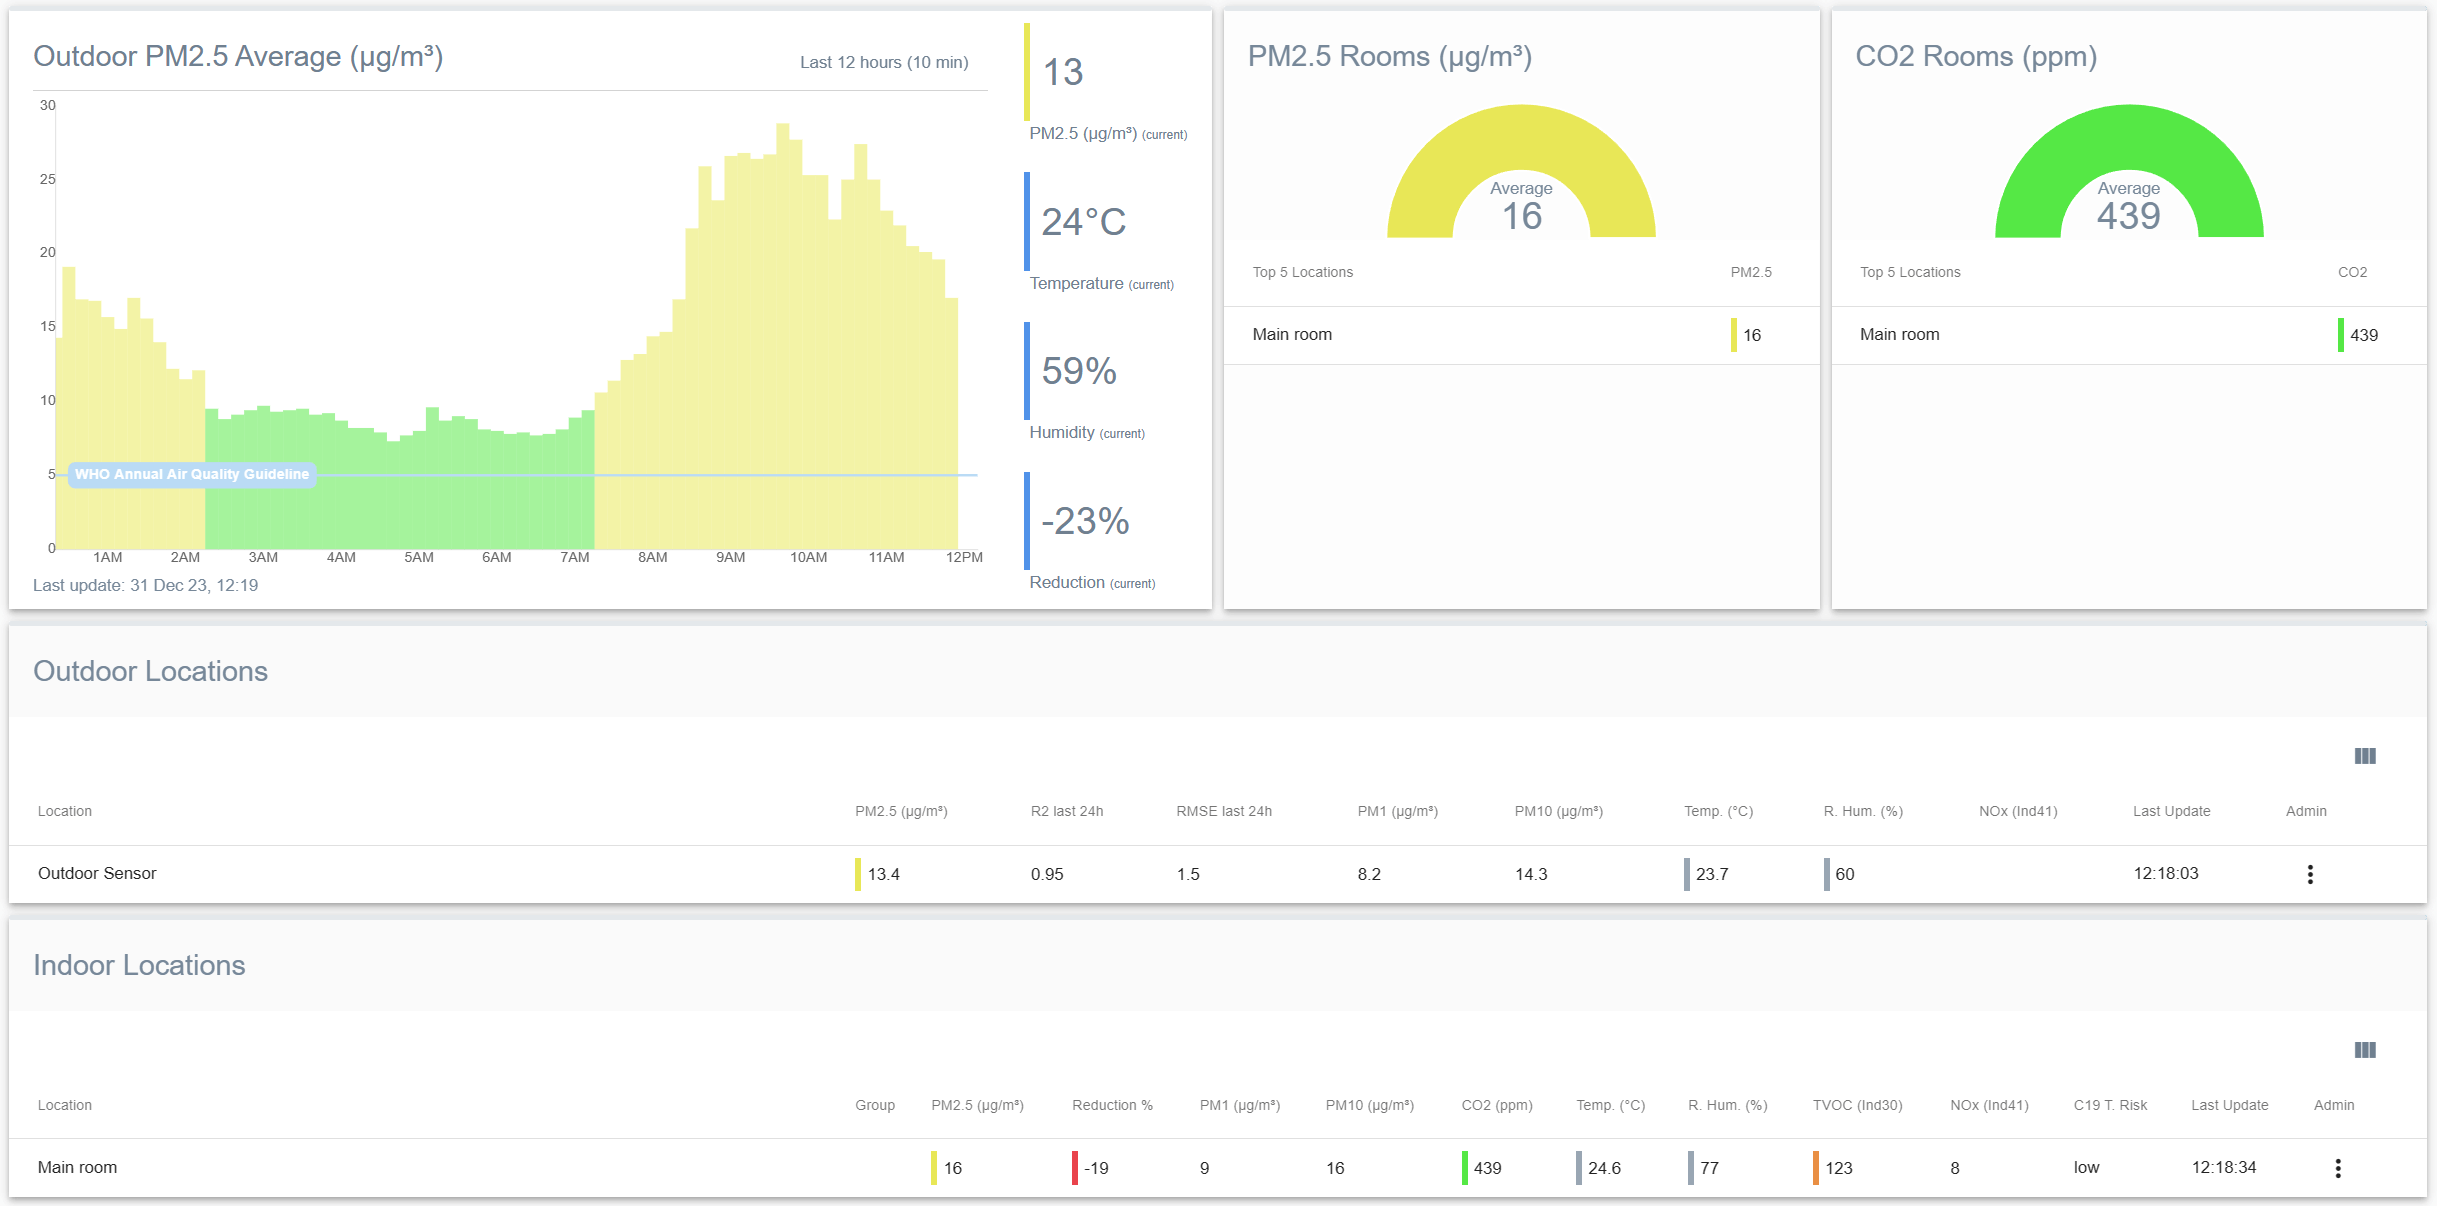
While these studies show that the PMS5003 (and, by extension, the PMS5003T) correlate well between sensors and compared to reference sensors, I was also interested in seeing data from my own AirGradient Open Air. Shown above, you can see the R-squared value (R2 last 24h) between the two PMS5003T sensors in my monitor is 0.98. This shows a very high correlation in readings between the two and further testifies to the accuracy of these sensors.
Based on this information, we can conclude that the PMS5003T is an accurate, low-cost PM sensor. While the second sensor may not be essential, I appreciate having it in the O-PP and O-1PPT both for the sake of improved accuracy and redundancy. However, even if you opt for the single-sensor O-1PST, you will get an accurate air quality monitor.
If you want to read more about the accuracy of the other sensors included in the O-1PPT and O-1PST, please refer to my AirGradient ONE review. While this is an indoor air quality monitor, the sensors used are the same, and therefore, they should perform identically across monitors. If you want the TLDR, the CO2 and combined TVOC/NOx sensors are also among the most accurate at this price range.
Design
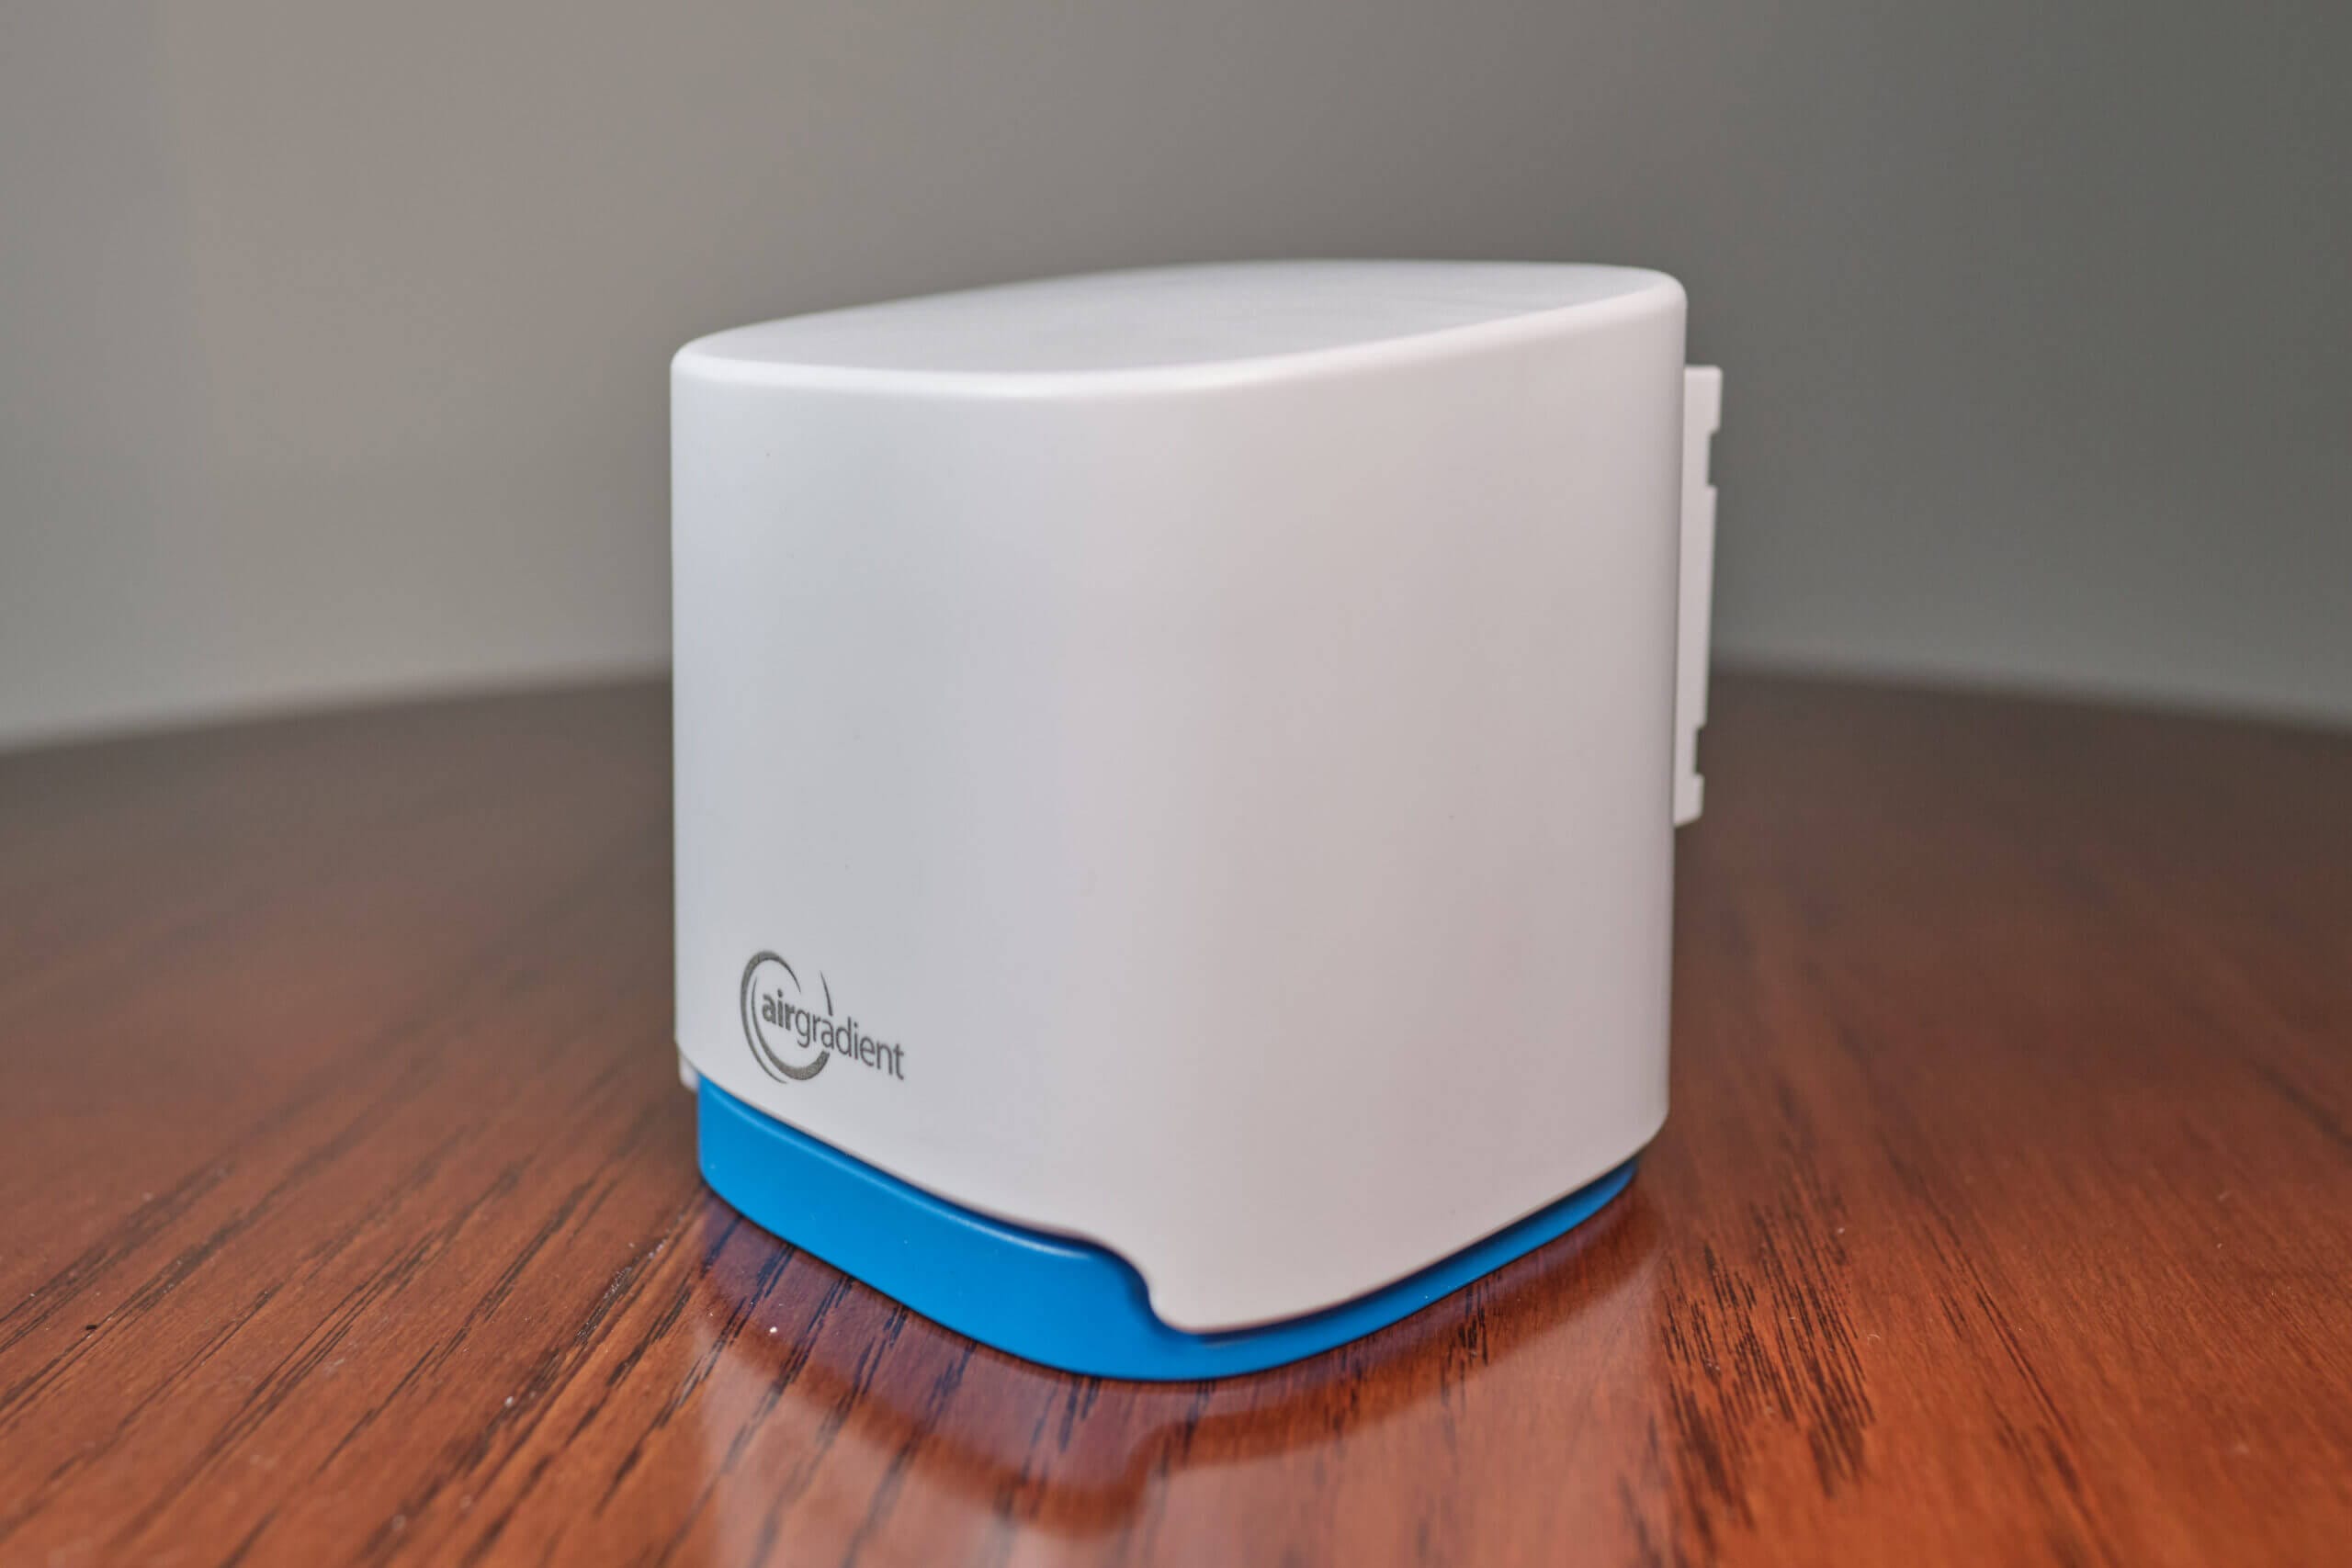
Once assembled, the AirGradient Open Air is a very simple-looking device. Unlike indoor air quality monitors, the design emphasis on the Open Air is clearly on making the device weatherproof and durable instead of pretty. Furthermore, since this is an outdoor air quality monitor, there is no need for a screen since you’ll be checking the data online.
All models of the Air Gradient Open Air look the same. Whether you have the O-1PP, O-1PPT, or O-1PST, all of the monitors use the same plastic shell, and from the outside, you won’t be able to notice which model a particular Open Air unit is.
Since the device needs to avoid water at all costs, as the components aren’t water resistant, the top and all sides of the device are covered by a plastic dome. However, ambient air does need to enter the device so the sensors can take measurements. Therefore, there is a large vent on the bottom of the device directly behind which the intakes for the sensors sit.
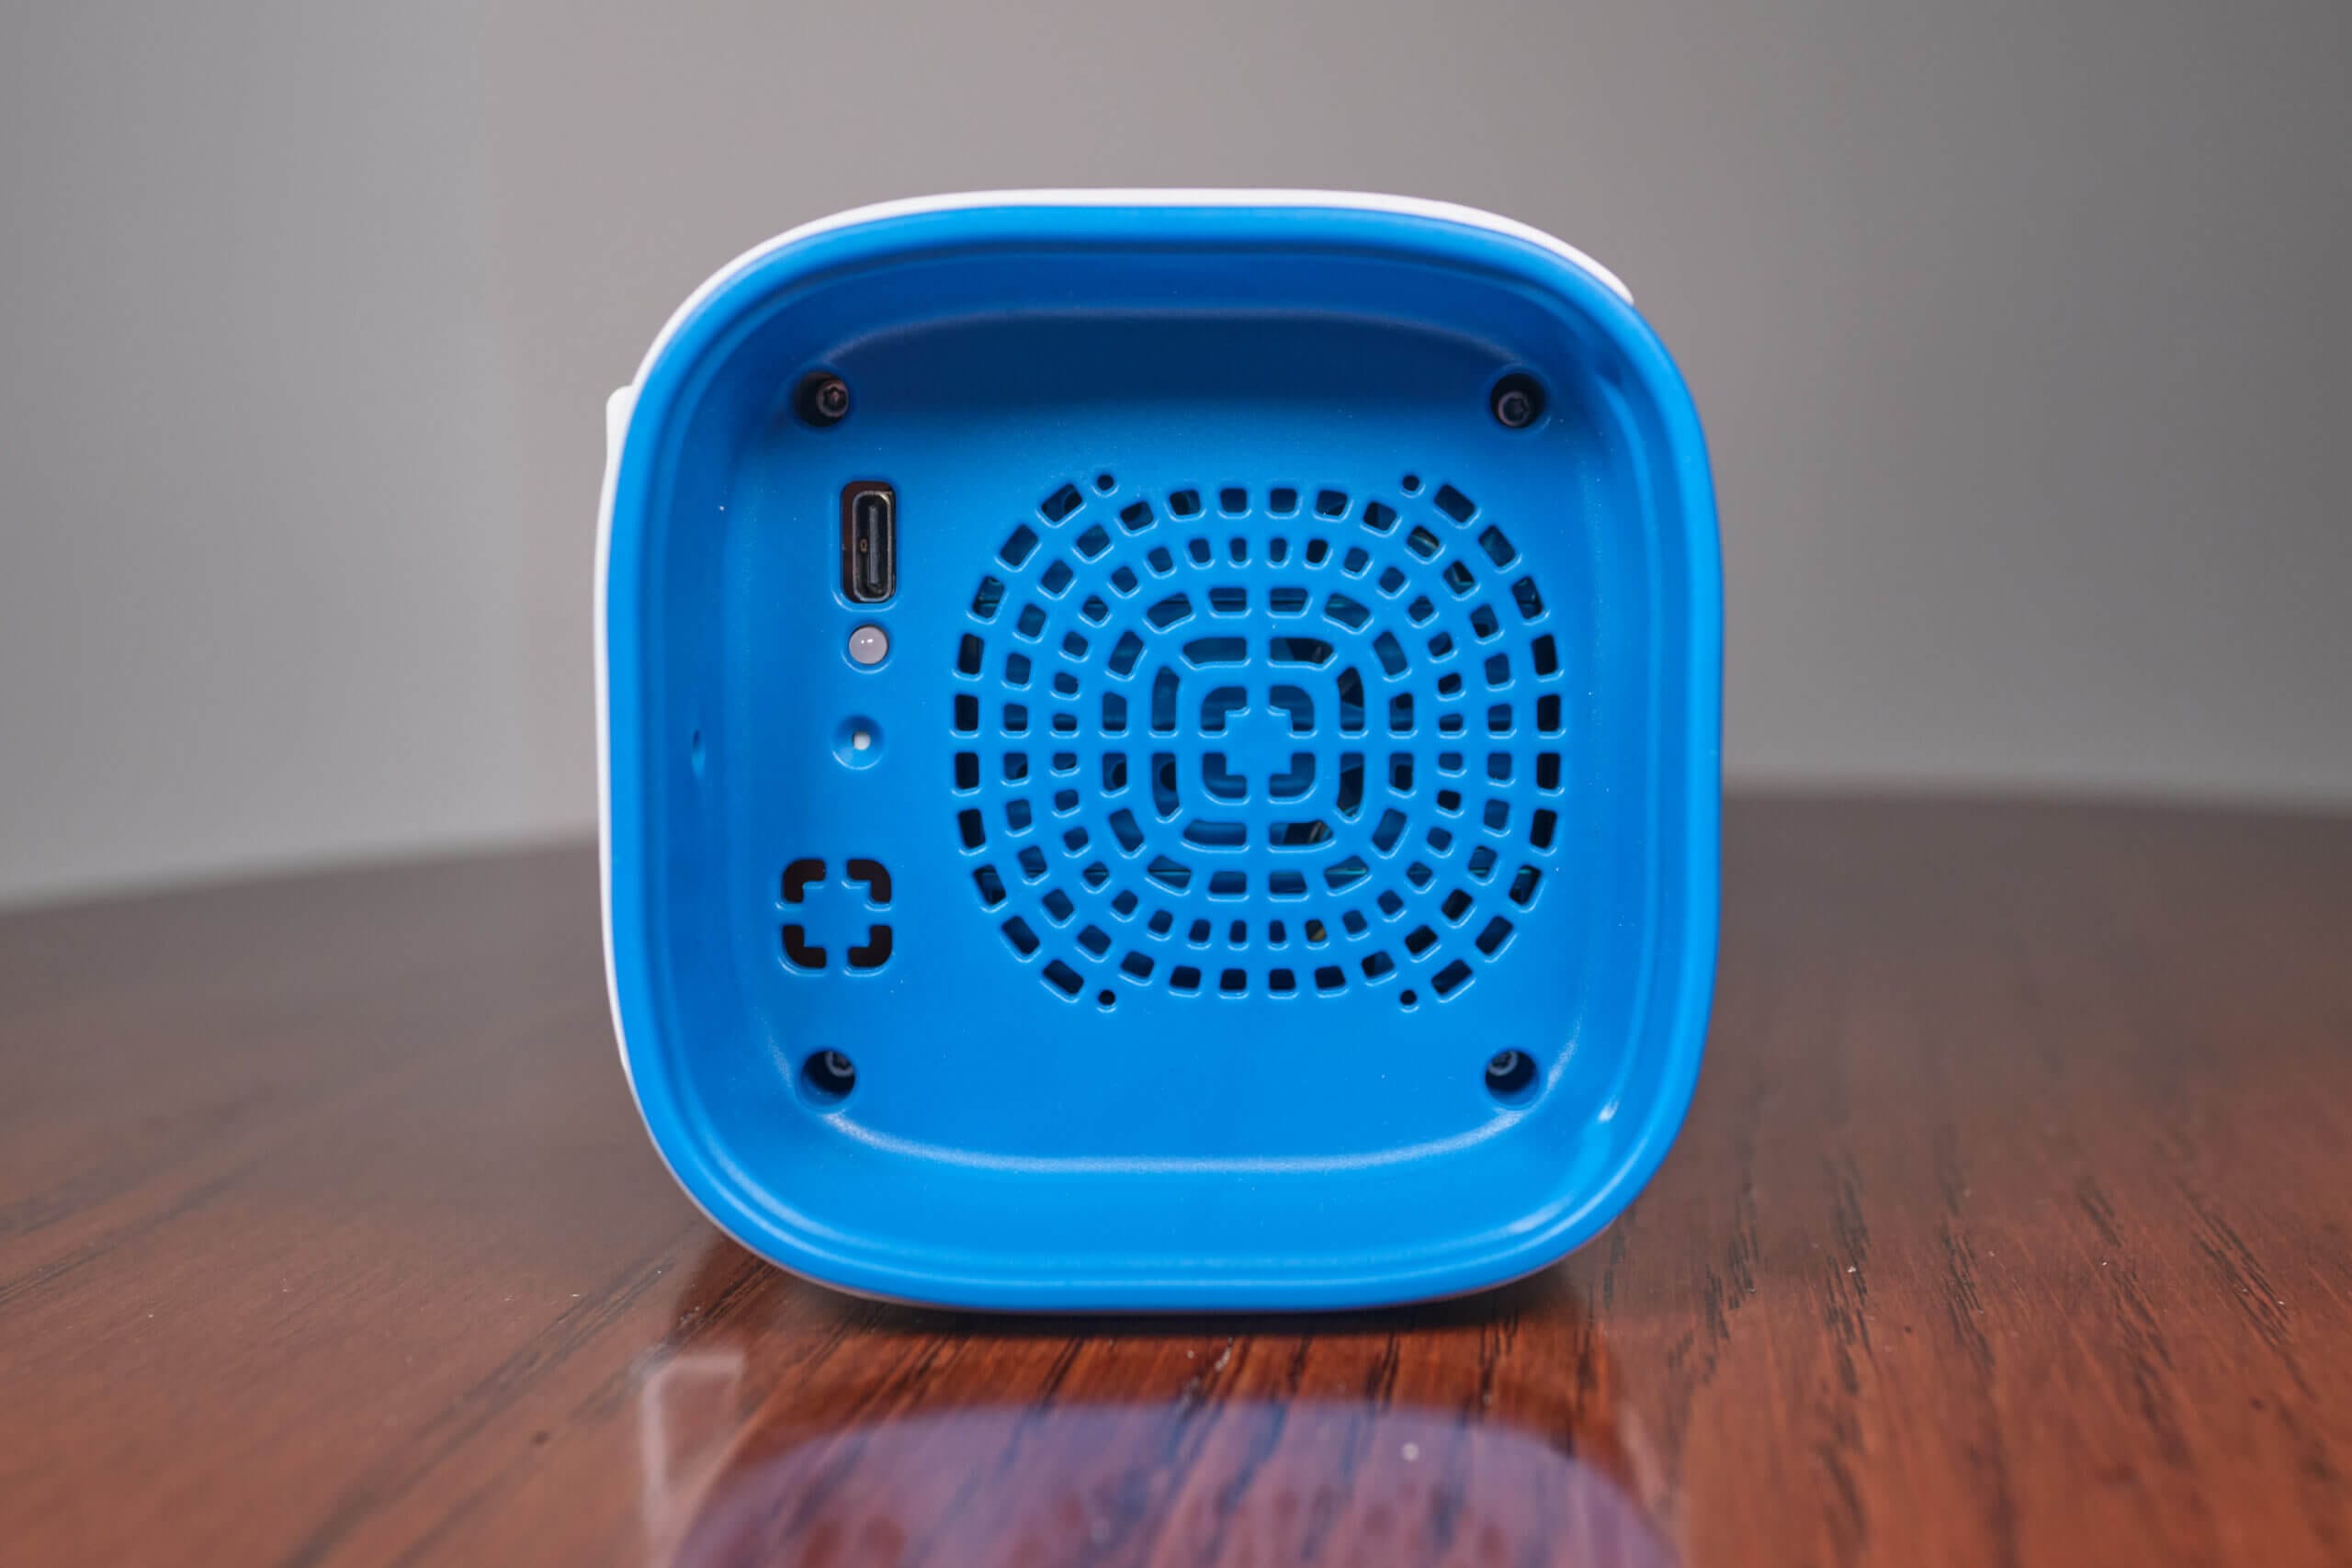
Also, at the bottom of the device, you will find the USB Type-C port and an activity LED. The port is self-explanatory and allows the device to be powered, but is placed on the bottom of the device to protect it from water. On the other hand, the blue LED will be on at most times but will flash when the device uploads data via WiFi.
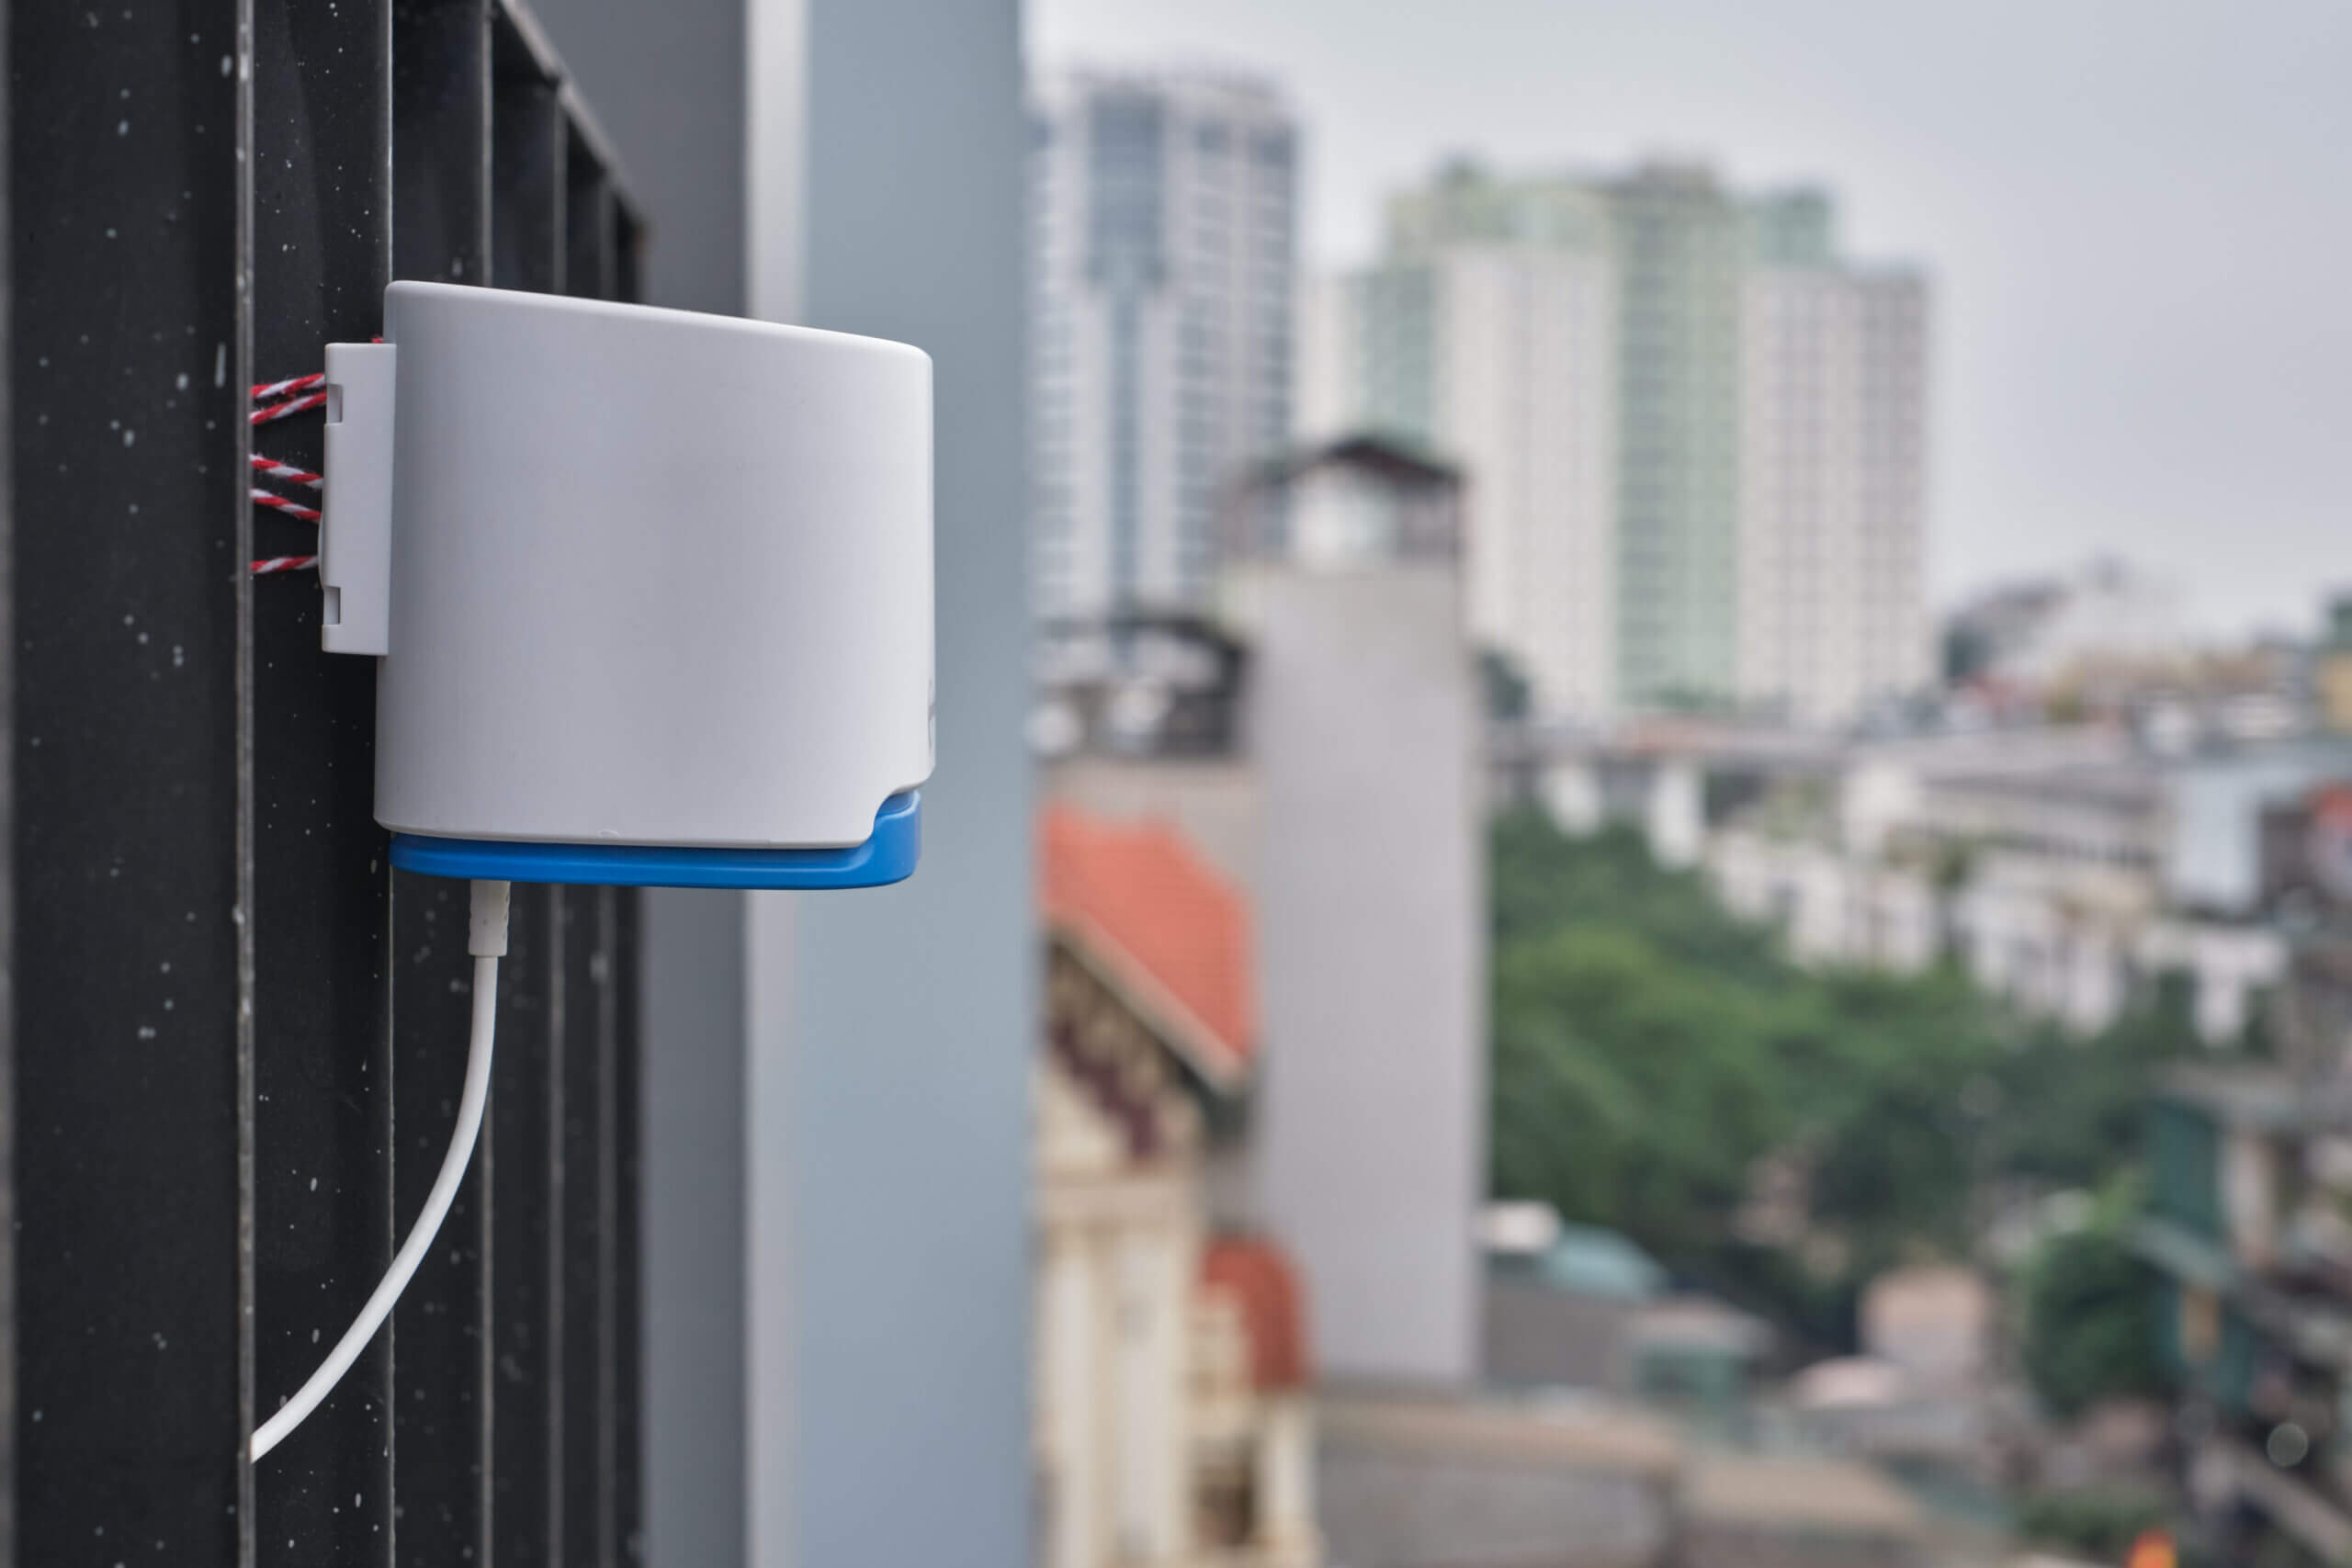
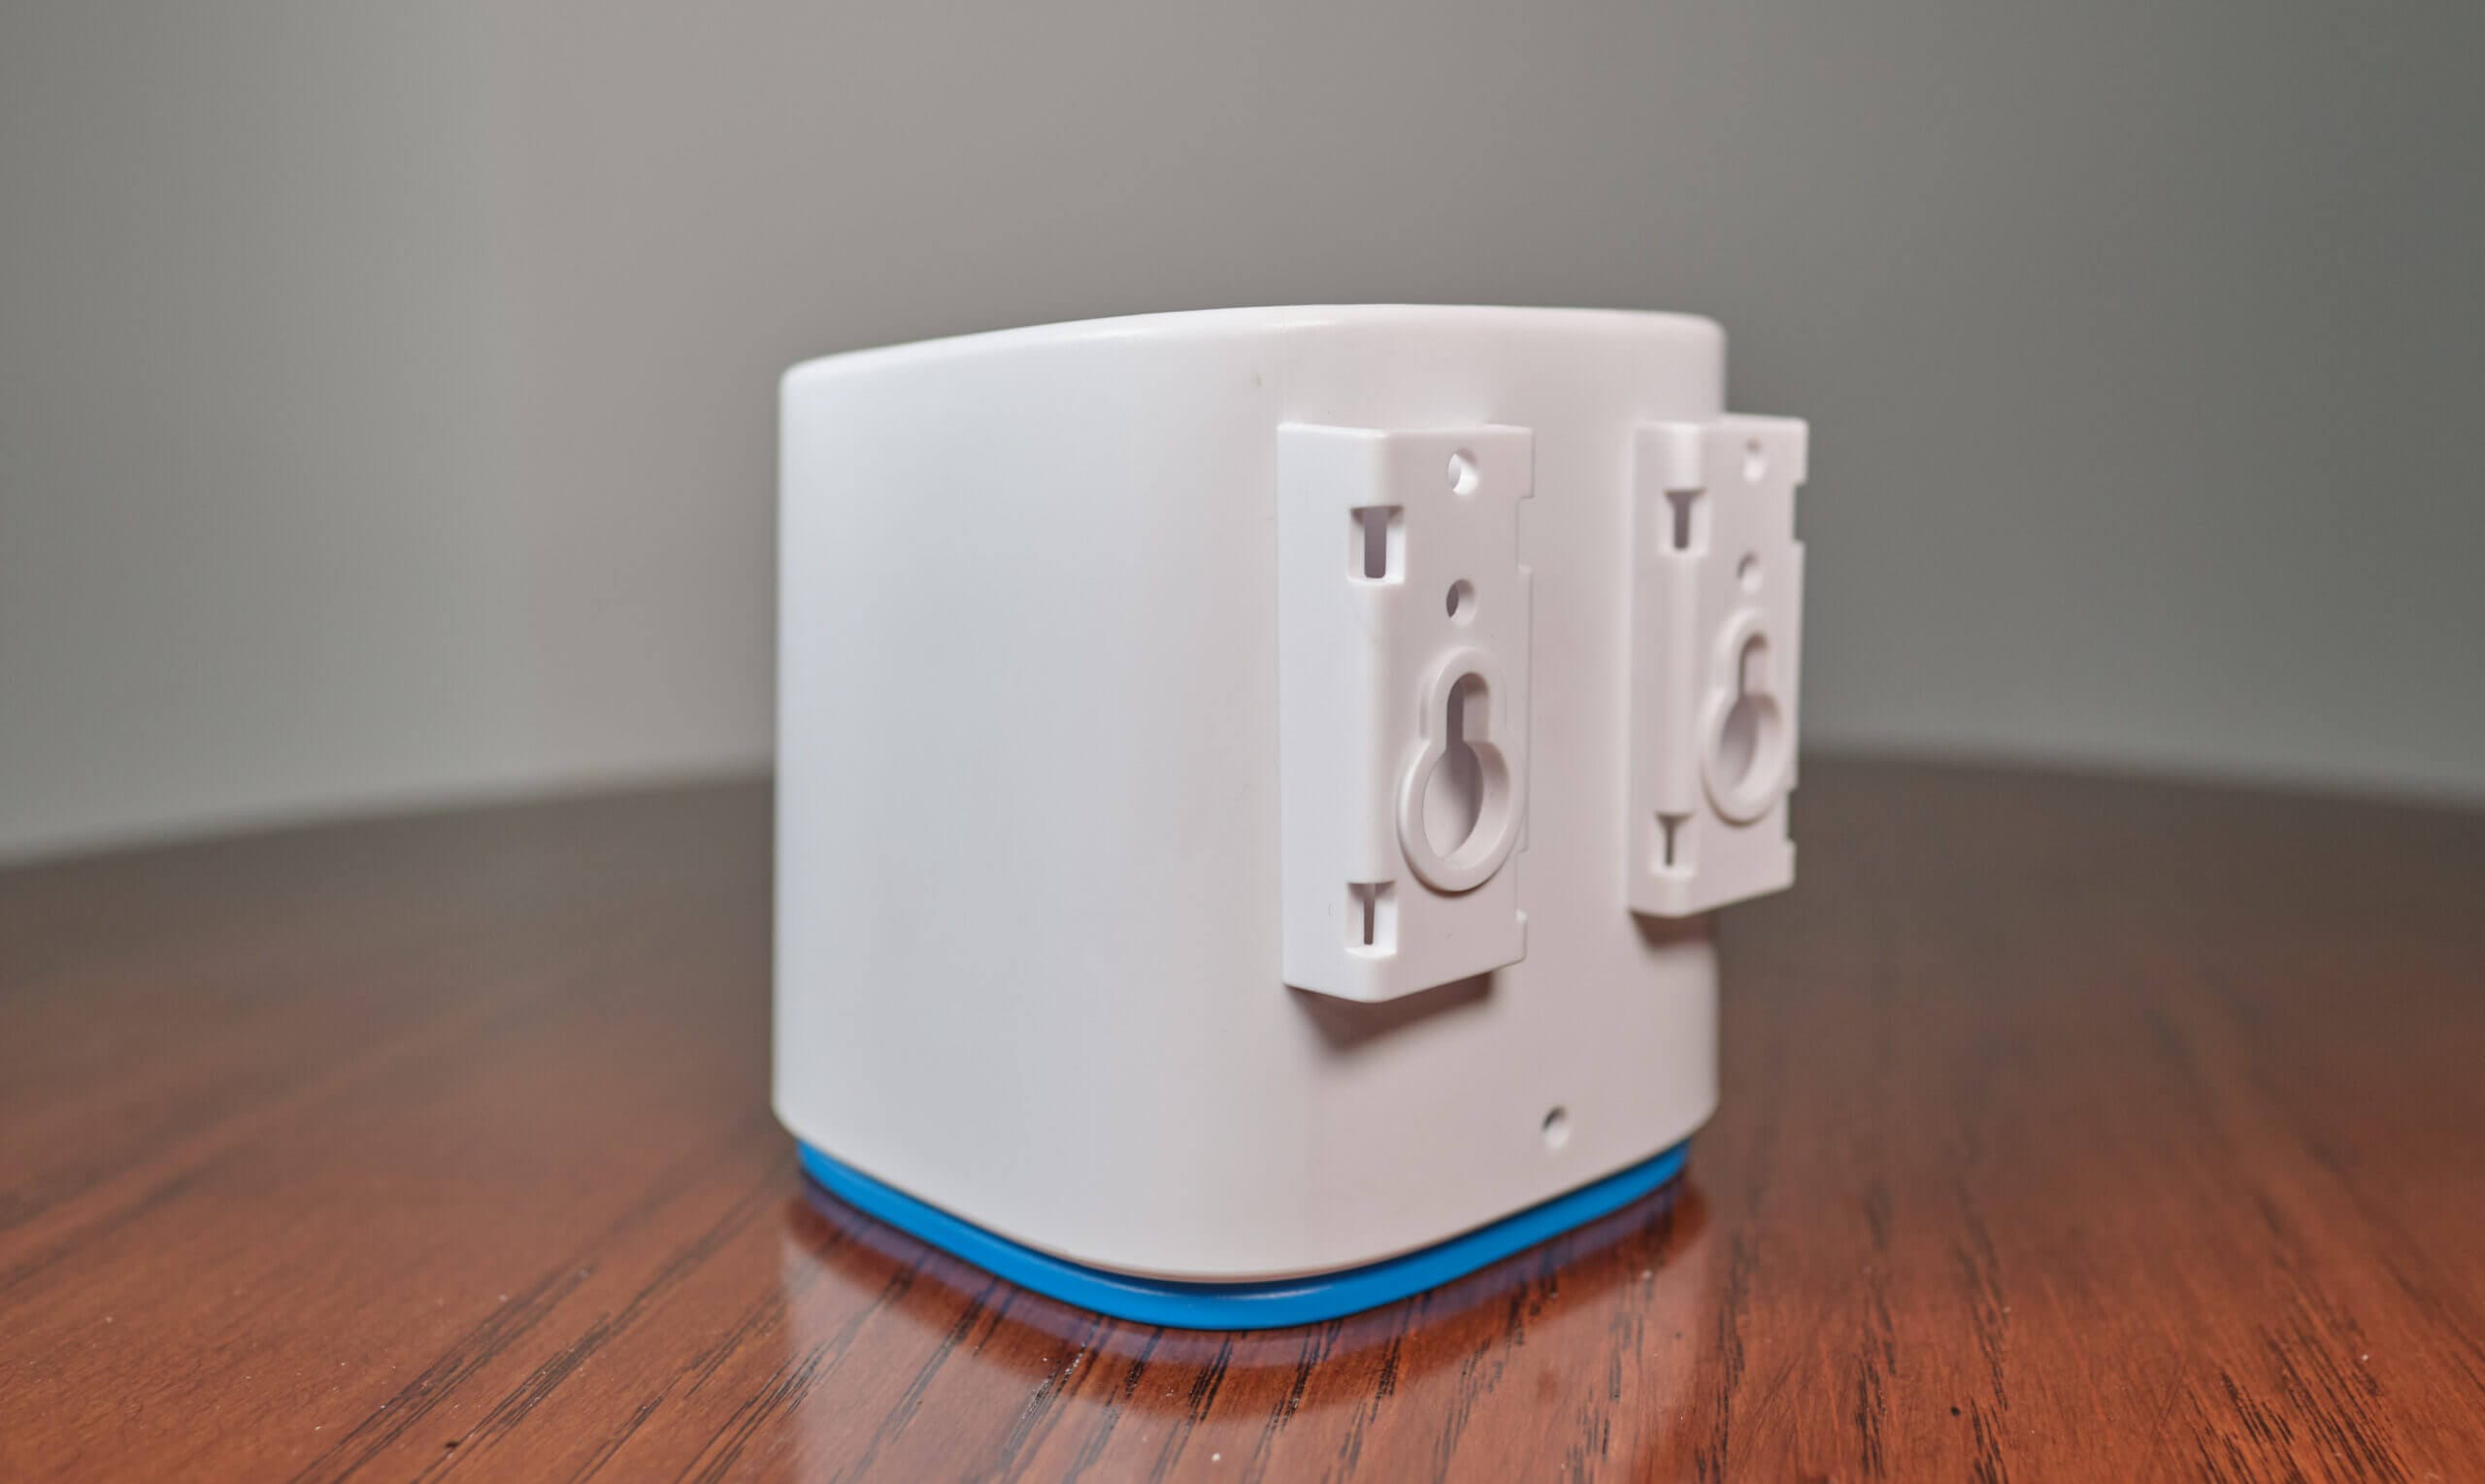
Two plastic rails on the back of the device allow multiple mounting methods, and I appreciate the flexibility of this system. When I want to use the device in a temporary position, I can use one or two zip ties to connect the device to almost anything. However, the device can be mounted with a more permanent method when I have a more permanent position.
There is also an anti-theft screw hole located at the bottom of the back of the device. The kit comes with an extra screw that can be used here, and while I haven’t used it (or tried it) myself, it’s nice to see this extra measure taken to prevent someone from easily removing the device and taking it.
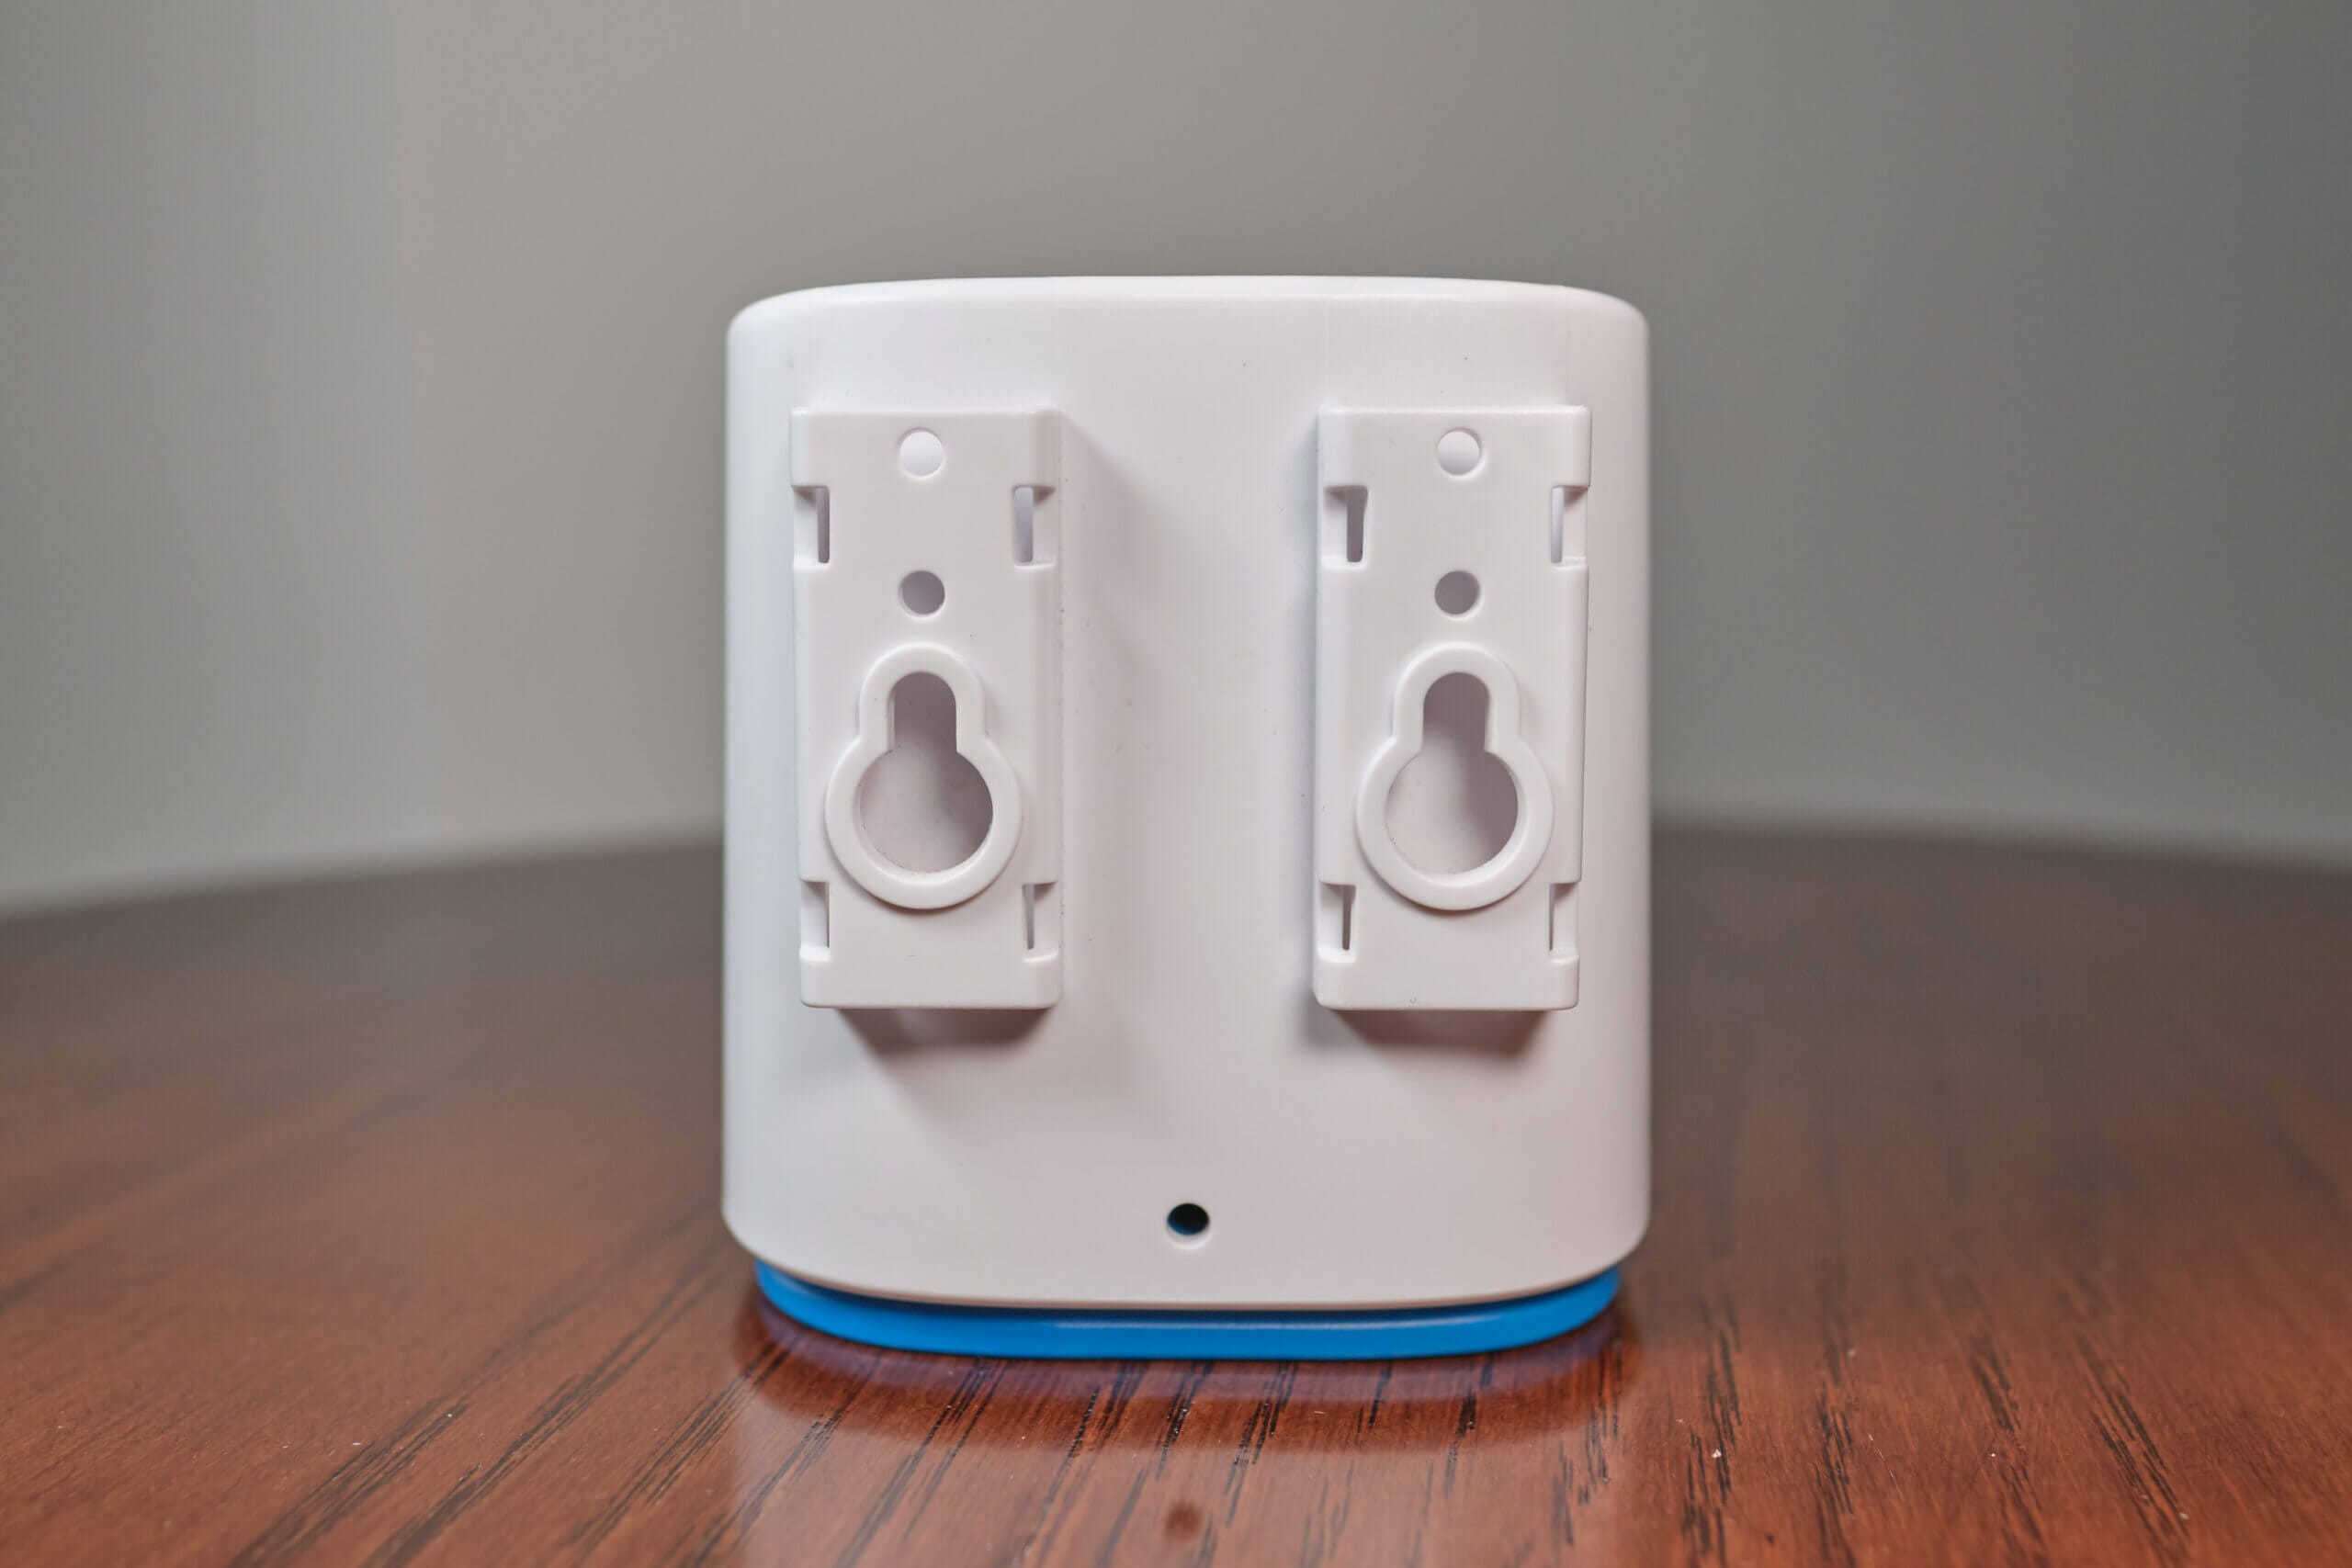
While the device’s design is simple, it’s well-thought-out and created so that the sensors can provide accurate measurements while not exposing the sensors and other sensitive electronics to harmful weather, such as rain. Furthermore, much thought has gone into the technical side of the device, including features such as ensuring it is self-ventilating to reduce condensation build-up.
Furthermore, the plastic used on the AirGradient Open Air is designed to be UV resistant and shouldn’t be yellow with exposure. For a white device like this, this is a nice benefit. While I’ve only had my Open Air for a few months, I can confirm that it doesn’t yellow quickly, if at all – but only time will tell.
While the bottom of the device is inlaid so that even rain at an extreme angle won’t be able to enter the device, the bottom is vented, and therefore, you will want to ensure water can’t enter from below. This means you will want to place it high enough so that water splashing below can’t splash upwards and enter the device.
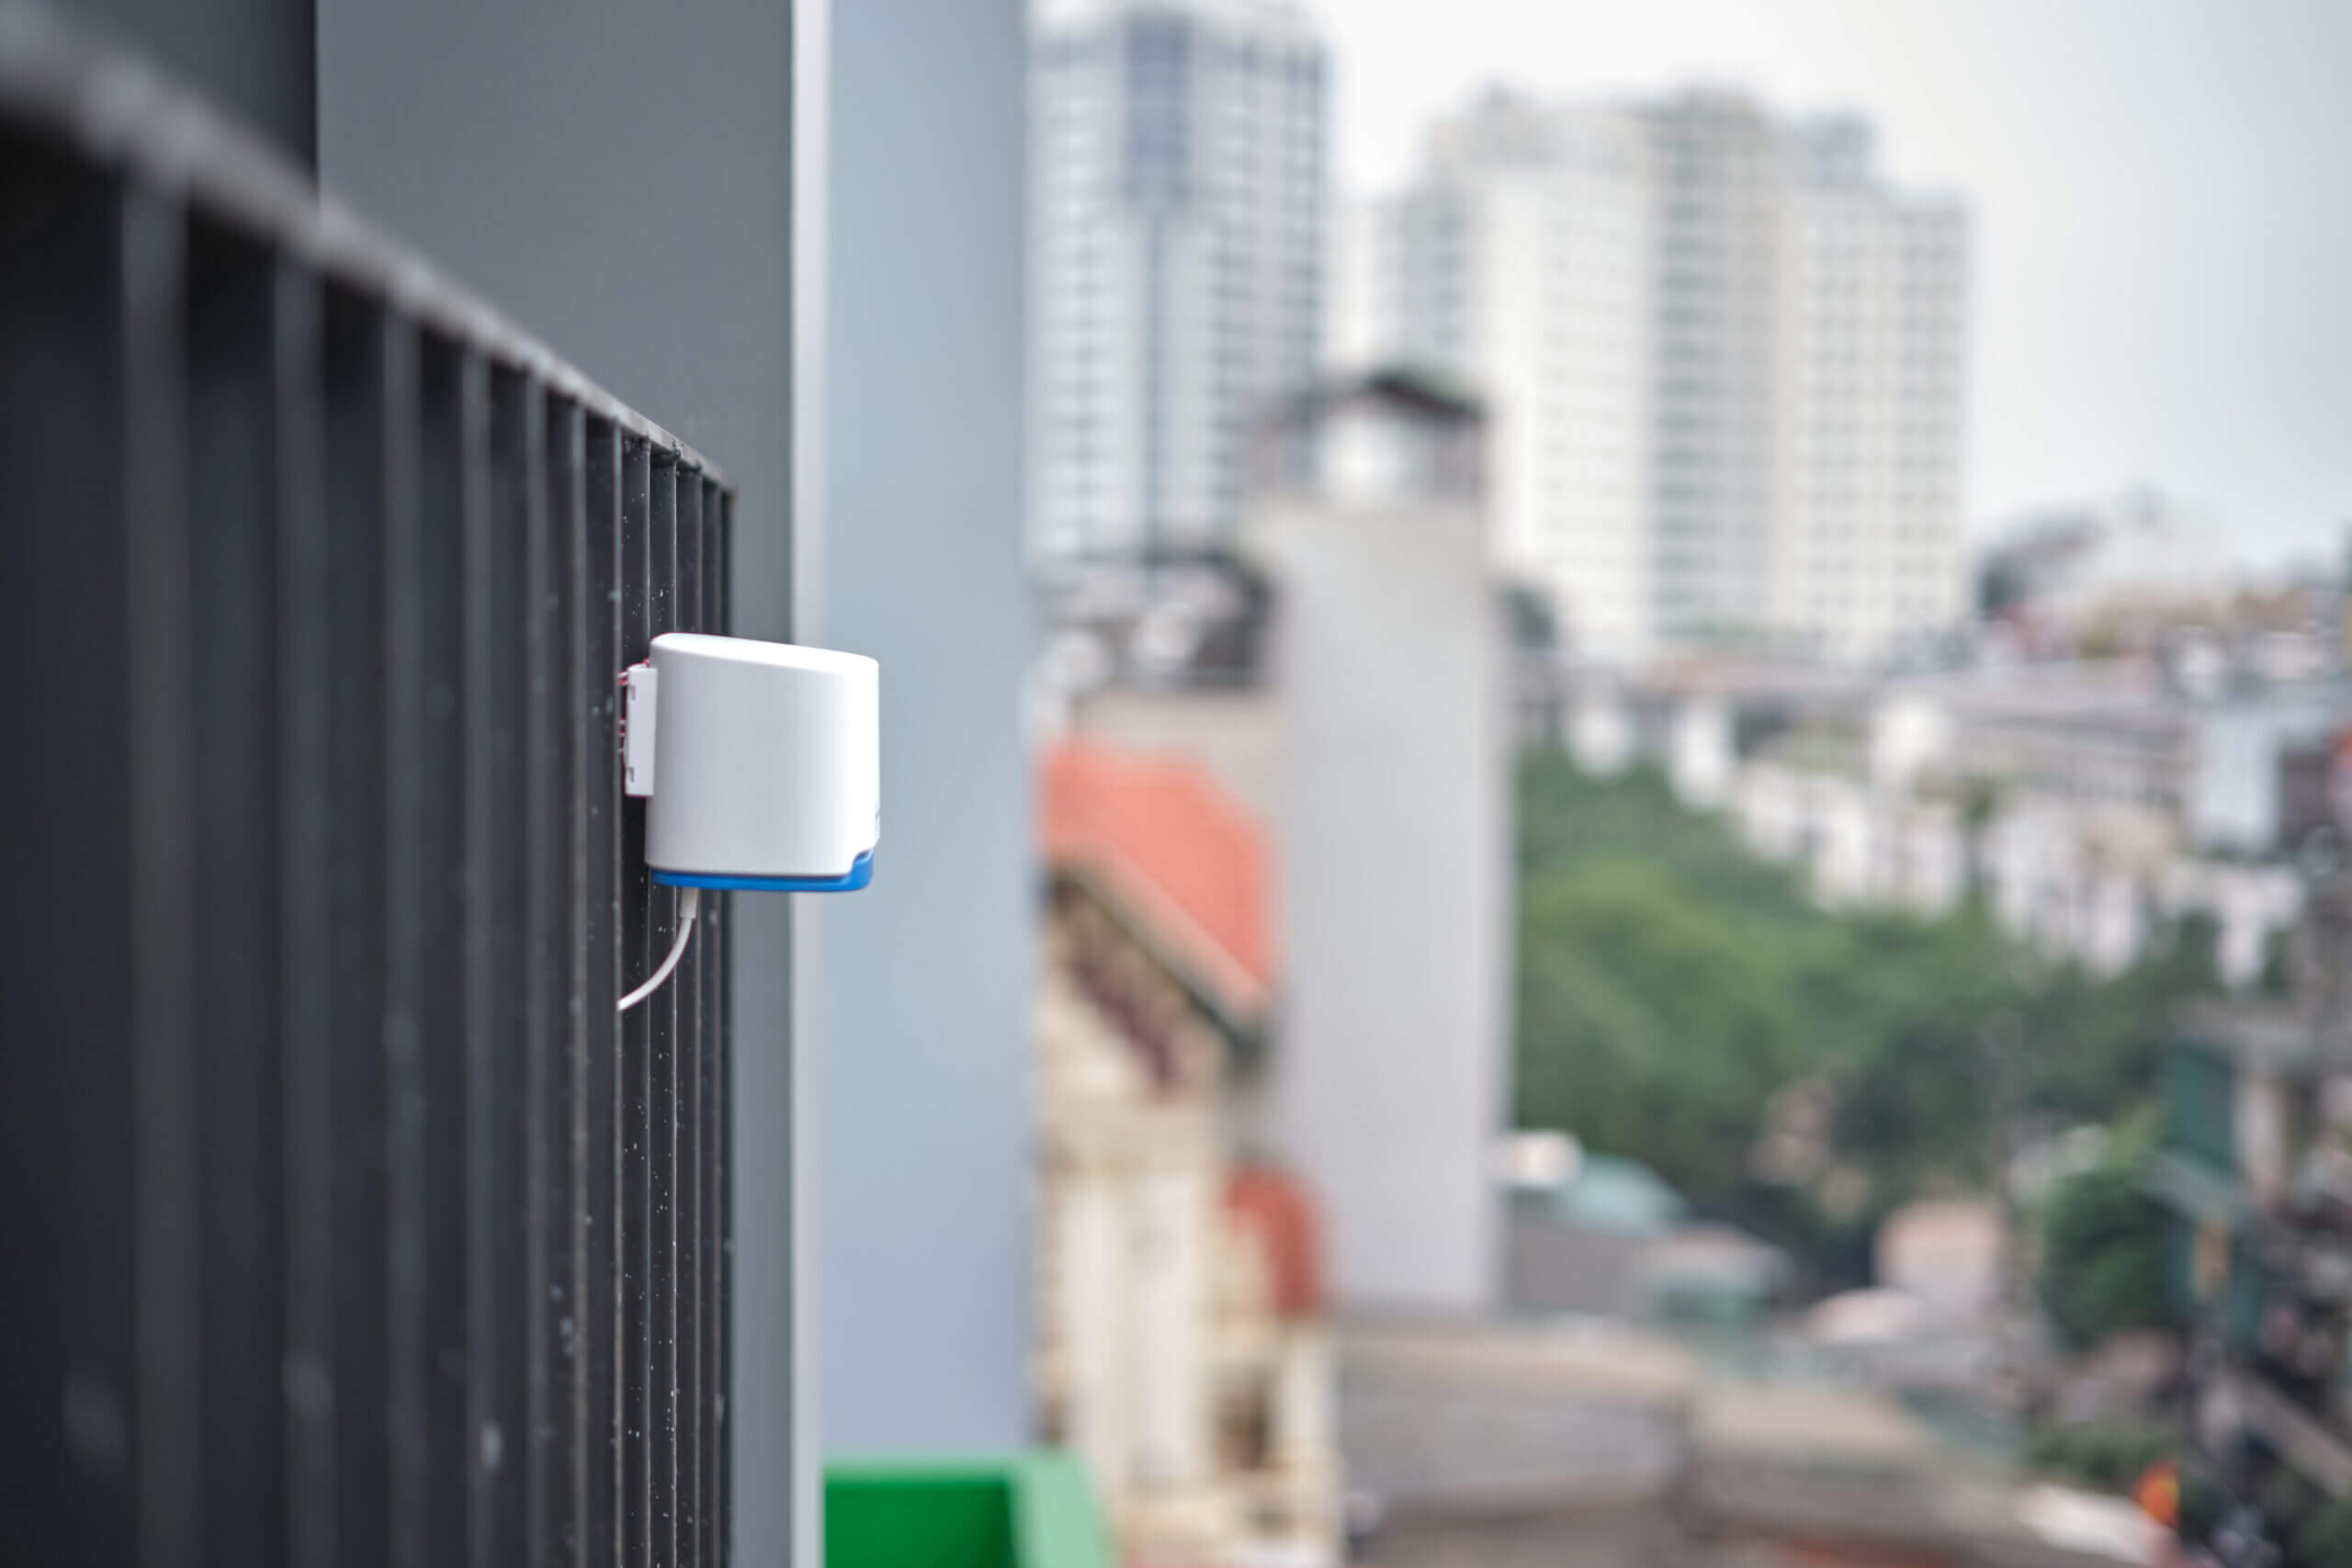
Another point worth mentioning is that the device must be powered. Luckily, AirGradient provides a 3-metre-long USB cable with the monitor. However, some people might need a longer cable, which means purchasing a 5-metre or 10-metre USB cable online. While these cables are generally not recommended as they become inefficient for transmitting power and data, they should be fine as no data is transmitted and the device is low power.
If you plan to run the cable inside, you can use any USB adapter to power the device. However, if you plan to use an outdoor socket to power the Open Air, you will want to purchase a weather-sealed USB adapter or use a sheltered power socket.
Connectivity & Dashboard
One of the most significant advantages of the AirGradient Open Air, which will particularly appeal to a niche set of customers, is that the monitor’s hardware and software are entirely open-source. With some technical knowledge, you can integrate your AirGradient monitor into many smart home systems, such as Home Assistant, HomeKit, or others.
However, I want to focus this review on what the monitor comes with. Many people are far more knowledgeable when it comes to smart home integration, and I think it’s important to focus on the experience you can expect out of the box. Therefore, while this monitor has almost limitless potential regarding connectivity, I will focus on how most people will be using the monitor.
The AirGradient Open Air has WiFi and uses this connection to upload data to a cloud dashboard. Since the monitor has no built-in screen or way to display data, you will want to set up WiFi as soon as possible. Thankfully, connecting your AirGradient Open Air to your local WiFi network is very straightforward!
When you first turn on the monitor, you will want to turn on your phone, tablet or laptop and look for a WiFi hotspot starting with AG. A combination of letters and numbers will follow AG – this is the serial number of your device. Once you connect to this hotspot, your device will be redirected to a portal page where you can choose a WiFi network to connect the monitor to. From here, select the network you want the monitor on and enter the WiFi password.
Depending on your device, the page may now abruptly close or seem like nothing happened. While this is a bit confusing, I found that at this stage, the device had already connected, and there just wasn’t feedback to let me know this was the case. To confirm the monitor is working, wait five to ten minutes and then visit the AirGradient Dashboard.
If it’s your first time visiting the page, you will need to create an account (which requires only an email and password). Since this account can be accessed from anywhere in the world and isn’t restricted to local network access only (as many air quality monitors are), an account is essential. Luckily, it doesn’t require personal information other than your email, so the signup process doesn’t feel invasive.
You will now be guided through adding your first AirGradient monitor to the dashboard. This setup requires only a few minutes and will ask for the serial number and model code. Once you’ve entered this information, you should be able to navigate to the dashboard and see air quality data. If there is no data yet, wait a few minutes and check again.
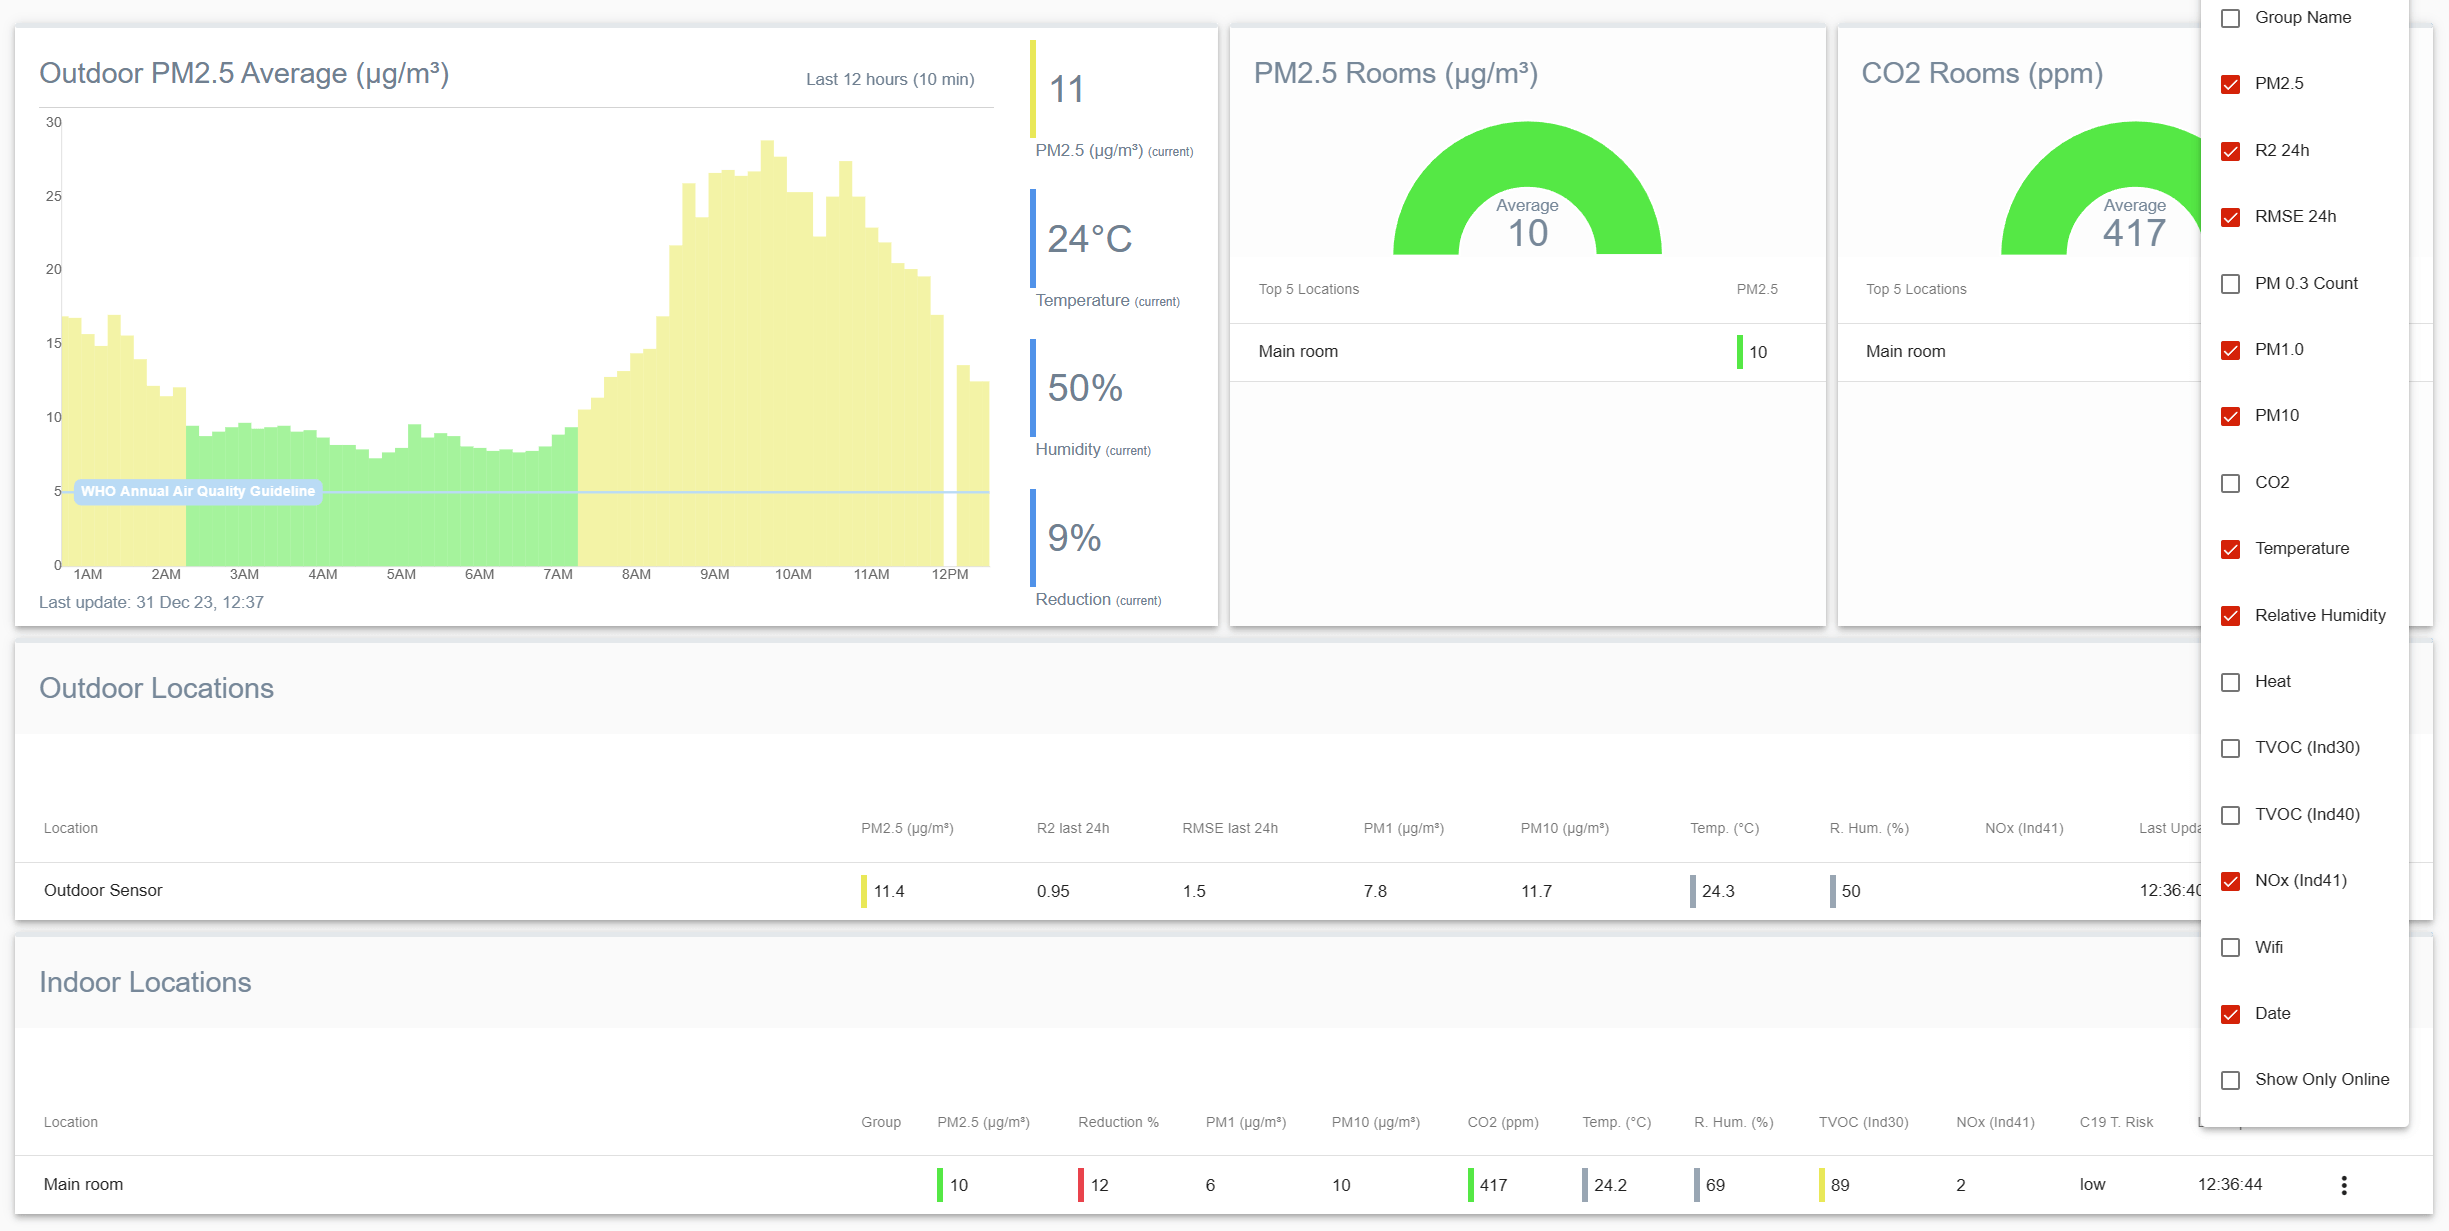
I have both an indoor air quality monitor (AirGradient One) and an outdoor air quality monitor (AirGradient Open Air) on my dashboard, so you won’t get all of this information if you have only an AirGradient Open Air. However, you should have a similar data-filled screen to the image above. As you can see on the right-hand side, you can choose which data is shown (depending on which sensors are present in your Open Air device).
This dashboard has a lot of functionality, but for advanced features such as subscribing to alarms, you must pay a fee to use the platform. While pricing hasn’t been announced yet, these extra features will likely cost a couple of dollars every month. Luckily, if you just want to view data from your monitors, the platform is free. It’s also worth noting that the monitors come with a 12-month subscription to the paid plan.

For the sake of privacy, AirGradient and I recommend entering a location that isn’t exactly where the sensor is based (which is, presumably, your home) but somewhere close enough by that the data remains accurate. For example, I selected a nearby convenience store around 50 metres away as my location. This is close enough that the data remains accurate, but it also protects the sensor’s exact location.
To add your monitor to the OpenAQ network, you will want to navigate to the ‘locations’ tab and tick the box titled ‘public’. This will allow you to choose a location for the monitor, and now it will be shown on the OpenAQ network and map – the data from which is used on many platforms worldwide.
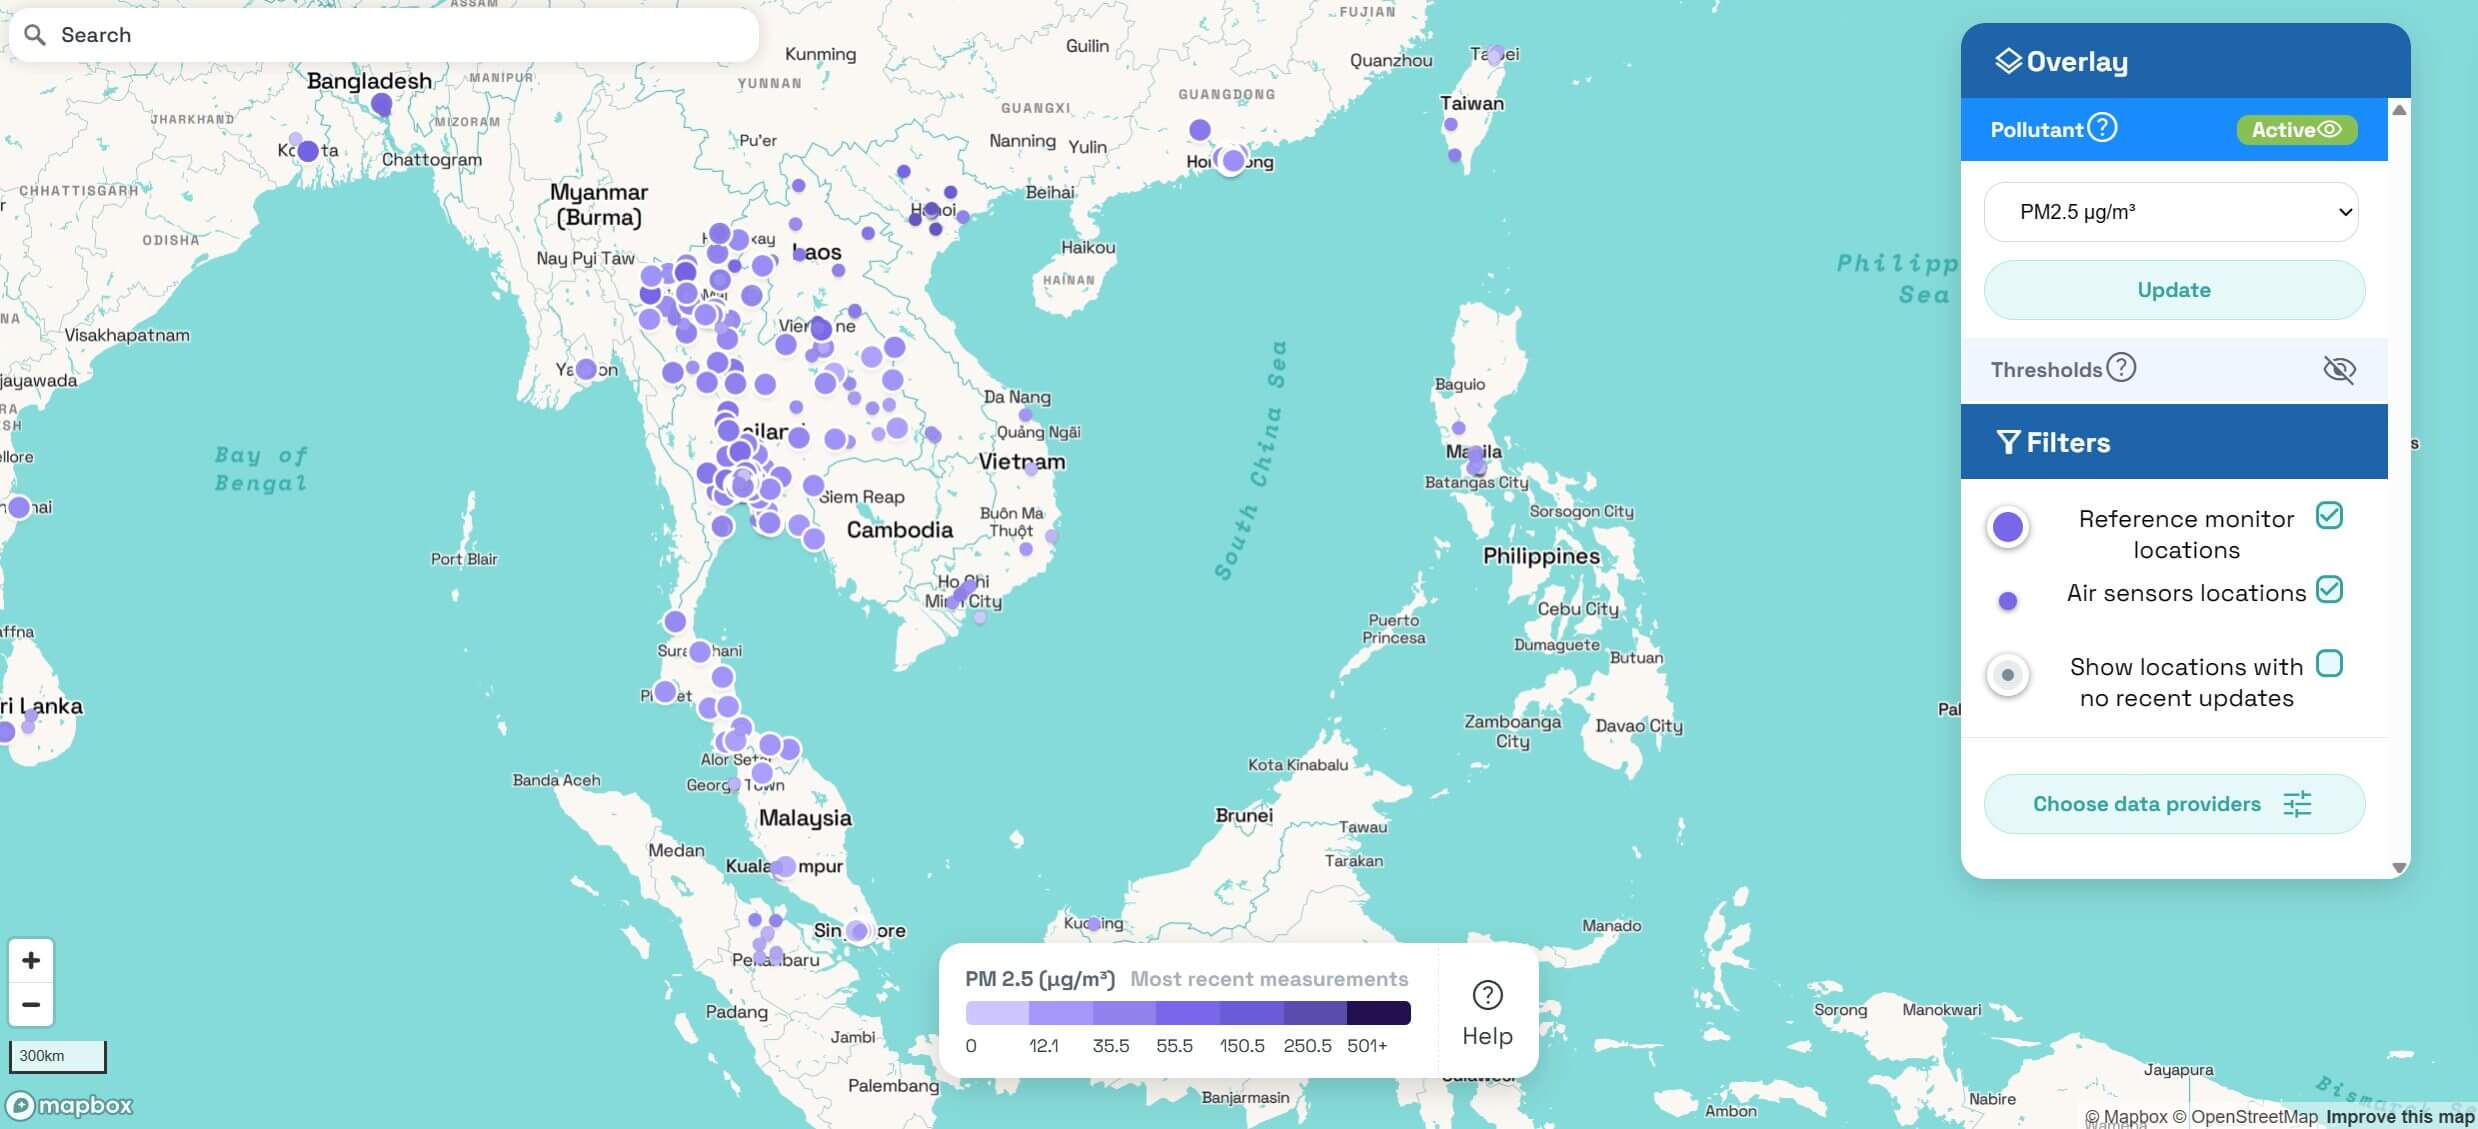
OpenAQ map showing air quality monitor locations (including mine!) and air quality.
I love how easy it is to integrate your AirGradient Open Air into the OpenAQ network because it feels like I’m doing something meaningful. There are very few air quality monitors in my area and no government/reference monitors. To be able to provide data about my local air quality, I hope that other locals can make informed decisions based on the air quality nearby.
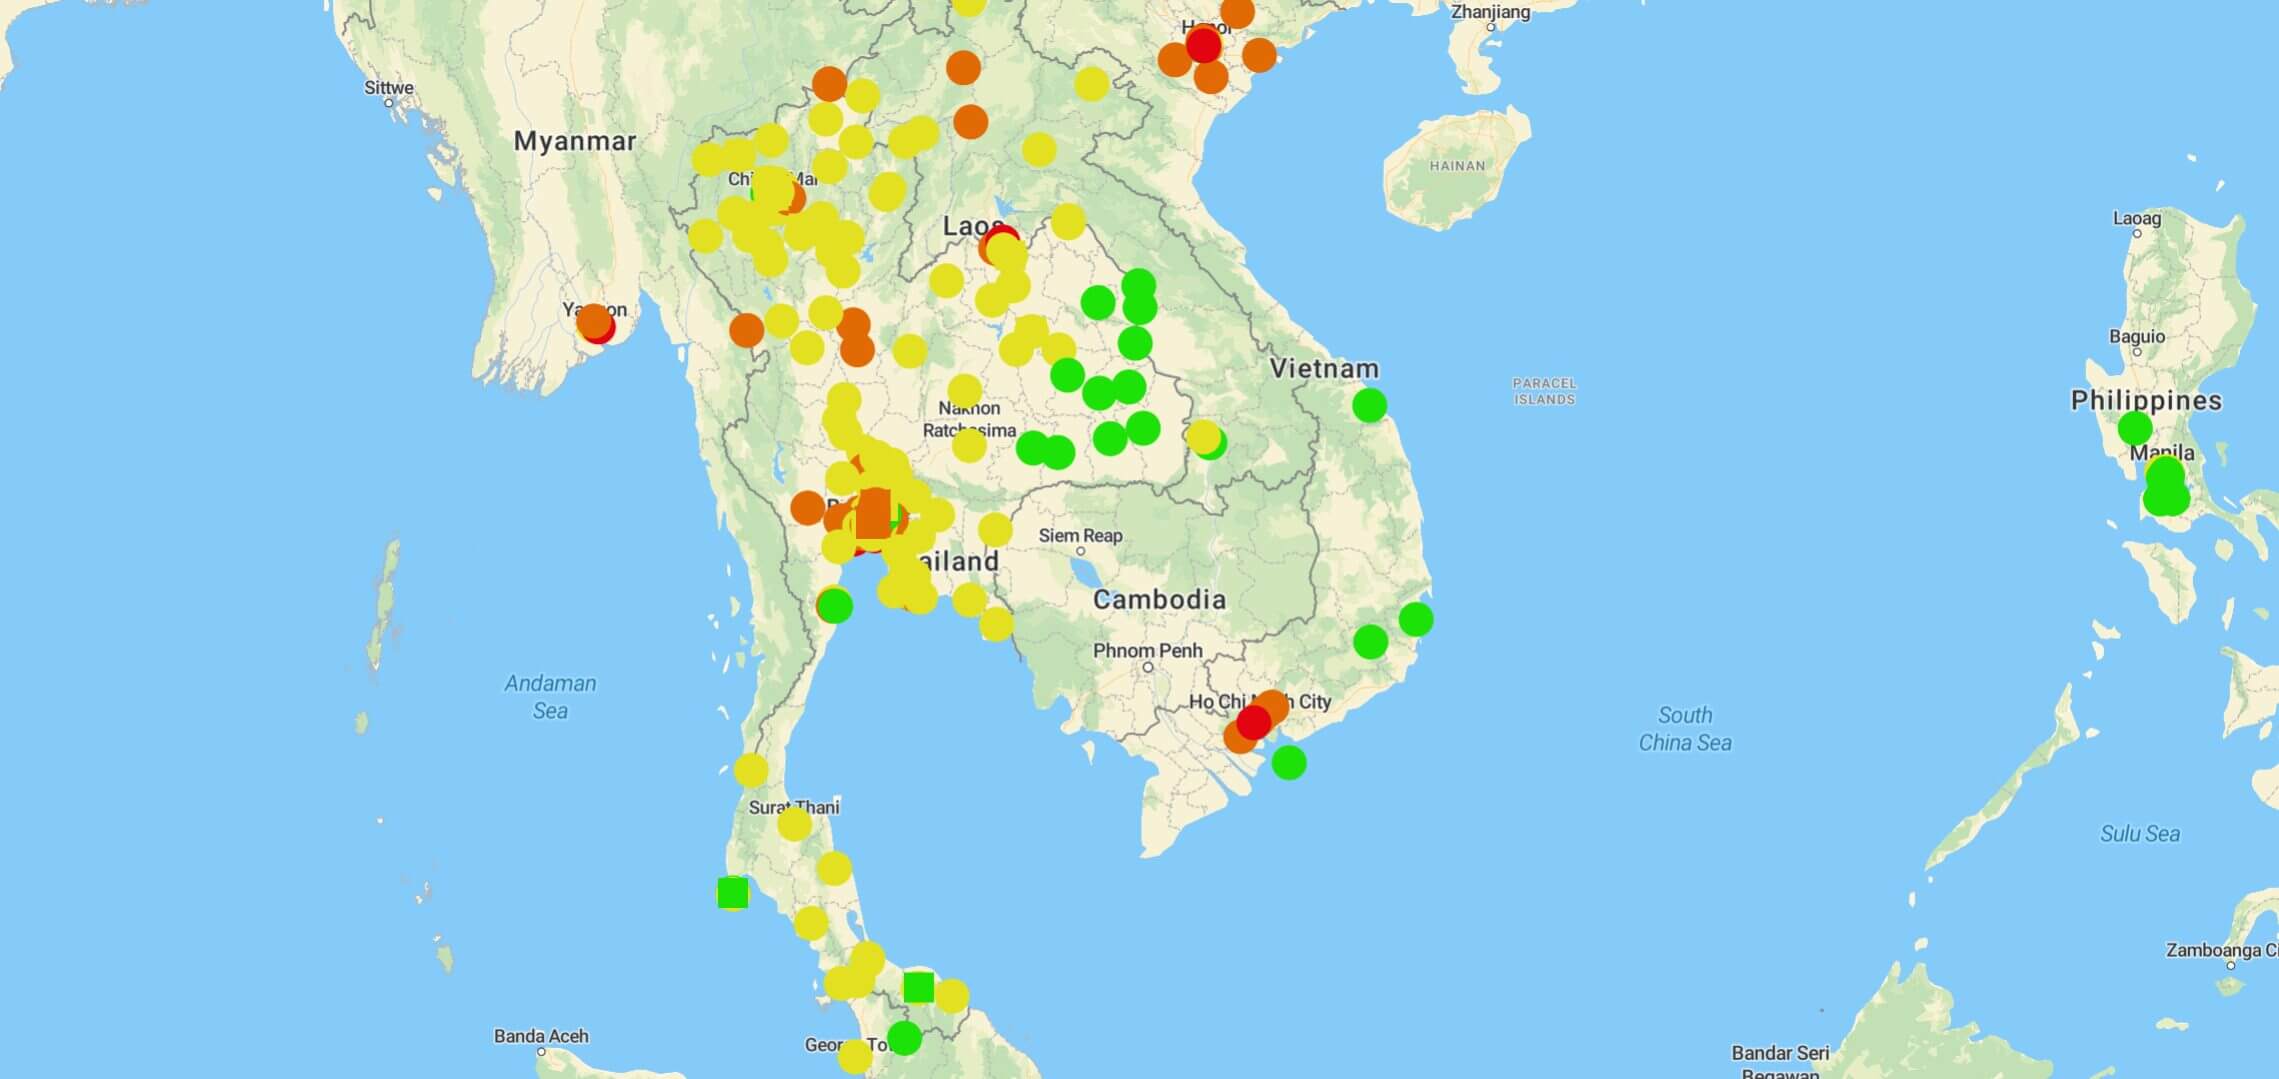
It’s also worth noting that AirGradient itself is developing an air quality map based both on its monitors and the data provided by OpenAQ. This map doesn’t currently have the functionality of OpenAQ’s map (it only shows PM2.5 data), but with time I am hoping to see this updated. To add your monitor to this map, too, all you need to do is make it public, as shown above.
Whether you want to make your sensor public or would prefer to keep the information to yourself, the ease of adding your information to OpenAQ is something I greatly appreciate. It’s truly a simple process! Before concluding this section, I also want to note that the AirGradient dashboard even allows you to add some air quality monitors from other brands if you own one.
Monitors from AirVisual, AirThings, ATMO, and more can all be added to your AirGradient dashboard. While there are mostly indoor air quality monitors, the ability to add them to this dashboard easily means you can view all of your data in one place if you have multiple monitors from different (supported) brands. The fact that every brand has a different app/website has always bothered me, and it seems like AirGradient is trying to overcome this issue. It is worth noting, however, that data from some of these other brands’ monitors is dependent on APIs, which may require a paid plan with that company (not AirGradient).
While the dashboard gives you a great overview of your current air quality, it also provides more advanced functionality, allowing you to export data from your monitors. This makes it easy to view data in a program such as Excel and further analyse it. If you’re really into learning about the trends in your local air quality, this is an invaluable feature to have!
Overall, both connectivity and the web dashboard for the AirGradient Open Air are strong points of the product – and this is without even diving into the open-source nature of the product. This connectivity makes the Open Air a compelling alternative to much more pricey outdoor air quality monitors.
Pricing & Lifespan
As you may have already gathered from some of my comments, the AirGradient Open Air is affordable and has a long lifespan due to its replaceable components. In isolation, this is great. However, how does it compare to other outdoor air quality monitors you can buy? Well, quite favourably, in fact. But first, let’s discuss lifespan.
When I asked AirGradient how they chose the components used in the Open Air (all models), I was told that longevity was one of the deciding factors. For example, the SenseAir S8 used in the O-1PST has an expected lifespan of 15 years. This is impressive, but more impressive is that each component can be individually replaced. Therefore, unless your device gets water-damaged or otherwise gets damaged in a way that causes many faults, your monitor should last many years.
Replacement parts for the Open Air cost between $8 and $45, depending on what needs replacing. Of course, these components don’t need to be purchased from AirGradient (with the exception of the main board) and can also be purchased from third-party sites. However, based on my research, the components from AirGradient are fairly priced and often cheaper than those from other online sellers.
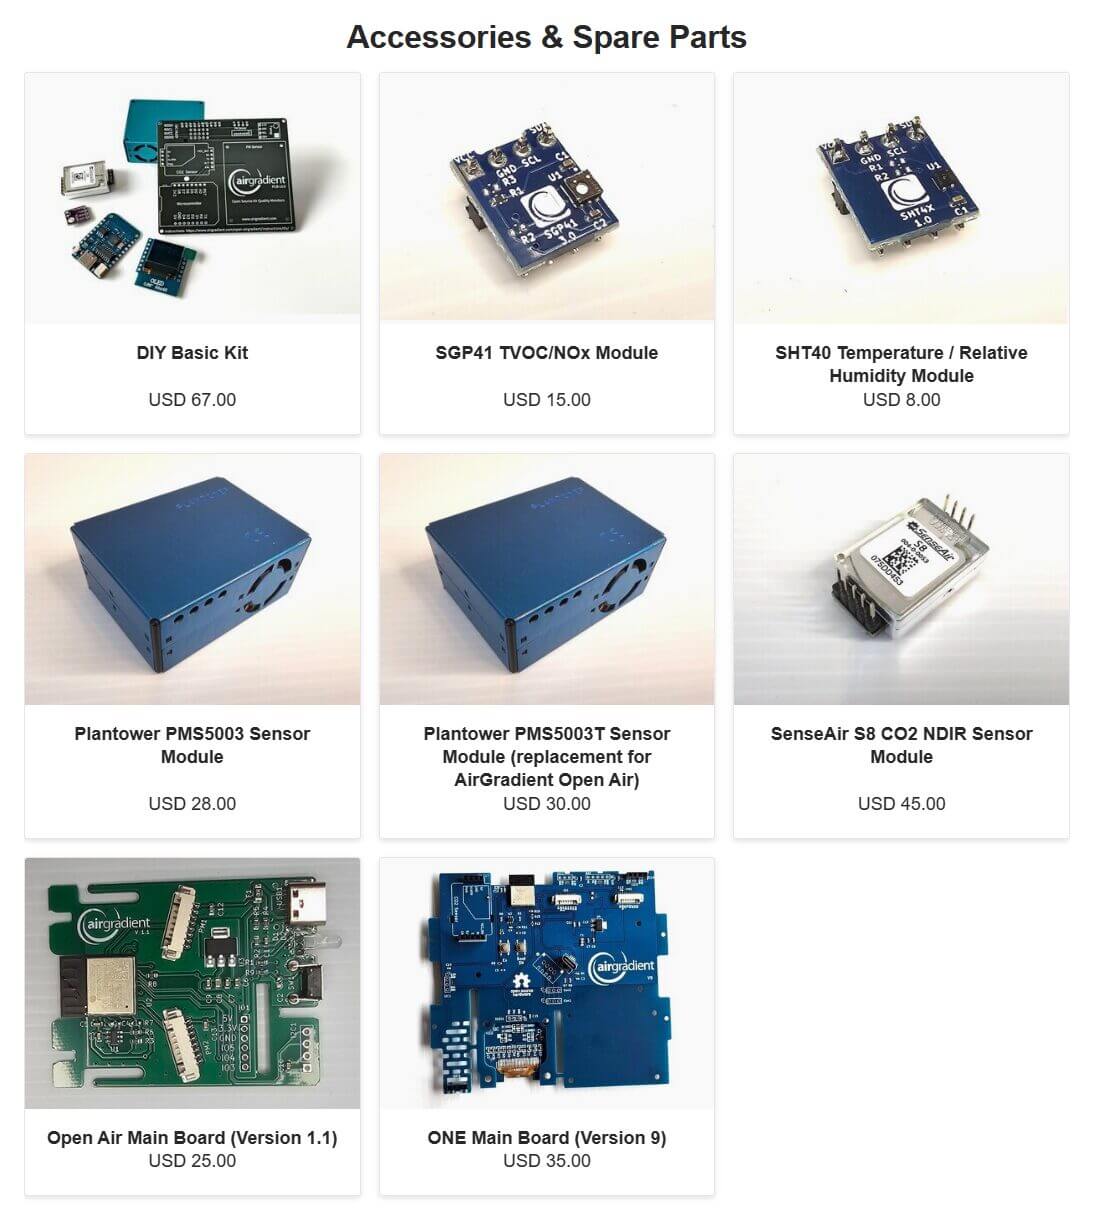
Therefore, unless your monitor is somehow damaged in its entirety, it should have a very long lifespan ahead of it. If any component gets damaged – for example, the PM sensors sometimes get bugs inside them – they can be individually replaced for a fraction of the cost of a complete replacement.
That brings us to cost. As discussed, the AirGradient Open Air also compares quite favourably in this respect. However, due to the different available Open Air models, it’s not quite as straightforward to compare them. Let’s look at how each kit’s pricing compares to other popular competitors.
| Monitor | Sensors | Price |
|---|---|---|
| Open Air O-1PP | 2x PMS5003T (PM1, PM2.5, PM10) | $95 (DIY kit) |
| Open Air O-1PPT | 2x PMS5003T (PM1, PM2.5, PM10), TVOC, NOx | $170 |
| Open Air O-1PST | 1x PMS5003T (PM1, PM2.5, PM10), CO2, TVOC, NOx | $125 (DIY kit) $190 |
| PurpleAir Flex | 2x PMS6003 (PM1, PM2.5, PM10), gases (VOCs and others) | $289 |
| PurpleAir Zen | 2x PMS6003 (PM1, PM2.5, PM10), gases (VOCs and others) | $299 |
| AirVisual Outdoor Monitor | 2x PM sensors* (PM1, PM2.5, PM10), CO2 (extra module required) | $299 |
As you can see, regardless of which Open Air model we compare and whether or not it’s a DIY kit, they all compare very favourably regarding pricing to offerings from both PurpleAir and AirVisual. While each model has some advantages and disadvantages (for example, the PMS6003 used by PurpleAir has a dual-laser design, but the PMS5003T has a built-in temperature and humidity sensor, allowing for improved accuracy through compensation algorithms), they are all comparable.
If you opt for one of the AirGradient Open Air DIY kits, you’re often looking at around 1/3 the price of a PurpleAir or AirVisual monitor, which is an incredible savings. Even if you purchase a fully-assembled Open Air, you’ll only pay 1/2 – 2/3s what you would pay for one of the monitors from these other brands. This is a fantastic value proposition from AirGradient!
Of course, these other monitors have some advantages too, and the extra cost might be worth it for you. However, there is no denying that the AirGradient Open Air is priced very competitively. While the pricing might make this monitor seem like a budget option, that’s only in price because otherwise, the monitor is comparable to far more pricey alternatives.
Conclusion
My conclusion for this review is much like my AirGradient ONE review. The AirGradient Open Air offers a fantastic value proposition, and in this price range, there is very little, if any, competition. To get a comparable monitor, you are looking at spending at least $100 more if you go with another popular brand such as PurpleAir.
If you decide on one of the Open Air DIY kits, you will save a ton of money and use very little time and effort assembling the monitor. For this reason, the DIY kits are what I would recommend for most people. However, even if you decide that you would prefer to purchase a fully assembled, ready-to-go monitor, you’re getting fantastic pricing.
Are there some downsides to the Open Air? Sure. I received the O-1PP, and I wish it had a CO2 sensor alongside the two PM sensors. On the other hand, I wish the O-1PST kept the two PM sensors while adding the extra gas sensors. While I understand that the decision to remove one PM sensor was likely since AirGradient wanted to use the same shell for the monitor, I wish there was one ‘top tier’ monitor that had two PM sensors alongside the CO2 and TVOC/NOx sensors.
But this is a minor gripe, and between the options offered by AirGradient for the Open Air, I believe there is a monitor for nearly everyone. I also fully support the open-source nature of the hardware and software with the Open Air. I wish more monitors followed this philosophy!
At the end of the day, I would recommend the AirGradient Open Air, regardless of which variant you choose to purchase. However, the final decision comes down to whether or not the Open Air supports all of the features you deem necessary in an outdoor air quality monitor.
AirGradient Open Air FAQ
What Is the Difference Between the Open Air Models?
The O-1PP is a DIY-only model that has two PM sensors. The O-1PPT comes fully assembled but has an additional TVOC/NOx sensor. Finally, the O-1PST has only one PM sensor but also measures CO2, TVOC and NOx. This monitor comes as a DIY kit or fully assembled.
Should I Buy the DIY Kit or a Fully Assembled Monitor?
If you want to save money, the DIY kit is, without a doubt, the best deal. However, the fully assembled monitors come certified and lab-tested. They also come with a 12-month warranty.
What Sensors Does the Open Air Use?
All monitors use either one or two Plantower PMS5003T sensors alongside (in some models) a SenseAir S8 and Sensirion Sensirion SGP41.
Is the AirGradient Open Air Open Source?
Yes! It’s open source for both hardware and software.
Does the Open Air Have Connectivity?
Yes, it has WiFi connectivity.
Where Can I Buy the Open Air?
Have Questions or Comments?
Join the discussion on the BreatheSafeAir Community Forum. Ask any questions you have about air quality or adjacent topics and get quick answers!
AirGradient Open Air
The AirGradient Open Air is an open source, outdoor air quality monitor that is very budget friendly yet uses high-quality components and materials.
Product Brand: AirGradient
4.5
Pros
- Comes either as an affordable DIY kit or a certified fully-assembled kit
- Affordable
- User-replaceable parts
- Open source software and hardware
- WiFi connectivity and cloud dashboard
- Comes with everything you need to use the device
Cons
- Shipping fees may be costly to some areas
- No option to have 2 PM sensors with a CO2 sensor (only one or the other)
Thanks for taking the time and trouble for this review, especially the measurement data. One question regarding the DIY model: I understand the reasoning behind not giving a warranty for the unit when we assemble it, but what if the sensors or board are defective on arrival? If a non-trivial percentage of these components have a manufacturing defect/failure and the purchaser has no recourse it may be that there is no cost saving. I am not casting aspersions on the company, but as we all have repeated experiences of slipshod QC it seems – to me, anyway – that the lack of any guarantee that the components will work is troubling, at least in the absence of any information on reliability. Are you aware of any data on this issue? Thanks in advance.
Achim from AirGradient here.
We do actually test every DIY kit before shipment and make sure it works. In general the sensors have a very low defective rate. In case something gets damaged during transport, we are sending replacement parts free of charge. We do not want to state this explicitly on the website because that policy could get exploited.